- Store
-
Support CenterGuides, License, ContactDownloadDownload installerChat SupportChat with a TechnicianPre-Sales InquiryChat with a Sales Rep
Have you come across files on your Mac that you are unable to delete? Discover how to force delete Mac in this comprehensive guide.
Table of Contents
Editing files and folders on a Mac is usually simple and straightforward. However, there are instances when even the seemingly most straightforward deletions can become a frustrating ordeal. Have you ever encountered those stubborn files or folders that refuse to go away, displaying error messages like "Item is in use" or "Cannot delete because it's locked"? If so, you are not the only Mac user to face this issue. This all-encompassing, meticulously detailed guide will thoroughly examine how to force delete Mac.
EaseUS will explore the multiple methods you can use to tackle files that refuse to be deleted. Whether you're facing issues with an unresponsive application, locked files, or undeletable files in Trash, our guide covers you.
This section will explore three effective methods to force delete files and folders on your Mac. Each technique offers a unique approach. We will provide the information to help you choose the one that suits your situation.
Before we begin, ensure you have access to a computer with installed macOS and administrator privileges to carry out the operations smoothly. Below is a table that introduces more basic information about the three methods:
| ⏰Duration | About 3 Minutes |
| 💻Goal | Force delete files on Mac |
| 🛠️Preparations | Mac, EaseUS NTFS For Mac |
| 🔒Difficulty Level |
✔️[Easiest] EaseUS NTFS For Mac ✔️[Easy] Delete Immediately ✔️[Hard] Terminal |
| 👨🔧Methods |
EaseUS NTFS for Mac is a powerful software designed to enable seamless access and management of NTFS-formatted drives on macOS systems. NTFS, the default file system for Windows, is not fully compatible with macOS. It often results in limitations when editing, writing, and deleting files on NTFS drives. EaseUS NTFS for Mac bridges this compatibility gap using its "Enable Writable" feature, allowing Mac users to perform a wide range of tasks with NTFS drives effortlessly.
As mentioned, EaseUS NTFS for Mac makes forcing deleting files on Mac a breeze. Here is how to force delete Mac:
Step 1. Launch and activate EaseUS NTFS for Mac. Click "I already have a license" to unlock this software.
Step 2. Connect an NTFS drive to Mac, EaseUS NTFS for Mac will automatically detect the device. Select your drive and you'll see it's now marked as 'Read-only". Click "Enable Writable" to add read and write rights to the drive.
Step 3. When the state of NTFS drives turns into "Writable".
Step 4. EaseUS NTFS for Mac will pops up a window to help Mac get access to the NTFS drive:
Step 5. When EaseUS NTFS for Mac restarts, you can then open to check, read, write, and even modify saved data on the NTFS device.
Now, you can select the files on the NTFS drive for deletion. Refer to the deletion method for Mac with normal storage devices: select the file and drag it into the trash bin.
We highly recommend using EaseUS NTFS for Mac as the preferred method for force deleting files on your Mac. Its user-friendly interface, selective file deletion, data safety, and time efficiency make it a reliable and practical tool for dealing with stubborn files and folders.
When faced with persistent issues deleting files and folders on your Mac, NTFS format on Mac via the "Delete Immediately" of Finder becomes a viable option. This feature avoids the Trash function and aids in removing unnecessary files, which works as below:
Step 1: Select the file you want to remove permanently. Hold down the "Option" key, and you will open the Finder's "File" menu.

Step 2: Select "delete immediately" from the "File" menu to delete files immediately. When the pop-up window appears, choose "Delete" to confirm the action.

For advanced users familiar with the command-line interface, the Terminal provides a powerful toolset to force delete files and folders on your Mac. The Terminal allows you to bypass various restrictions and permissions that might prevent regular deletions.
However, proceed cautiously, as using Terminal commands can potentially cause data loss or system instability if not executed properly. Discover how to force delete Mac via Terminal by these steps:
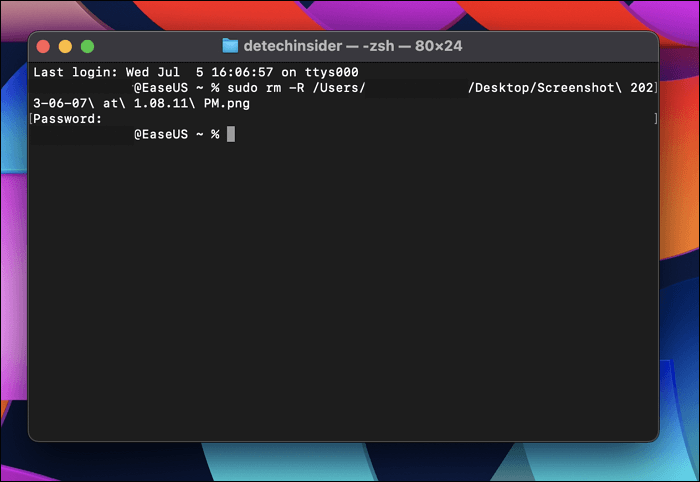
Step 1: Launch the Terminal app, which you can find in "Utilities." The "Utilities" folder can be accessed through "Applications."

Step 2: Use the command sudo rm –R on the Terminal. Ensure that you add a space after "R." Drag and drop the file need to be deleted in the Terminal. This will add the file name and file path to the command.

Step 3: After the command is complete, run it. When prompted, enter your admin password. You won't see the password typed – this is normal Terminal behavior.

Step 4: The Terminal won't ask for further confirmation, so ensure you have entered the correct file/folder path before executing the command. It will forcefully delete the specified file or folder without displaying any success message.
There are many users on social media that have the same problem. Immediately share this post to help them:
Sometimes, attempting to delete files on your Mac can be met with frustration when encountering stubborn roadblocks that prevent their removal. This section will explore why you might face difficulty deleting files and folders on your Mac.
One of the most frequent reasons for the inability to delete a file is that an active application or process currently uses it. When a file is open in a program, macOS restricts its deletion to prevent accidental data loss or corruption. Additionally, background processes or system services may also be accessing the file, making it temporarily locked for deletion.
If you have an external hard drive or USB flash drive formatted with the NTFS file system (commonly used in Windows), macOS has limited write access to these drives. While you can read files from NTFS drives on your Mac, writing or deleting files requires special permissions. This limitation can hinder your ability to delete files on NTFS drives using standard methods. Read details on Everything You Should Know About NTFS for Mac.
A corrupted or damaged file can lead to difficulties during deletion. macOS may encounter errors when attempting to remove files that are no longer in proper working condition. These files can result from interrupted downloads, hardware issues, or glitches.
Files with the "Locked" attribute set cannot be deleted until the attribute is removed. Additionally, specific system files and critical components may be protected by macOS to prevent accidental modifications, making them resistant to deletion.
To conclude, we explored three effective methods to force delete Mac files and folders, each tailored to different scenarios and user preferences. While erasing the entire hard drive via Delete Immediately and using Terminal provide viable solutions for experienced users, the clear standout and our top recommendation is EaseUS NTFS For Mac. This powerful software presents a user-friendly interface, ensuring accessibility for users of all levels.
With its ability to read, write, and force delete files on NTFS-formatted drives, EaseUS NTFS For Mac bridges the compatibility gap between macOS and Windows, making file management seamless and hassle-free. The advantages of EaseUS NTFS For Mac over other methods are evident: selective file deletion, data safety, and time efficiency. Unlike erasing the entire hard drive, this tool allows you to target specific files or folders for deletion. Find more key functions of the feature-rich software by the following links:
If you have further questions or encounter specific issues while attempting to force delete files on your Mac, don't fret. We've compiled answers to some of the most common questions to help you troubleshoot and find solutions to your file deletion challenges.
1. Why can't I delete files on my external hard drive on Mac?
If you cannot delete files from an external hard drive Mac, the most common reason is that the drive is the NTFS file system. macOS has limited write access to NTFS drives, which means you can only read files from them but not delete or write new files.
To enable write access and force delete files on an NTFS-formatted external hard drive, you can use specialized software like EaseUS NTFS For Mac, which grants full read and write capabilities on NTFS drives.
2. How do I delete files on Mac?
To delete files on Mac using the traditional method, follow these simple steps:
Step 1: Locate the file that you want to delete in the Finder. Right-click on the file or folder (hold the "Control" key while clicking) to open the context menu.
Step 2: Afterward, click the "Move to Trash" option from the menu. Alternatively, you can drag the file or folder to the Trash icon in the Dock.
3. What should I do if a file won't delete on Mac?
Encountering a file that stubbornly refuses to be deleted on your Mac can be frustrating. However, you can take several troubleshooting steps to overcome this issue. First, ensure that the file is not in use by any application. If it is, first close the application and then try deleting the file.
Next, check the file's permissions by right-clicking, selecting "Get Info," and examining the "Sharing & Permissions" section. Afterward, ensure you have all the required permissions to delete the file.
Related Articles - ALSO ON EaseUS SOFTWARE
Fixes to Unable to Copy Files to External Hard Drive Mac
![]() Cici/2025-07-07
Cici/2025-07-07
How to Enable Full Disk Access on Mac | Full Guide
![]() Cici/2025-06-26
Cici/2025-06-26
How to Change Permissions on USB Drive Mac [Ultimate Guideline]
![]() Cici/2025-07-07
Cici/2025-07-07
How to Fix USB Drive Read Only Mac FAT32 [Full Guide]
![]() Banu/2025-06-26
Banu/2025-06-26
Copyright © 2004 - 2023 EaseUS. All rights reserved.


