- Store
-
Support CenterGuides, License, ContactDownloadDownload installerChat SupportChat with a TechnicianPre-Sales InquiryChat with a Sales Rep
Do you know how to access an NTFS drive and edit files saved on the NTFS drive on a Mac computer? Due to different file system mechanisms, the Apple Mac computer only allows uses to read the NTFS-formatted drives but can't write to them. This page shows you how to break the limits and enable NTFS on Mac so that you can read and write NTFS drives flexibly on Mac Monterey, Catalina, Big Sur, etc.
Table of Contents
Can I mount the NTFS drive on a Mac? How do I enable NTFS write and write support on Mac so as to copy, write, and even edit files on an NTFS drive on a Mac computer?
Here below, we'll discuss what NTFS is and show you how to enable NTFS on Mac so as to use and edit files on NTFS drives on Mac successfully. Let's see the details.
| ⚙️Complex Level | Low, Beginners |
| ⏱️Duration | 5-10 minutes |
| 💻Applies to | macOS |
| ✏️Fixes |
You can share this article to let more users know about how to enable or use NTFS on a Mac.
For many reasons, Mac users may want to enable and use their NTFS drives on Mac computers. For example, to transfer big files, to set up a game drive, or to construct a unique test environment, etc.
So, how to use NTFS drives on a Mac computer? Easy. You just need to enable NTFS to write support on Mac, which is now possible by following any of the three listed methods.
Note that the methods are listed from easy to complex; if you are looking for an easy trick to make NTFS drives readable and writable on Mac, take EaseUS NTFS for Mac help.
One-click to Make NTFS Drive Writable on Mac
Recently, EaseUS software has released its new featured tool - EaseUS NTFS for Mac to help Mac users to set up an NTFS storage device accessible on Mac. Any level of Mac users can enable NTFS write support of their drives on Mac in just one click.
It enables you to:
Feel free to download and enable your NTFS drive on Mac in just one click.
Step 1. Launch and activate EaseUS NTFS for Mac. Click "I already have a license" to unlock this software.
Step 2. Connect an NTFS drive to Mac, EaseUS NTFS for Mac will automatically detect the device. Select your drive and you'll see it's now marked as 'Read-only". Click "Enable Writable" to add read and write rights to the drive.
Step 3. When the state of NTFS drives turns into "Writable".
Step 4. EaseUS NTFS for Mac will pops up a window to help Mac get access to the NTFS drive:
Step 5. When EaseUS NTFS for Mac restarts, you can then open to check, read, write, and even modify saved data on the NTFS device.
Note that EaseUS NTFS for Mac will automatically enable NTFS write support once you used the software to enable the NTFS drive one time.
If the drive is un-writable, just click the Mount option, you'll be able to edit, delete, move, and transfer files between the NTFS drive and your Mac computer now. So you don't need to do extra operations.
The other workaround for taking writing access to an NTFS drive on Mac.
For some advanced Mac users, you can turn to BootCamp to access the NTFS drive. Bootcamp is highly related to Mac computer boot issues. And it requires users to boot into Windows on a Mac computer so to obtain NTFS write access.
Note that, using Bootcamp to obtain NTFS access will delete your Time Machine backups. If you tend to do so, remember to back up your files in advance.
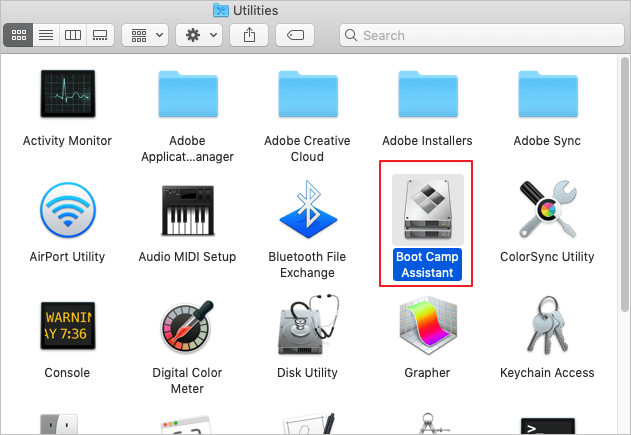
Step 1. Go to Finder > Applications > Utilities > Boot Camp Assistant.
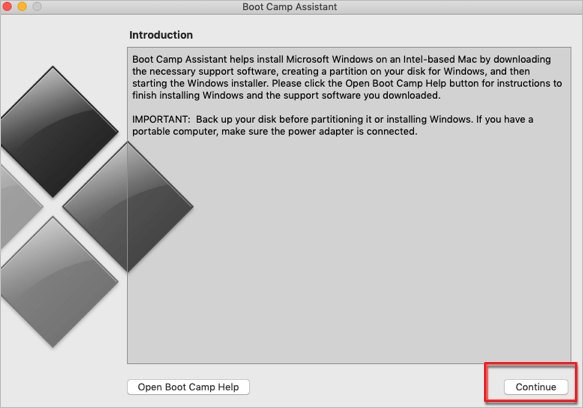
Step 2. Launch Bootcamp, click "Continue" and set to boot into Windows on Mac.
Step 3. Restart the Mac computer and wait for the computer to boot into Windows.
Step 4. Connect the NTFS drive to the Mac computer and then you can access and write to files in the drive.
A bit complex but workable solution to enable NTFS write support on Mac.
Terminal, a Mac built-in utility, is widely used for editing and making changes to Mac computers and storage devices. You can also apply this application to make changes to the NTFS drive, making it writeable on a Mac computer.
Here are the steps that you can follow to enable NTFS on Mac computers:
Step 1. Connect the NTFS drive to Mac and open Terminal.
Step 2. Type the command here and press Return: sudo nano /etc/fstab

Step 3. Replace "NAME" with the name of the NTFS drive on your Mac computer by typing: LABEL=NAME none ntfs rw, auto, nobrowse, and press Return.
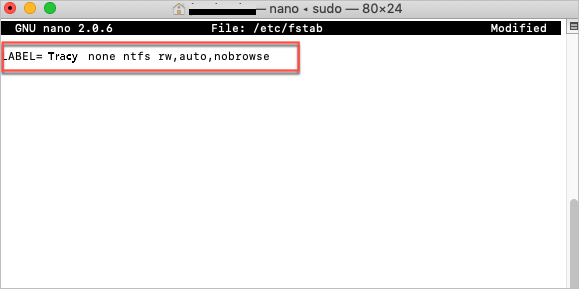
Step 4. Press Control + O > Control + X on Mac keyboard.
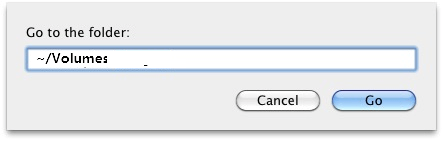
Step 5. In Finder, click Go > Go to Folder > Type: /Volumes, and click "Go".
Replace Name with the label of your NTFS drive.
This will allow you to fully read and write files on your NTFS drive on Mac.
NTFS was developed by Microsoft, known as NT File System or New Technology File System. From Windows NT3.1, NTFS was set as the default file system of the Windows operating system.
With several technical improvements, NTFS surpassed other file systems like FAT, HPFS in data transfer, reliability, and disk space usage. It is especially useful for transferring and saving big single files up to 4GB.
Can Mac Read NTFS? Yes! Apple macOS like Big Sur, Catalina, and even older operating systems can read Windows-formatted NTFS drives. In a word, you can open and view contents in an NTFS drive on Mac.
Can Mac Write to NTFS Drive? No! As macOS lacks supports for NTFS drives, Mac users cannot write, copy, edit or even delete files on an NTFS-formatted storage device.
Can I Enable NTFS on Mac? Sure! With the solution presented in the next part, you can enable NTFS and use NTFS drives on Mac with all macOSes, like Big Sur, Catalina, and even the latest Monterey.
On this page, we explained what is NTFS and why can't Mac users directly write to NTFS drives. Though macOS has limits in visiting NTFS-formatted devices, it doesn't mean you can't access or edit files in NTFS drives on Mac at all.
This page includes 3 methods that you can follow anyone to make your NTFS drive writable successfully. For the easiest way out, take EaseUS NTFS for Mac and it will automatically make your drive accessible without any extra operations or hard works.
Related Articles - ALSO ON EaseUS SOFTWARE
How Do I Wipe a NTFS Drive on Mac and Windows [2023 Guide]
![]() Daisy/2025-06-26
Daisy/2025-06-26
NTFS for Mac M1 Free: How to Get Write Access on M1 Mac
![]() Banu/2025-06-26
Banu/2025-06-26
Erase Button Greyed Out Mac Disk Utility | How to Fix
![]() Sherly/2025-06-26
Sherly/2025-06-26
Can Mac Read exFAT [Quick Answered 2023]
![]() Sherly/2025-06-26
Sherly/2025-06-26
Copyright © 2004 - 2023 EaseUS. All rights reserved.


