- Store
-
Support CenterGuides, License, ContactDownloadDownload installerChat SupportChat with a TechnicianPre-Sales InquiryChat with a Sales Rep
Are you looking for ways to change user permission on your MacBook? Learn how to change permissions on a USB drive Mac in this guide.
Table of Contents
Macintosh users frequently encounter situations where they must adjust to various devices. While everything seamlessly integrates within the Apple ecosystem, challenges may arise when interacting with non-Apple devices. One particular challenge emerges when utilizing external peripherals on your Mac, such as USB drives formatted with NTFS.
This scenario can become more troublesome as USB drives are a commonly used data-sharing method. However, there is no need to panic as this article will take you through changing permissions on a USB drive Mac. EaseUS will discuss both native and non-native solutions to fix this issue.
One of Mac's most common causes for permission errors is the NTFS file system. It is the default file system in Windows computers, but Mac cannot support NTFS. This guide will discuss four ways to modify USB permissions.
When encountering such scenarios, EaseUS NTFS For Mac is the optimal approach. This software is purpose-built to establish seamless compatibility between Mac's native file system and the ubiquitous NTFS format. This tool allows individuals to read and write to USB drives formatted in NTFS, enabling effortless file access, data transfer, and file manipulation without encountering any limitations compared to other methods, and using EaseUS NTFS For Mac results in faster data transfer speed.
Following are the straightforward step-by-step instructions to utilize EaseUS NTFS For Mac to access an NTFS-formatted USB drive on your MacBook:
Step 1. Launch and activate EaseUS NTFS for Mac. Click "I already have a license" to unlock this software.
Step 2. Connect an NTFS drive to Mac, EaseUS NTFS for Mac will automatically detect the device. Select your drive and you'll see it's now marked as 'Read-only". Click "Enable Writable" to add read and write rights to the drive.
Step 3. When the state of NTFS drives turns into "Writable".
Step 4. EaseUS NTFS for Mac will pops up a window to help Mac get access to the NTFS drive:
Step 5. When EaseUS NTFS for Mac restarts, you can then open to check, read, write, and even modify saved data on the NTFS device.
Key Features of EaseUS NTFS For Mac
We highly recommend giving EaseUS NTFS For Mac a chance, as it allows an efficient way to access NTFS-formatted USB drives. It simplifies the process and ensures you maximize the targeted USB drive.
When it comes to managing permissions on a USB drive connected to your Mac, there are two primary options you can explore:
Option 1. Change the Permission Directly If You Are Administrator
As the Mac administrator, you can directly modify permissions for a USB drive. It grants you complete authority over who can access, edit, or delete files stored on it. This degree of control proves invaluable regarding overseeing user access for a USB drive connected to your Mac. By adhering to these steps, you can seamlessly change permissions on a USB drive Mac:
Step 1: Connect the target USB drive to the Mac and locate it in Finder. The USB will be found under "Location." Now, right-click your drive and choose "Get Info."

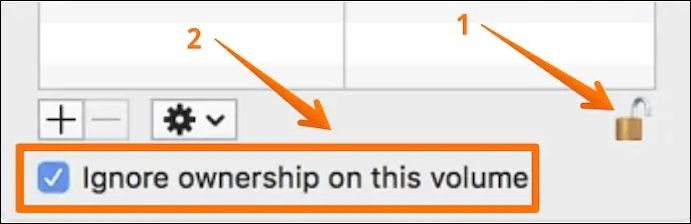
Step 2: In the "Get Info" window, move to the bottom, and you will see a lock sign. Click it and enter the administrator password if it asks. Select the option that says "Ignore ownership on this volume" now. Click the "Gear" icon located under the "Sharing & Permissions" category and choose "Apply to enclosed item…"
Option 2. Assign Permissions to New Users
Permitting specific permissions to new users accessing a USB drive is crucial to maintaining control over your data. With this choice, you can customize access levels and security configurations to match the unique requirements of each user. If you wish to bestow specific authorizations upon new users, you can proceed by adhering to the following instructions:
Step 1: After connecting your USB drive, locate it in Finder and right-click it. Choose "Get Info" from the menu and move to the bottom to click the padlock icon.
Step 2: When you click the padlock icon, it will ask for the administrator password. Provide it and click the targeted users in the "Sharing & Permissions" section to grant permissions.

Step 3: Select from three different permission types: "Read & Write," "Read Only," and "Write Only."
Utilizing the Terminal provides a powerful and flexible method for users who prefer a command-line approach to manage their USB drive on a Mac. Terminal grants direct access to the file system, allowing for precise control over permissions, file manipulation, and system configuration. Here is how to effectively access your USB drive using Terminal commands:
Step 1: Once you have connected your USB drive to your Mac, launch "Terminal." To do that, first navigate to the "Applications" folder through Finder and click to open the "Utilities" folder. Here, find "Terminal" and launch it.

Step 2: Within the "Terminal," type sudo nano /etc/fstab command and run it. You will be asked to provide the administrator password and run the following command afterward. LABEL=NAME none ntfs rw, auto, nobrowse (Use your USB drive name instead of NAME.)

Step 3: Now press the "Control+ O" keys, then press Enter and follow it using the "Control+ X" keys. Now disconnect and connect your USB drive to the Mac again. Afterward, access "Dock" and click "Go." Here, choose "Go to Folder," type "Volumes," and click "Go."
The reason behind the inability to read/write the USB drive can be a system problem. You can encounter unexpected errors, experience data corruption, or face difficulties with mounting.
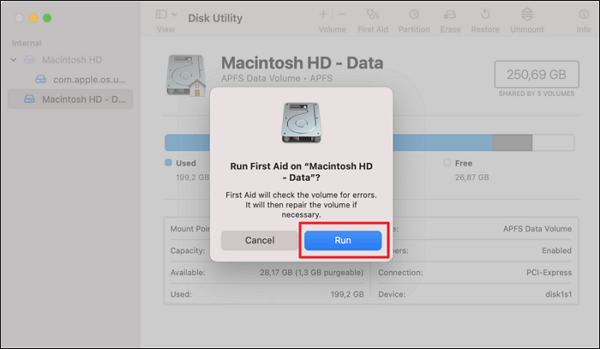
In such cases, the built-in "First Aid" feature in Disk Utility can be invaluable. First Aid is specifically designed to identify and resolve typical disk-related issues. Below, we guide you through the steps to run First Aid:
Step 1: After ensuring your USB is connected to the Mac, open the "Utilities" folder through the "Applications." Here, click "Disk Utility" to launch it.

Step 2: Choose the USB on the left side and click "First Aid" from the top bar. Here, use "Run" to initiate the disk repair process.
Have you ever paused to ponder the significance of changing permissions on your USB drive when using a Mac? It's a question worth considering, as understanding why this action can profoundly impact your data security and device functionality. Below are the crucial motives behind altering permissions:
Share this post with other Mac users:
In this comprehensive guide, we've explored various methods to change permissions on USB drive Mac. From accessing your USB drive through Terminal for advanced control to using Disk Utility's First Aid for troubleshooting, we've covered a range of techniques. One standout solution that deserves your attention is EaseUS NTFS for Mac, which bridges the compatibility gap between your Mac and NTFS-formatted USB drives.
This versatile tool empowers you to read and write data seamlessly, enhancing your overall Mac experience. Its user-friendly interface, data security features, and high-speed performance make it a must-have for anyone dealing with NTFS drives on a Mac. Read more articles about changing permissions on USB drives for more information:
If you're about to change permissions on a USB drive Mac, you've come to the right place. Here, we've compiled a set of frequently asked questions to provide you with guidance:
1. How do I change permissions on my external hard drive?
To modify permissions for your external hard drive, please adhere to the following instructions:
Step 1. Begin by linking your external hard drive to your Mac and accessing it via the "Locations" section within Finder. Next, execute a right-click on the external drive and opt for "Get Info" from the context menu.
Step 2. Move downward to access the "Sharing & Permissions" section on the upcoming window. Click the "Padlock" icon to unlock it by providing the administrator password. Afterward, select the targeted users and change the permissions.
2. Why is my Mac saying I don't have permission to save to this location?
This notification often arises when attempting to save a file in a location where your user account lacks the required write permissions. To address this issue, you have two options: adjust the folder permissions or utilize an administrator account to complete the task.
3. How can I access files on my Mac?
Here are the steps to access your files on your Mac:
Instructions: Access "Finder" through "Dock" and select the folder here. If you recently used that file, it will be in "Recents." For downloaded files, access "Downloads," or you can use Finder to navigate to the targeted folder.
Related Articles - ALSO ON EaseUS SOFTWARE
NTFS-3G for macOS Free Download and Install Tutorial
![]() Banu/2026-01-05
Banu/2026-01-05
How to Use G-Drive External Hard Drive on Mac [Set Up Guide]
![]() Banu/2025-06-26
Banu/2025-06-26
What Is NTFS for Mac, Everything You Should Know About It
![]() Daisy/2025-06-26
Daisy/2025-06-26
Full Guide to Convert NTFS to FAT32 on Mac without Losing Data
![]() Daisy/2025-06-26
Daisy/2025-06-26
Copyright © 2004 - 2023 EaseUS. All rights reserved.


