- Store
-
Support CenterGuides, License, ContactDownloadDownload installerChat SupportChat with a TechnicianPre-Sales InquiryChat with a Sales Rep
A read-only USB device on Mac is a common problem in macOS devices. In this article, we explore how a Mac user can overcome this annoying problem.
Table of Contents
| Workable Solutions | Step-by-step Troubleshooting |
|---|---|
| Check Whether USB Is Running Well | Step 1. Go to Finder, then Applications, and run Disk Utility; Step 2. From the sidebar, pick the USB device...Full steps |
| Unlock USB Drive That Is Read-Only Mac (FAT32) | 1. Change Permissions to Access Read-Only...Full steps 2. Reformat Read-only USB with Disk Utility...Full steps |
| Bonus Tip: Get Read-Write Permission for NTFS-Formatted Disk | Step 1. Launch and activate EaseUS NTFS for Mac. Click "I already have a license" to unlock this software...Full steps |
Is your USB drive showing "read-only" on Mac? Let's help you fix that.
Mac devices are known for their great products. Not only are they employed by people in various facets of life, but their demands have also gone up in recent times because of the pandemic and the entire work-from-home scenario. However, one common problem a lot of Mac users run into is low storage.

That's why they use USB drives to back up their data or move important files. However, one common problem that many Mac users face is their USB devices being read-only. This annoying problem can become difficult to deal with.
So, how do you fix it when your USB drive is read-only? Let's dive in and find out.
The first step in understanding if the USB drive read-only Mac Fat32 can be fixed. Now, the thing with specific formats is that some are only Windows compatible, while others only work with Mac computers. Now, FAT32 is the only file system that's supported by both.
Shortened from File Allocation Table 32, FAT32 has been around since 1977. Therefore, both Mac and Windows computers support it and run it seamlessly. You can read and write using this file system on both operating systems. Some key information about FAT32 includes:
However, once you connect a FAT32 USB to a Mac device, it tends to turn it into a read-only state. This permission is altered by Mac as soon as it reads the file system after detecting the external storage.
Finding out the problem with your USB drive read-only Mac FAT32 device is your first task. It might just be that your device isn't performing well, so the Mac renders it read-only since it cannot access specific parts of your storage.
Here's how you can check that on a Mac computer:
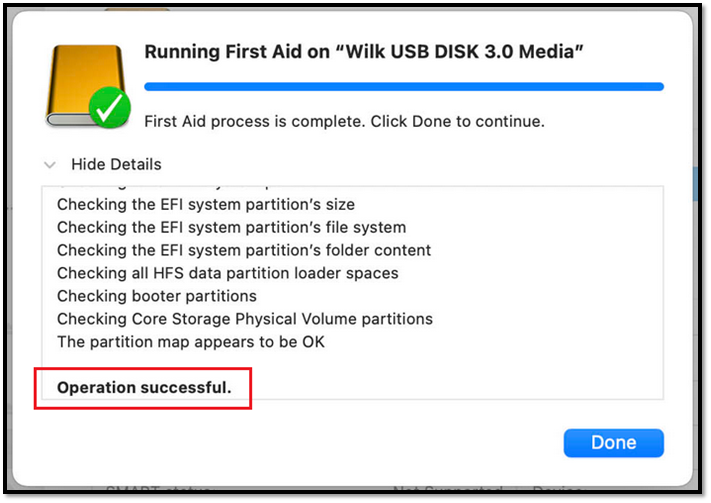
Step 1. Go to Finder, then Applications, and run Disk Utility.
Step 2. From the sidebar, pick the USB device you wish to check.
Step 3. Then run First Aid.

Step 4. Click on Run when prompted.
If your USB device is working well, then you'll see something like this:
So, how do you check whether the USB is running well in Windows? Here's how:
Step 1. Press Windows+R and type CMD.
Step 2. Type chkdsk H:/f.
Once the check is done, and you see something like this, then your USB device is working well. How? On the lower side of the screen, look at "0 KB in bad sectors". As it indicates the error-free performance of our device.
Now that you've determined your USB device is working find out how do you unlock a USB drive that's read-only on Mac FAT32? There are three main methods that you can use, such as:
So, how will these two methods work? Let's find out:
The first way you can change a read-only external device on Mac is by changing the permissions. Here's how:
Step 1. Connect the USB device to your Mac.
Step 2. Head to Finder and right-click the device to find "Get Info", then click it.
Step 3. Extend the Sharing & Permissions section.
Step 4. Click on the lock icon to unlock the settings.
Step 5. Then check Ignore ownership on this volume.
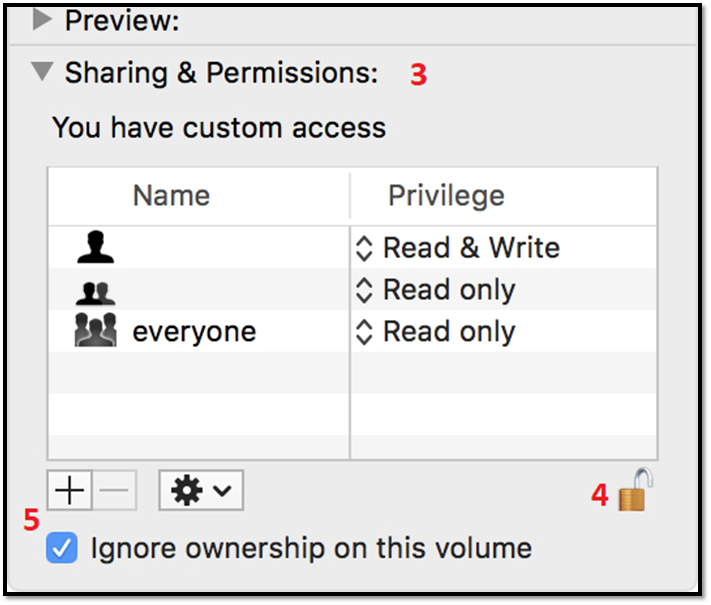
This will bypass any permission errors and help you access the device. You can additionally restart your Mac device to check if the settings persist or revert to the original.
If the problem persists, then there's only one way to solve this issue, and that's by formatting it. Therefore, it's suggested that you back up any data before proceeding using a Windows computer. Once done, here's how to reformat it:
Step 1. Find and run Disk Utility.
Step 2. Pick the USB device and click on Erase.
![]()
Step 3. Pick a file system. Choose MS-DOS (FAT) or ExFAT.
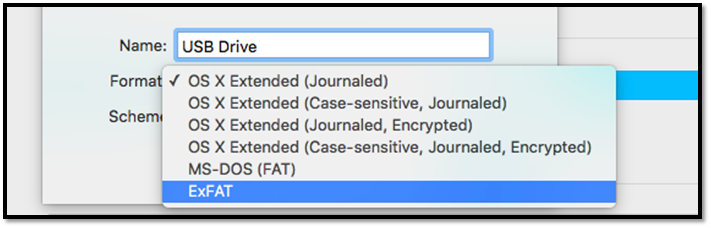
Step 4. Click on Erase.
Once done, you will be able to see the formatted drive in your Disk Utility or Finder app. Make sure you pick the file system properly because OS X and APFS are only readable by Mac devices.
You don't even need to go through all this if your NTFS USB drive is showing read-only on Mac. You can make it all easier by simply using EaseUS NTFS for Mac. This tool helps you easily mount and unmount Windows-formatted devices from Mac's status bar. How does it do that?
Step 1. Launch and activate EaseUS NTFS for Mac. Click "I already have a license" to unlock this software.
Step 2. Connect an NTFS drive to Mac, EaseUS NTFS for Mac will automatically detect the device. Select your drive and you'll see it's now marked as 'Read-only". Click "Enable Writable" to add read and write rights to the drive.
Step 3. When the state of NTFS drives turns into "Writable".
Step 4. EaseUS NTFS for Mac will pops up a window to help Mac get access to the NTFS drive:
Step 5. When EaseUS NTFS for Mac restarts, you can then open to check, read, write, and even modify saved data on the NTFS device.
All these factors make it an ideal companion for any Mac user today. Not only does it help you get read-write permissions of an NTFS-formatted disk on any Mac device, but it helps you reformat or repurpose it accordingly - without compromising your data or time.
You can also find a solution when the hard drive won't mount on Mac or when you don't have permission to write to the external hard drive on Mac.
These are some of the best ways you can fix a read-only USB Device on Mac, folks. You can try the various methods, but if nothing works, EaseUS NTFS for Mac will surely get this trouble away from you. Therefore, pick the one method that works the best for you.
Related Articles - ALSO ON EaseUS SOFTWARE
Top 6 Free NTFS for Mac Users in 2026
![]() Banu/2026-01-05
Banu/2026-01-05
How to Format Disk to NTFS on Mac Using Terminal [2026 Full Guide]
![]() Banu/2026-01-05
Banu/2026-01-05
How to Easily Fix Read-Only File System on Mac [Step-by-Step Guide]
![]() Cici/2025-11-11
Cici/2025-11-11
[Full Guide] Fix 'WD My Passport Is Read-Only On Mac' Error 2026
![]() Banu/2026-01-05
Banu/2026-01-05
Copyright © 2004 - 2023 EaseUS. All rights reserved.


