- Store
-
Support CenterGuides, License, ContactDownloadDownload installerChat SupportChat with a TechnicianPre-Sales InquiryChat with a Sales Rep
Learn the simple steps to grant and enable Full Disk Access on Macs, ensuring seamless operation and enhanced functionality of your apps.
Table of Contents
When it comes to Mac user rights, having full disk access is essential for a smooth operation. But have you ever encountered any issues due to limited Mac access? If yes, don't worry; you can unlock these permissions with the help of the Mac's Full Disk Access function.
EaseUS will walk you through the process to enable Full Disk Access Mac so that you can utilize the system to its full potential. Moreover, if you want a quick and beginner-friendly solution for this issue, the next section of this article contains the most efficient third-party program that will allow you to unlock the full power of your disk in only a few clicks.
Having difficulties with full disk access on Mac? Restricted disk access might make file management more difficult, make it harder to install applications, and impact overall system performance. Moreover, enabling the standard Full Disk Access option on your Mac might not work for the NTFS-formatted disks.
Don't worry! EaseUS NTFS for Mac is your key to unrestricted disk access. It is a must-have solution that efficiently permits seamless disk access when the usual Enable Full Disk Access Mac option fails. This powerful alternative will easily bridge the gap, allowing full disk access to unlock read and write privileges even on NTFS-formatted disks. It delivers ease of use by allowing you to mount and unmount drives from your Mac's status bar.
Download EaseUS NTFS from its official website and follow this guide for seamless disk access on your Mac. Here are the steps to use EaseUS NTFS:
Step 1. Launch and activate EaseUS NTFS for Mac. Click "I already have a license" to unlock this software.
Step 2. Connect an NTFS drive to Mac, EaseUS NTFS for Mac will automatically detect the device. Select your drive and you'll see it's now marked as 'Read-only". Click "Enable Writable" to add read and write rights to the drive.
Step 3. When the state of NTFS drives turns into "Writable".
Step 4. EaseUS NTFS for Mac will pops up a window to help Mac get access to the NTFS drive:
Step 5. When EaseUS NTFS for Mac restarts, you can then open to check, read, write, and even modify saved data on the NTFS device.
So, say goodbye to difficulty in Full Disk Access and hello to a stress-free experience managing, copying, and editing files on your Mac, regardless of their format.
If you want to learn more conventional methods for enabling full disk access on your Mac, this section is for you. Here, two effective options are provided, each offering a means to smoothly enable full disk access Mac. Follow the easy guide provided under each method to run your Mac at its peak performance.
You can use the Mac's built-in System Preference option to enable full disk access. You can follow the steps below to use Mac system preference to enable full disk access.
Step 1. After you click the Apple icon, choose "System Preferences."
Step 2. Navigate to "Security & Privacy" and choose the "Privacy" option.

Step 3. Scroll down to "Full Disk Access" and unlock to allow modifications.
Step 4. Add apps to the Full Disk Access list.

This will allow you full disk access for the selected apps.
Are you encountering challenges while working with the terminal because it disables full disk access on your Mac? Don't worry! This method will help you enable full disk access for the terminal. All you need to do is follow the steps given below:
Step 1. Select the Apple icon on your screen and choose "System Preferences."
Step 2. Now go to "Security and Privacy."
Step 3. Choose "Privacy" and navigate to "Full Disk Access."
Step 4. Click on the "+" icon to add the terminal from the applications folder.
Step 5. Check the checkbox next to Terminal.
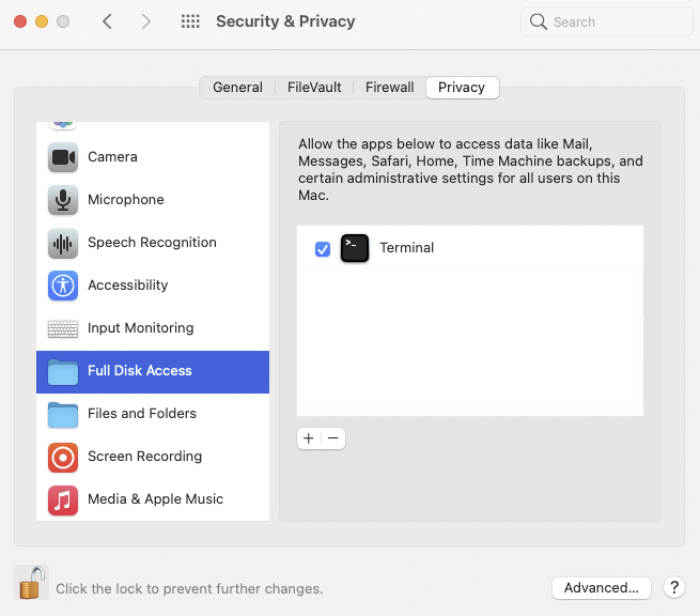
Step 6. Re-lock the padlock to finalize the process.
Hopefully, this method has provided full disk access for your terminal.
This article discusses two straightforward methods to get full disk access on your Mac. However, if you're a novice or the conventional method falls short, consider using the EaseUS NTFS tool.
It's the perfect solution, with a user-friendly interface and extensive support for NTFS disks. Remember that EaseUS NTFS accelerates the entire process if your system has trouble handling NTFS files or other formats.
You can find answers to your queries in the FAQs below if you still doubt enabling full disk access on your Mac.
1. How do I grant access to a disk on a Mac?
Connect the disk to your Mac, then follow the steps given below to allow access to the disk:
Step 1. Launch the disk utility.
Step 2. Choose the disc.
Step 3. Press "Erase" and select a format.
2. How do I grant Photoshop full disk access in Mac System Preferences?
To grant Photoshop full disk access on Mac:
Step 1. Tap "System Preferences" and navigate to "Security & Privacy."
Step 2. Click "Privacy," then select "Full Disk Access."
Step 3. Unlock settings.
Step 4. Add Photoshop using the [+] button.
3. Why don't I have full disk access on Mac?
On a Mac, problems with full disk access might be caused by obsolete software, improper permissions, privacy settings, or authorization restrictions. Verify that you have administrator rights, check System Preferences for access, and update your operating system and apps.
Related Articles - ALSO ON EaseUS SOFTWARE
Can't Delete Folders/Files from External Hard Drive on Mac [Fixed]
![]() Banu/2025-06-26
Banu/2025-06-26
How to Fix LaCie Hard Drive Not Showing Up on Mac (5 Practical Methods)
![]() Banu/2025-06-26
Banu/2025-06-26
5 Quick Fixes - New SSD Not Showing Up in Disk Utility
![]() Sherly/2025-07-07
Sherly/2025-07-07
Can Mac Use NTFS? 2025 Full Guide Here
![]() Cici/2025-09-01
Cici/2025-09-01
Copyright © 2004 - 2023 EaseUS. All rights reserved.


