- Store
-
Support CenterGuides, License, ContactDownloadDownload installerChat SupportChat with a TechnicianPre-Sales InquiryChat with a Sales Rep
Wondering how do I wipe an NTFS drive on Mac and Windows? Then, check out this ultimate guide to find safe and easy solutions to wipe the NTFS drive data.
Table of Contents
Want to wipe an NTFS drive on Mac and Windows?
Then, you have clicked on the right post. This post will suggest the best and easy solutions to wipe an NTFS drive on Mac and Windows for a clean start. So, let's scroll down and wipe out the external hard drive data now.
It might sound a bit weird - why would someone want to erase an NTFS drive data? But on many occasions, Mac and Windows users might find themselves in a situation where deleting an NTFS drive content is the only solution for them, such as:
1. Cleaning up disk to restore full storage size: If there's nothing important on an NTFS drive, wiping out all data will give access to the full storage space.
2. Fix inaccessible NTFS drive: By default, Apple only provides read-only support to NTFS file format. Therefore, Mac users have to wipe an NTFS drive and convert it to a Mac-compatible file format like FAT32, APFS, etc.
3. Create a new partition on the NTFS drive: If you want to add a new partition or change the space distribution between partitions on an NTFS drive, it is suggested to fully wipe the drive and then reallocate the space.
4. Change NTFS drive format: NTFS is a great file format, but it isn't accessible on Mac. Thus, users might want to change the NTFS drive's format to use the same drive on Mac and Windows.
5. Security concerns: If there are highly confidential data stored on the NTFS drive, wiping it will protect the data from getting into the wrong hands.
6. Sell an NTFS drive: Do you want to sell an NTFS drive? Make sure to fully clean the drive before selling it.
There could be any reason to wipe an NTFS drive on Windows and Mac for you. But thankfully, it is not at all hard to erase external hard drive data on Mac and Windows. Below, we have mentioned the simple ways to wipe NTFS drive data, so let's get moving.
For Mac users, it is more important than Windows users to learn how to wipe an NTFS drive. That's because NTFS isn't a Mac compatible file format, and it often becomes hard to access NTFS drives on Mac devices.
Here's how to wipe an NTFS drive on Mac:
Note: Before you follow the wipe operation, we recommend users to back up the data first to avoid losing important data.
The simplest way to wipe NTFS drive data on a Mac is to open the drive and save data to a secure place on the internal hard drive or iCloud. However, this solution will work differently when NTFS is working fine on Mac and when it's not.
If you find the NTFS drive is working fine, then you can use the EaseUS NTFS for Mac to get writing support, and then save data to a secure place.
If the NTFS drive is corrupted, you can use EaseUS Data Recovery Wizard for Mac to recover important files first and then back up data to a safe place.
Firstly, Mac users can download the EaseUS NTFS for Mac to read and write NTFS disk with ease. This software will provide smooth NTFS file access to all Mac devices to copy and backup them to another drive before deleting.
On the other hand, if an NTFS file is only available in read-mode, users have to use the EaseUS Data Recovery Wizard. This software will scan the disk and recover the files, partitions, and other raw data. It is a 100% safe solution to recover data on external hard drives.
Steps of how to enable writable to NTFS drive on Mac are listed below:
Step 1. Launch and activate EaseUS NTFS for Mac. Click "I already have a license" to unlock this software.
Step 2. Connect an NTFS drive to Mac, EaseUS NTFS for Mac will automatically detect the device. Select your drive and you'll see it's now marked as 'Read-only". Click "Enable Writable" to add read and write rights to the drive.
Step 3. When the state of NTFS drives turns into "Writable".
Step 4. EaseUS NTFS for Mac will pops up a window to help Mac get access to the NTFS drive:
Step 5. When EaseUS NTFS for Mac restarts, you can then open to check, read, write, and even modify saved data on the NTFS device.
There are two prominent methods to fully wipe an NTFS drive on Mac:
Method 1. Wipe NTFS Drive Using Disk Utility
Using the Disk Utility, you can erase the NTFS drive data without any hassle. Just follow these steps:
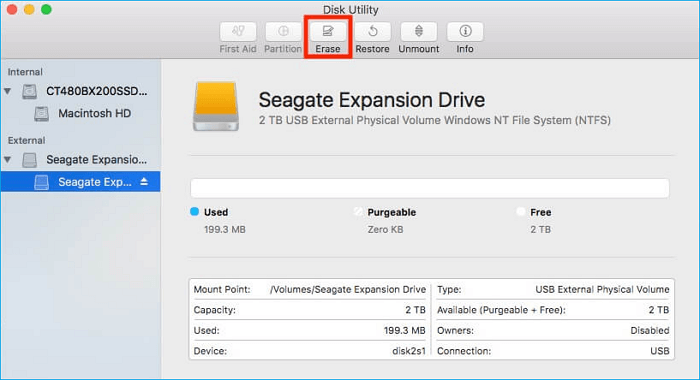
Step 1. Go to Applications > Utilities > Disk Utility.
Step 2. Connect the NTFS drive to a Mac, select the disk from the left pane and click on the Erase button.
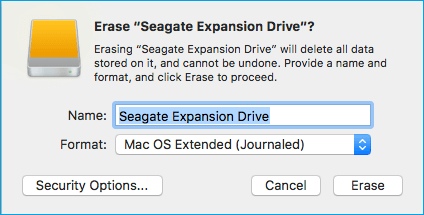
Step 3. A new window will pop up asking for a new file format for the drive. Based on your requirements, select the new file format and click Erase.
Step 4. Wait for a few minutes to complete the process.
Method 2. Wipe NTFS Drive Using Terminal Command
If you are good with the command-line, use the Terminal application on Mac to erase the NTFS drive data. This method works this way:
Step 1. Connect the NTFS flash drive to a Mac computer.
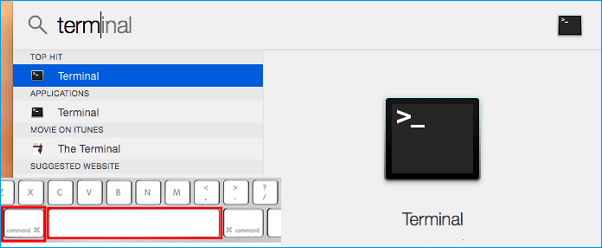
Step 2. Press cmd + space keys to open Spotlight, then type 'terminal' in the search field and hit Enter.
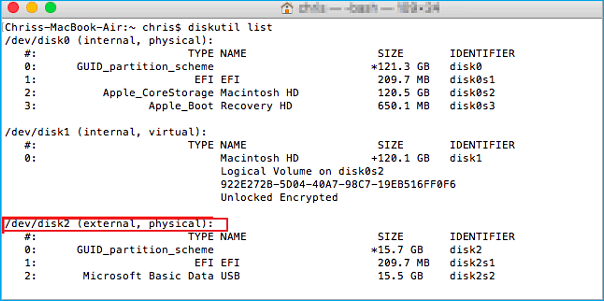
Step 3. Type "diskutil list" to search the NTFS drive name.
Step 4. After that, type this to tell the Disk Utility to format the drive to any file format.
Step 5. Once the process is complete, type "diskutil list" to ensure whether the NTFS file has been fully erased or not.
For Windows users, it is super easy to wipe out NTFS drive data using the following methods:
Like Mac users, Windows operators can also transfer the NTFS drive data to a safe location on their internal hard drive, another external drive, or third-party cloud storage servers.
However, if the NTFS drive isn't working properly, use the EaseUS Data Recovery Wizard to recover the formatted drive's data. The software can recover over 550+ file types on all the leading Windows versions, including the latest Windows 11.
Professional Windows users can wipe NTFS disk data with the Command Prompt on Windows. But this method will completely delete the drive's data, so make sure to back up the NTFS drive before proceeding further.
Here's how to use CMD to wipe NTFS drives on Windows:
Step 1. Search for the Command Prompt and run it as Administrator.
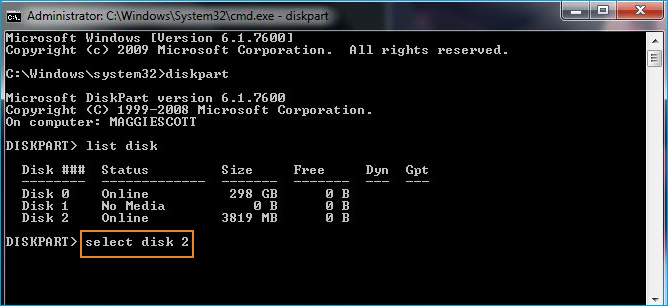
Step 2. Type "diskpart" and hit Enter. In a Diskpart window, type "list disk" to find the connected NTFS disk.
Step 3. Type "select disk (disk number)" to specify the drive number that needs to be formatted.
Step 4. Now, type "clean" to permanently delete all files and folders present on the disk.
Step 5. Next, type "create partition primary" to make the disk accessible again.

Step 6. Type "format fs=ntfs" to a new or NTFS file format and assign a drive letter.
Be it cleaning the NTFS drive or making it accessible on Mac is your main purpose of wiping the whole drive; never forget to back up the whole data before formatting your NTFS disk. Simply because backup will make it easy to recover the deleted data at any point.
Additionally, if the reason behind formatting the NTFS drive is to make it accessible on Mac, there are better options available like EaseUS NTFS for Mac. This software can make NTFS files available in read-write mode on Mac without data loss.
However, if there's no other option than wiping the whole NTFS drive, get EaseUS Data Recovery Wizard to recover formatted data anytime.
Now, that's it in this post! For more Mac and Windows guides, keep on following us on the social networks.
Related Articles - ALSO ON EaseUS SOFTWARE
Don't Have Permission to Write to External Hard Drive on Mac? Get Your Complete Guide
![]() Banu/2025-11-10
Banu/2025-11-10
How to Change Read and Write Permissions Mac [Step-by-Step]
![]() Cici/2026-01-05
Cici/2026-01-05
Can't Delete Files From SD Card on Mac [Reasons and Fixes]
![]() Sherly/2025-07-07
Sherly/2025-07-07
Full Guide to Permanently Delete Files from NTFS Drive on Mac 🎈
![]() Banu/2025-06-26
Banu/2025-06-26
Copyright © 2004 - 2023 EaseUS. All rights reserved.


