- Store
-
Support CenterGuides, License, ContactDownloadDownload installerChat SupportChat with a TechnicianPre-Sales InquiryChat with a Sales Rep
As some user complained, their NTFS formatted external hard drive can not mount NTFS on mac. In this article, we will show you the effective ways to mount NTFS drive on mac and enable the read-write mode.
Table of Contents
| Workable Solutions | Step-by-step Troubleshooting |
|---|---|
| Fix 1. Use EaseUS NTFS for Mac | Step 1. Launch EaseUS NTFS for Mac on Mac computer, and click "I already have a license" to enter...Full steps |
| Fix 2. Use macFUSE | Step 1. Disable System Integrity Protection if your OS is macOS High Sierra, macOS Mojave, macOS...Full steps |
| Fix 3. Use Terminal | Step 1. Click Go > Utilities > Terminal to start with; Step 2. Edit fstab file by enter command line...Full steps |
Real case from the forum: "......I recently purchase a Mac Mini that is running Big Sur and it will NOT even mount the NTFS drive nor does it allow you to download the appropriate driver. The only fix I have found is to reformat the disk to exFAT but reformatting would erase the data and I'm not prepared to do that yet......Any suggestion?"
Have your mac device failed to mount NTFS for Mac? Without mounting, you can not read, write files on NTFS drives. It is well known that Mac only allows a read-only mode for NTFS drive. Don't worry. You are lucky to get 3 ways for mounting NTFS drive on Mac.
Mounting ensures that your computer can recognize the file format correctly, which means a process by which the OS makes computer files and directories on a storage device, like shared resource or CD-ROM, accessible through the computer's file system.
So here the mounter for NTFS drive is necessary. Go to the next part for some reliable mounters.
Many tutorials had suggested formatting NTFS drive to exFAT, but it is not an ideal suggestion if some important files have been stored on the device.
1. EaseUS NTFS for Mac Free Download
2. Use Free Open-source Program
3. Using Terminal to Enable NTFS Support
Finding the simple method to easily mount NTFS on mac, EaseUS NTFS for Mac is the straightforward mounter you can use to mount NTFS drive in read and write mode. It has an automatic read-write mode and you can also change to the read-only mode manually.
If you put the disk into read/write mode and then exit at will, your data may be lost. To avoid data loss, we recommend you use the safe exit feature of EaseUS NTFS for Mac.
After the product activation and running software at one time, this program will mount on the background by default.
Free Download EaseUS NTFS for Mac:
How to Use EaseUS NTFS for Mac:
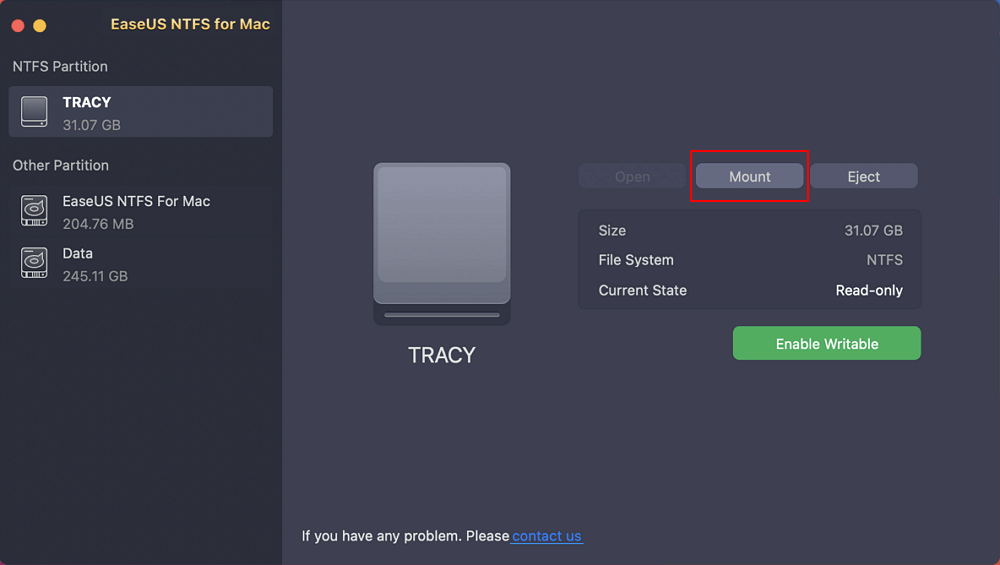
Step 1. Launch EaseUS NTFS for Mac on Mac computer, and click "I already have a license" to enter your code for unlocking the software.
Step 2. Connect your NTFS external storage device to Mac, and let EaseUS NTFS for Mac to detect it. Once it detects your drive, select the drive and click "Mount".
After this, EaseUS NTFS for Mac will mount this drive on Mac and you shall be able to open and view its content.
If you often use the command prompt on mac, then using macFUSE is surely easy for you. The steps contain many command line.
How to Use macFUSE:
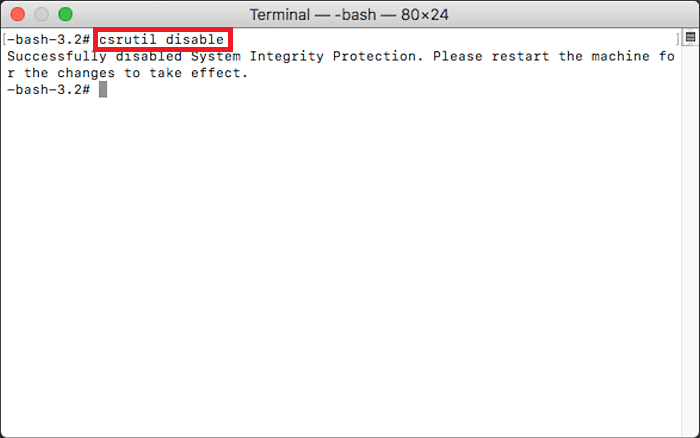
Step 1. Disable System Integrity Protection if your OS is macOS High Sierra, macOS Mojave, macOS Catalina.
Restart the computer and press Command + R to boot Recovery OS mode.
Go to Utilities > Terminal > Type the command line: csrutil disable and press Return
Step 2. Download and install macFUSE.
You can visit GitHub.com to get a quick download.
Step 3. Download and install Homebrew.
Step 4. Install NTFS-3G.
Navigate to Go > Utilities > Terminal
Enter command line and hit Enter:
Type brew install ntfs-3g > Enter password
Enter sudo mkdir /Volumes/NTFS
Type diskutil list and you can see your NTFS volume.
Type sudo /usr/local/bin/ntfs-3g /dev/disk3s1 /Volumes/NTFS -olocal -oallow_other (Replace identifier as NTFS volume.)
As you can see, this method is complicated. If you are not good at using the command lines, you've better try another solution in terms of data protection.
In this method, the command prompt is still needed.
Recommend: You can directly copy the command line in this article instead of type the command manually. The wrong command line will definitely damage your mac.
Step 1. Click Go > Utilities > Terminal to start with.
Step 2. Edit fstab file by enter command line: sudo nano /etc/fstab, press Enter. (Enter password if prompted.)

Step 3. Go to Terminal and type LABEL=NAME none ntfs rw,auto,nobrowse, hit Enter. Remember to change the NAME as the name of your NTFS drive.
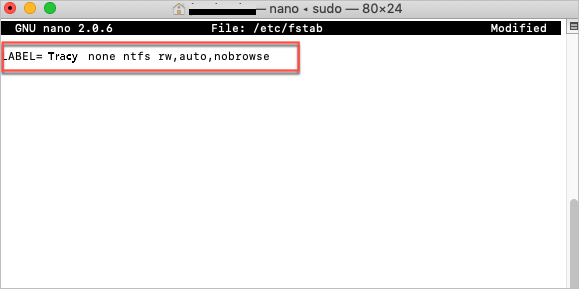
Step 4. Press Ctrl + O to save.
Step 5. Press Ctrl + X.
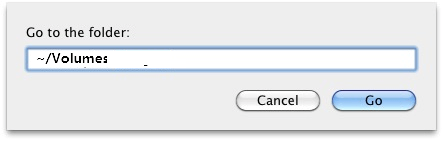
Step 6. Unmount the device and reconnect the NTFS drive again.
Step 7. Click Go > Go to Folder > Enter /Volumes and press Enter
To sum up, the paid EaseUS NTFS for Mac is the reliable and easiest method to mount an NTFS drive on Mac. For beginners who are less interested in the command line, this software is trustworthy to try. If you want free software, method 2 is free but holds a complicated tutorial, be cautious when you follow it. The last one is the reliable programs you can apply to, but it is not welcome inexperienced users. Choose any mounter by your needs.
Related Articles - ALSO ON EaseUS SOFTWARE
NTFS-3G for macOS Free Download and Install Tutorial
![]() Banu/2026-01-05
Banu/2026-01-05
What Is NTFS for Mac, Everything You Should Know About It
![]() Daisy/2025-06-26
Daisy/2025-06-26
How to Force Erase Disk Mac Terminal [Quick Guide]
![]() Cici/2025-11-11
Cici/2025-11-11
How to Copy Files From Mac to External Hard Drive Without Formatting
![]() Sherly/2025-06-26
Sherly/2025-06-26
Copyright © 2004 - 2023 EaseUS. All rights reserved.