- Store
-
Support CenterGuides, License, ContactDownloadDownload installerChat SupportChat with a TechnicianPre-Sales InquiryChat with a Sales Rep
Are you facing issues regarding copying and transferring files and folders between Mac and external storage devices? These issues can be related to file systems and permission settings. This article will guide you on how to change read-write permissions on Mac.
Table of Contents
According to the surveys, one of the most common issues Mac users faces is the issue with read and write permissions. The primary reason behind this is that the Mac has a different file system and lacks support for the NTFS file system. Whatever the reason, understanding how to change read and write permissions on your Mac is an essential skill for managing your files and maintaining your system's security.
EaseUS will discuss the different reasons that can create read and write permission issues in this post. It will also list the four easiest methods to change read-write permissions on Mac.
Before discussing how to change read-write permissions on Mac, it is essential to understand why this issue arose in the first place. There are many reasons which can result in the case. Some of these reasons are the following:
Before reading the detailed steps of each solution, let's check them by the quick view list:
There are multiple ways to change the file permission on the Mac. These range from using the Terminal to employing third-party tools. Below we have explained the four easiest methods to change read-write permissions on Mac:
If your issue concerns NTFS, the best solution is to use a third-party tool. Adding NTFS permission through a Terminal or a free NTFS driver is complex and hectic. The best tool which provides you with the simplest way to mount and unmount NTFS drive on Mac's status bar is EaseUS NTFS for Mac.
It is the most excellent option and comprehensive NTFS utility for Mac users. There are command lines, no virtual machines, and no drive formatting. You need to install this lightweight and dedicated software, and you can use NTFS on Mac natively.
The simple step-by-step process to change read-write permissions Mac via EaseUS NTFS for Mac is given below to help you:
Step 1. Launch and activate EaseUS NTFS for Mac. Click "I already have a license" to unlock this software.
Step 2. Connect an NTFS drive to Mac, EaseUS NTFS for Mac will automatically detect the device. Select your drive and you'll see it's now marked as 'Read-only". Click "Enable Writable" to add read and write rights to the drive.
Step 3. When the state of NTFS drives turns into "Writable".
Step 4. EaseUS NTFS for Mac will pops up a window to help Mac get access to the NTFS drive:
Step 5. When EaseUS NTFS for Mac restarts, you can then open to check, read, write, and even modify saved data on the NTFS device.
Suitable For: Hard Drive, External Hard Disk, SSD, USB Drive, Thunderbolt Drive, SD Card, CF Card, etc.
Compatible With: macOS 13 Ventura ~ macOS Sierra 10.13
If you are troubled by one of the above problems, launch and install the EaseUS NTFS for Mac to help you fix them quickly and safely:
One solution for NTFS external storage drives is to format them to a file system fully compatible with Mac. It is recommended if you have only bought the hard drive and it has yet to have any data or is backed up elsewhere. Here is how you can reformat the incorrect NTFS drive on Mac:
Step 1: To begin, connect the NTFS drive to your Mac and tap the Finder from the Dock. Select "Application" from the left panel and move to "Utilities." Here, tap and launch "Disk Utility."

Step 2: Select your NTFS Drive and press "Erase" from the top bar in the Disk Utility. Choose the drive name and file system in the formatting options and tap "Erase" to start the process.

Suitable For: External Storage Devices, like SSD, HDD, etc.
Compatible With: All macOS versions.
For advanced Mac users, a way is available to change read-write permissions Mac via Terminal. It means you will run commands to manage the permission for files, folders, and drives. And you can also format the disk to NTFS on Mac using Terminal. Since running commands can be risky, you should only try this method if you are confident in your skills. Follow these steps to change permission via Terminal:
Step 1: Access and run the Terminal from "Utilities" in "Applications" and access the folder where the required file is present using the "cd" command. Afterward, run the first command, ls -l, to see all the files with their permission.
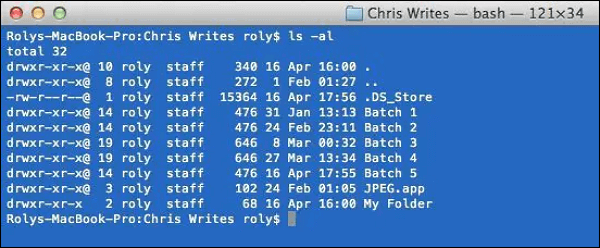
Step 2: Now run these commands to set the read and write permissions for the user, group, and others on Mac Terminal:
"chmod ugo+ rwx""My Folder"
ls -l
This first command will grant permission, while you can view the current permissions with the second.
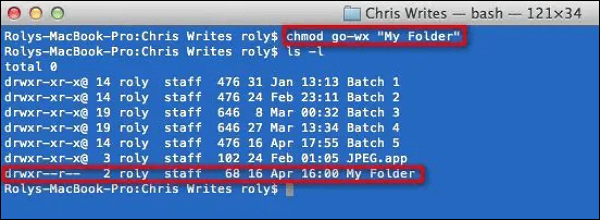
Step 3: If you want to remove the permissions, use the "chmod ugo+ rwx""My Folder" to remove file permissions for groups and others. You can also remove only a group using the "chmod g= "filename" command.
Suitable For: Files, Folder, and Groups
Compatible With: All macOS versions.
If you don't want to use Terminal and aren't comfortable running commands, you can use the "Get Info" window to change read-write permissions on Mac. It is a simple process and only requires a little tech expertise to use this method. However, you do need to have administrator privilege to make these changes. Use the following steps to fix the permission problem via Finder:
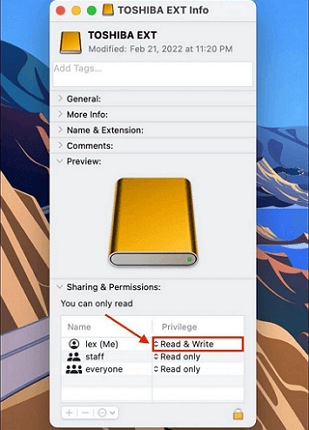
Step 1: Launch the Finder through Dock on Mac and select your targeted hard disk. After selecting, right-click the drive and choose "Get Info."

Step 2: The "Command + I" shortcut key is also possible. Next, from the "Get Info" window, locate and choose the "Sharing & Permissions" option. Now you need to change the permission to "Read & Write" if it is "Read Only" to fix the issue.
Suitable For: External Storage Devices, like SSD, HDD, etc.
Compatible With: All macOS versions.
Here are some mainstream social media websites, which you can share this valuable article with one simple click:
To conclude the article, changing read and write permissions on a Mac can be complicated. However, knowing how to do it is vital for fully utilizing your external storage devices. While there are several ways to change permissions on Mac, a quick and reliable solution is to use EaseUS NTFS for Mac.
This software lets you efficiently manage read and write permissions for NTFS formatted drives on your Mac. With this tool, you can easily overcome the limitations of the NTFS file system on Mac. In short, if you want to fix: Can't change permission on external drive Mac, EaseUS NTFS for Mac is the way to go.
If you want to see more information about changing read and write permissions on Mac, click the following related articles links to find the answers:
Review the answers to the FAQs regarding change read write permission Mac below if you have more queries:
1. Why can't I change the permissions of an external hard drive on a Mac?
There are many possible causes for your inability to change the permissions of the external hard drive on a Mac. These range from incompatible file formats like NTFS to locked permissions. Most of these issues are easily solvable through a third-party tool like EaseUS NTFS for Mac.
2. How to change a read-only file to write on Mac?
Follow these steps to change read-only files to write on Mac via the Get Info method:
Step 1: Use the Finder from the Dock to access the targeted drive. Use the "Command + I" to open the Get Info menu.
Step 2: Now scroll down to the bottom in "Sharing & Permissions" and set the read-only permissions to read and write.
3. How to change file permission using a Mac terminal?
Use the following step to change the file permissions using Mac Terminal:
Step 1: Launch Mac Terminal through Utilities from Application. Now run the command "chmod ugo+ rwx""My Folder".
Step 2: Grant the user, groups, and others read and write permissions.
Related Articles - ALSO ON EaseUS SOFTWARE
How to Format FAT32 to NTFS on Mac
![]() Banu/2025-06-26
Banu/2025-06-26
Erase Button Greyed Out Mac Disk Utility | How to Fix
![]() Sherly/2025-06-26
Sherly/2025-06-26
Fix 'This Disk Is Not Formatted as MacOS Extended' Error 2026
![]() Banu/2026-01-05
Banu/2026-01-05
Can Mac Use NTFS? 2026 Full Guide Here
![]() Cici/2026-01-05
Cici/2026-01-05
Copyright © 2004 - 2023 EaseUS. All rights reserved.


