- Products
- Store
- Partner
-
Support
Support CenterGuides, License, ContactDownloadDownload installerChat SupportChat with a TechnicianPre-Sales InquiryChat with a Sales Rep
Table of Contents
| Workable Solutions | Step-by-step Troubleshooting |
|---|---|
| Change & Assign Permissions |
Method 1. Change Permissions If You are the Administrator...Full steps Method 2. Assign Permissions to Users & Add New Users...Full steps |
| Fix "Can't Write to External Device" |
1. Enable Write to External Drive...Full steps 2. Check Disk Space or Reformatting Drive...Full steps |
Permission settings on Mac are designed to control who can access and edit files on the computer.
If you don't change its read-only mode for your disk, then your external hard drive will say you don't have permission on mac.
Things go easy by two quick fixes:
Step 1. Connect the external hard drive to Mac.
Step 2. Right-click your disk. Then choose Get Info.
Step 3. At the bottom right of the window, you can see a lock icon. If it is locked, click it to unlock it. Enter the administrator name and password if it asks to. Expand the Sharing and Permissions tab. Then tick the "Ignore ownership on this volume" box.
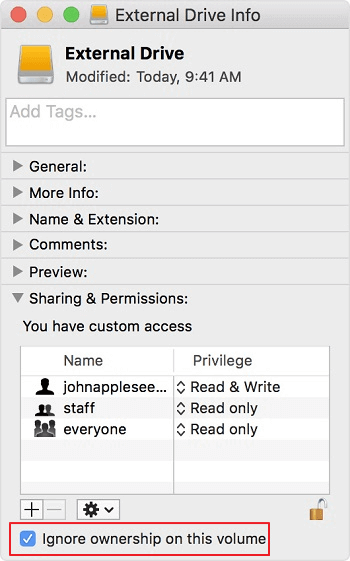
Step 4. Click the Gear icon(Show as 3 dots icon on macOS Big Sur) at the bottom right of the window, then choose "Apply to enclosed items..."

Step 1. Right-click your disk and then choose "Get Info".
Step 2. Click the lock icon to unlock it. And input administrator name and password.
Step 3. Expand the Sharing & Permissions section and click one of the users you want to assign permissions to.
Step 4. Choose Read & Write.
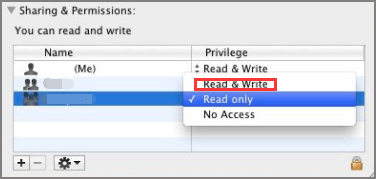
Note: You can go to the Gear icon (macOS Catalina/Mojave) or the 3 dots icon (macOS Big Sur) to undo changes. Click the "Revert Changes".
Even though Apple provides a detailed guide about how to get permission from read-only to read-write, here are extra situations that users still can not write to an external hard disk, like the case below:
"......When I click it in finder and choose to get info, it says that I have permission to read and write. Whenever I try to copy something to it, it says something along the line of 'Copy Failed: You don't have permission' I also know I have permission to read and write......"
Apparently, this catch can not solve by permission settings. Don’t worry. Here are two methods you can keep:
Option 1 - Using Free NTFS for Mac Tool (Easy)
EaseUS NTFS for Mac enables you to write to the NTFS drive without formatting and data loss. Whenever you connect a disk to a computer, this NTFS for Mac tool will automatically recognize it and turn on the writable access. Then you can add, edit, delete, transfer files or folders right now.
Enjoy 7 day's free trial:
How to enable writable by EaseUS NTFS for Mac:
Step 1. Launch and activate EaseUS NTFS for Mac. Click "I already have a license" to unlock this software.
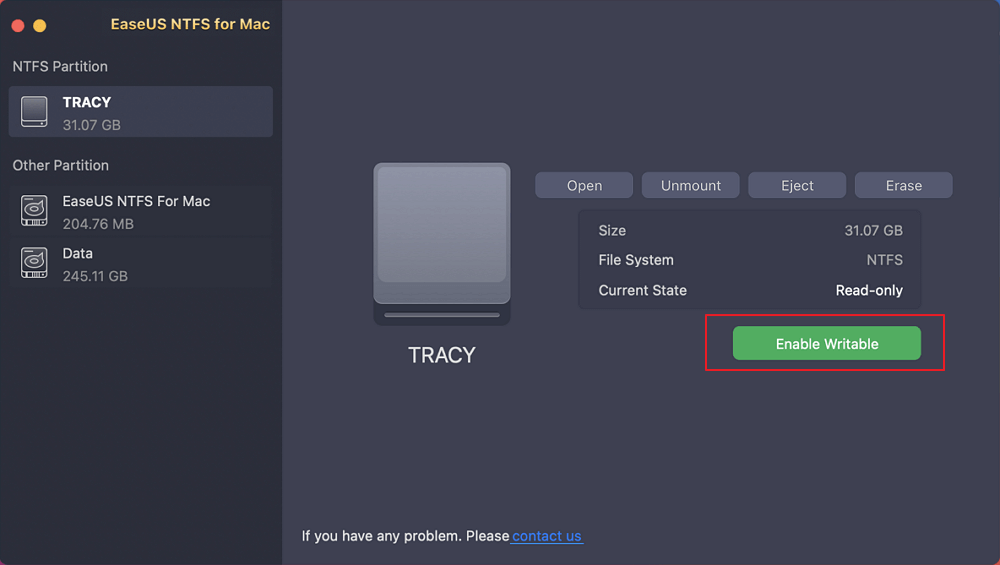
Step 2. Connect an NTFS drive to Mac, EaseUS NTFS for Mac will automatically detect the device. Select your drive and you'll see it's now marked as 'Read-only". Click "Enable Writable" to add read and write rights to the drive.
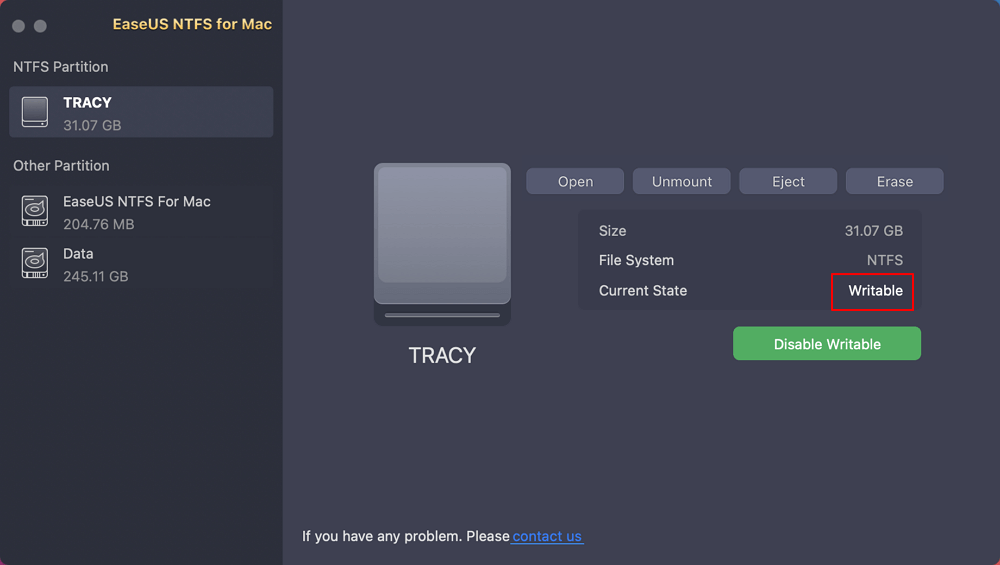
Step 3. When the state of NTFS drives turns into "Writable".
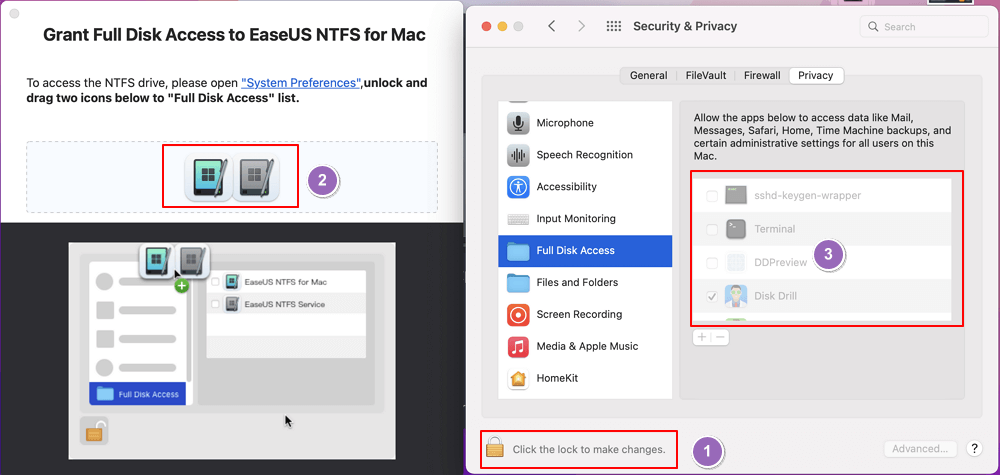
Step 4. EaseUS NTFS for Mac will pops up a window to help Mac get access to the NTFS drive:
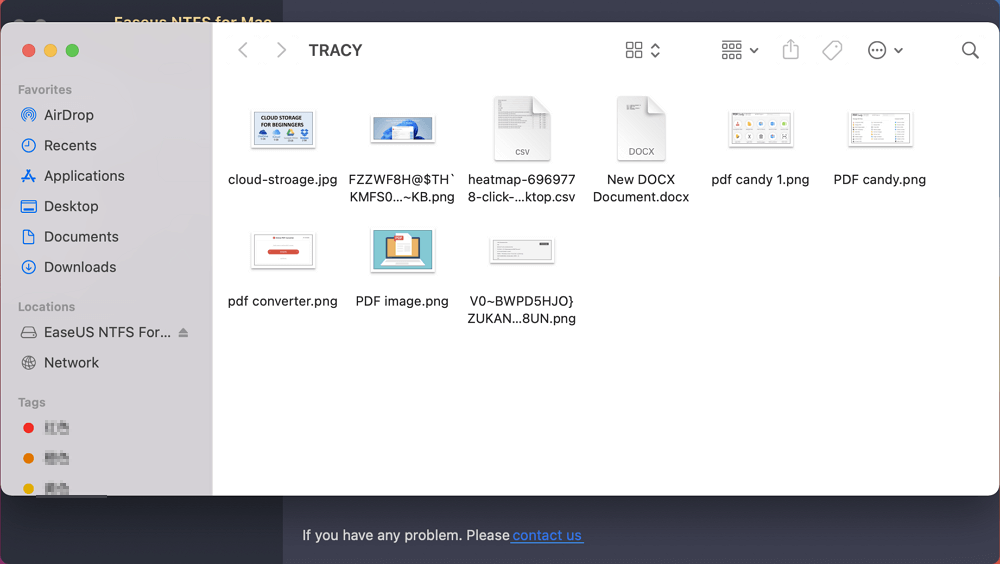
Step 5. When EaseUS NTFS for Mac restarts, you can then open to check, read, write, and even modify saved data on the NTFS device.
Read an array of articles around macOS can't write to NTFS:
Option 2 - Run Terminal to Get Write Access (Data loss Risk)
Apple does have the built-in tool, Terminal, to access the NTFS drive. You can use it but back up files first.
Step 1. Connect drive to Mac and click Finder > Applications > Utility > Terminal.
Step 2. Type the command line and hit Enter key.
Sudo nano /etc/fstab

Step 3. Input the password.
Step 4. Continue to type the command line and then press Enter.
LABEL=NAME none ntfs rw, auto, nobrowse (Change NAME as your drive name.)
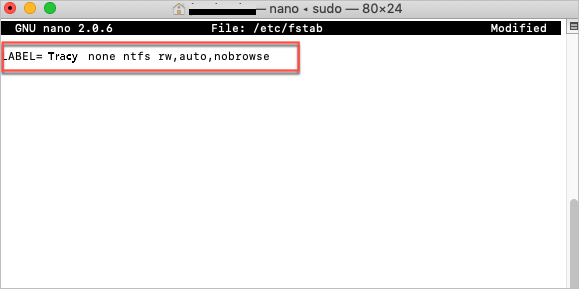
Step 5. Press Ctrl + O > Enter > Ctrl + X
Step 6. Connect drive to computer again.
Step 7. Go to the dock and click Go, then choose Go to Folder...
Type "~/Volumes" on the box and then click the Go button.

One simple reason is your external hard drive running out of space. Sounds easy anyway. You can check your disk space in case. If the drive becomes full, clear up big files.
If your disk is close to blank, then you can format it to another file system.
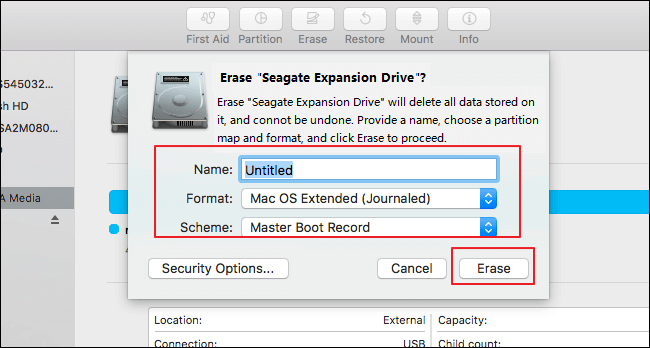
Step 1. Click the Search icon on the top right corner of the screen. Directly search Disk Utility and click to go.
Step 2. On the left side of the screen, expand the External hard drive tab and select your drive. Then click the Erase button.
Choose the file system you need.
For the "Don't have permission on Mac" issue, we introduced two situations to get control over read-write access.
For users who have permission but can't write to an external hard drive, EaseUS NTFS for Mac software can mount and enable writable in a few clicks.
Related Articles - ALSO ON EaseUS SOFTWARE
How to Mount External Hard Drive Mac [Complete Guide]
![]() Cici/2025-07-07
Cici/2025-07-07
Fix Toshiba External Hard Drive Won't Let me Add Files on Mac Error
![]() Daisy/2025-06-26
Daisy/2025-06-26
How to Change Permissions on External Hard Drive Mac [Full Guide]
![]() Cici/2025-06-26
Cici/2025-06-26
(Solved!) Can't Copy Files to USB on Mac
![]() Oliver/2025-06-26
Oliver/2025-06-26

