- Products
- Store
- Partner
-
Support
Support CenterGuides, License, ContactDownloadDownload installerChat SupportChat with a TechnicianPre-Sales InquiryChat with a Sales Rep
Table of Contents
Toshiba is one of the fastest and secure USB brands, but it still sometimes shows read-only errors on Mac. It might happen due to faulty permission settings, incompatible file systems, or other formatting errors.
However, there is no need to worry. There are many solutions available to fix Toshiba read-only errors on Mac. This page includes 5 reliable solutions that can help to remove read-only errors from Mac external hard drives.
| Fix 1. Ignore Permission | Step 1. Choose the external hard drive icon located on your desktop in the Finder sidebar...Full steps |
| Fix 2. Unlock Toshiba | Step 1. Connect the Toshiba volume to the Mac...Full steps |
| Fix 3. Format Toshiba Drive | Step 1. Connect the drive to a Mac computer and go to Applications > Utilities > Disk Utility...Full steps |
| Fix 4. Use First Aid | Step 1. Press the Command + Space keys, then type Disk Utility...Full steps |
| Fix 5. Enable Toshiba Writable | Step 1. Launch and activate EaseUS NTFS for Mac. Click "I already have a license" to unlock this software...Full steps |
Many times Toshiba USB flash drives will show read-only errors on Mac. It happens due to several reasons, such as:
Mac allows users to modify the Sharing and Permissions to determine who can delete or edit data on the external hard disk. Thus, if you have set permission to read-only Toshiba, you can't write or modify it on Mac. To fix this, you need to change the permission settings on Mac to get read-write Toshiba USB access.
It is also a permission error. If you have intentionally or unintentionally locked a Toshiba USB drive, it won't open USB in write mode. To check whether Toshiba is locked or write-protected, right-click on the disk icon and select the Get Info to check the disk information. If it says ‘read this Toshiba hard drive’ even though it is formatted in the right file system, you can't write to the drive.
Sometimes formatting issues on external hard drives won't allow Mac to write or modify Toshiba USB. To fix the internal errors, use Disk Utility or, in the worst case, get a new Toshiba hard drive.
The NTFS file format is one of the common reasons behind Toshiba read-only errors on Mac. If the Toshiba drive is formatted in NTFS file format, it will only open in read-only mode on Mac. By default, Apple only reads NTFS formats as it is a Windows file system. Thus, convert NTFS files to Mac compatible format or use a third-party tool to mount NTFS drives.
It might seem like a daunting task to remove the Toshiba read-only error from Mac, but it is not. There are several systematic solutions available to fix read-only external drive issues on Mac, such as:
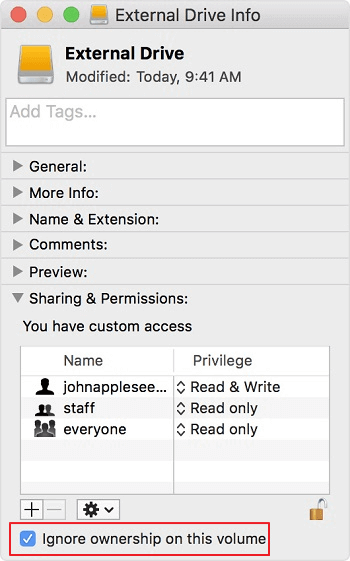
If changed permission setting is a problem for Toshiba read-only errors on a computer, simply change the disk permission settings from the Finder, as follows:
Step 1. First of all, choose the external hard drive icon located on your desktop in the Finder sidebar. Then, press the Command + I keys to get information about the drive.
Step 2. Next, click on the arrow next to the Sharing & Permissions tab near the bottom of the window.
Step 3. Check the box that says Ignore ownership on this volume or toggle it off. It might ask to add the password of your Mac to enable the write mode.
If files on the Toshiba external drive show the read-only or locked message, this is also a permission error. It means that the Toshiba drive is password-protected or encrypted, and it needs to be decrypted for access. Here's how to unlock a drive on Mac:
Step 1. Connect the Toshiba volume to the Mac.
Step 2. Select the external drive from the Finder and right-click on the drive icon, select the 'Decrypt DriveName' from the list.
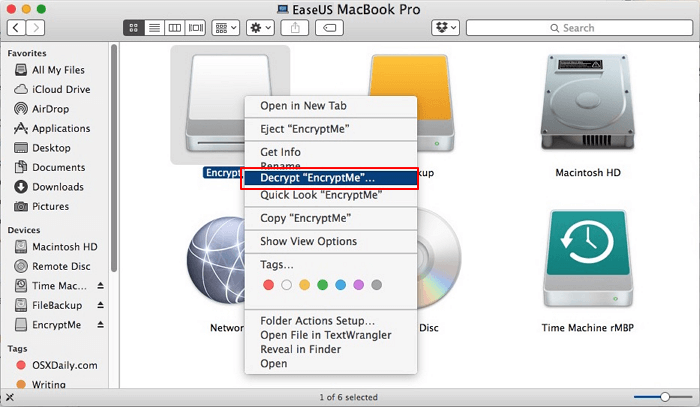
Step 3. Enter the password used to encrypt the drive.
Step 4. Decrypting the Toshiba drive will take some time, depending upon its size. However, once the process is done, you will be able to access the drive's content on Mac.
If the Toshiba hard drive is formatted to the NTFS file system, Mac will open it in the read-only mode by default as it is a Windows file format. The most compatible Mac file systems are FAT, exFAT, HFS+, and others. So, the only solution here is to format a Toshiba to the Mac compatible file format.
If your external hard drive doesn't contain any important files, go to Disk Utility and erase it. From there, one can select the several Mac suitable formats for Toshiba hard disk. The process works this way:
Step 1. Connect the drive to a Mac computer and go to Applications > Utilities > Disk Utility.
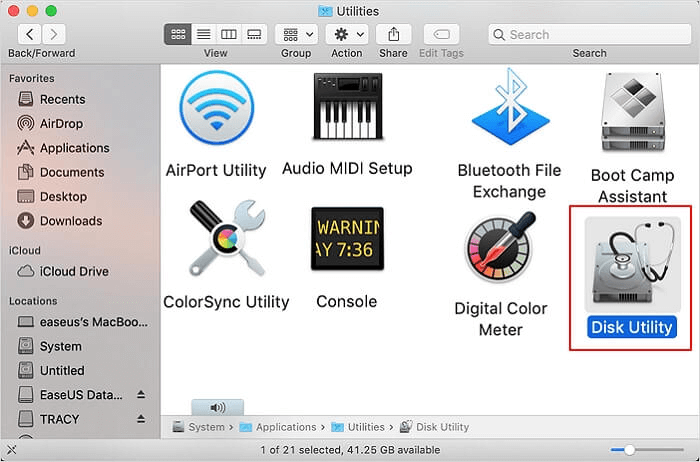
Step 2. Select the Toshiba drive from the list of all the available storage devices.
Step 3. Click on the Erase button located in the Erase tab. Before erasing the disk, make sure to select the file system in which you would like to use it.
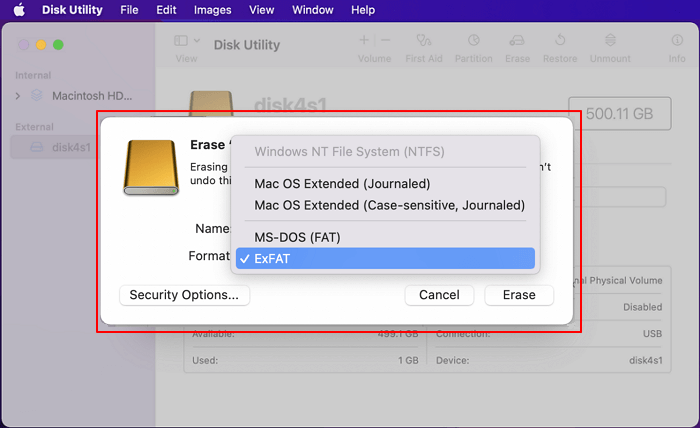
Step 4. Wait for a few minutes to complete the process.
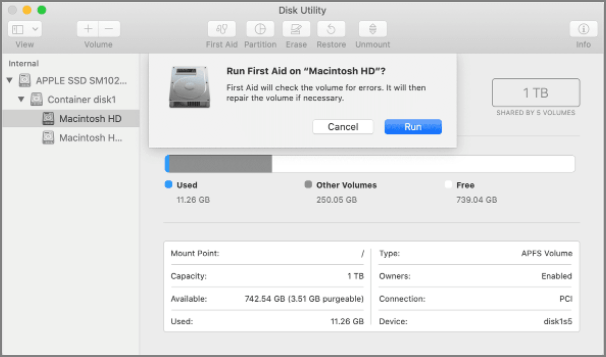
If there's a formatting problem with the external hard drive, use Disk Utility to highlight and repair those errors using the First Ais option. To do so:
Step 1. Press the Command + Space keys and then type Disk Utility.
Step 2. Select the Toshiba hard drive, click on the First Aid, and then click on the Run to find and repair the errors.
If you don't want to lose the high-quality NTFS file format, use EaseUS NTFS for Mac to mount Toshiba writable. This incredible software can mount and unmount Toshiba formatted in NTFS from Mac's status bar.
Without losing data, EaseUS NTFS for Mac can eliminate Toshiba read-only errors on Mac. The software works with Windows 11/10/8/7 and even M1-based Mac devices.
List of EaseUS NTFS for Mac Features:
Here's how can remove the read-only error from NTFS Toshiba disk on Mac using EaseUS NTFS for Mac:
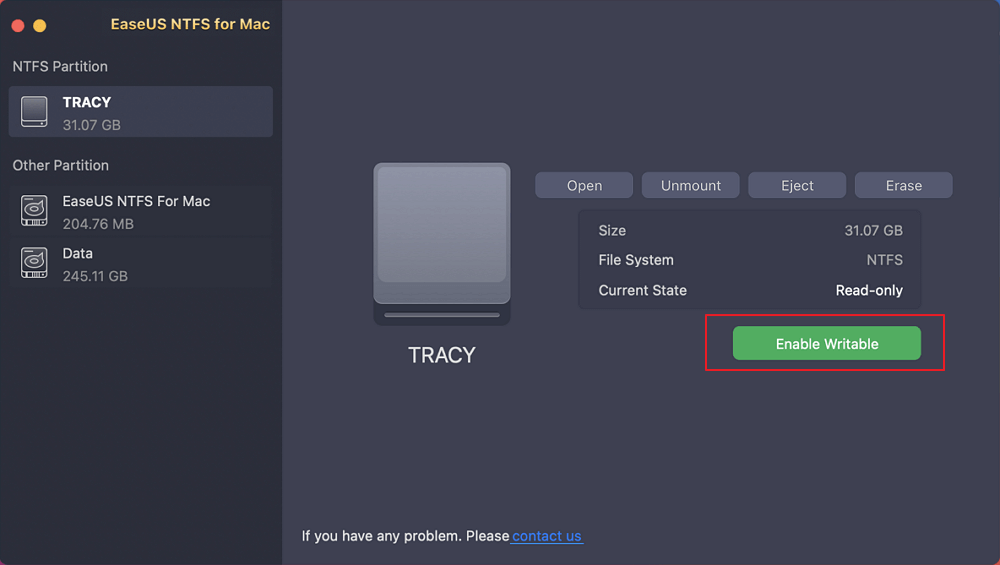
Step 1. Launch and activate EaseUS NTFS for Mac. Click "I already have a license" to unlock this software.
Step 2. Connect an NTFS drive to Mac, EaseUS NTFS for Mac will automatically detect the device. Select your drive and you'll see it's now marked as 'Read-only". Click "Enable Writable" to add read and write rights to the drive.
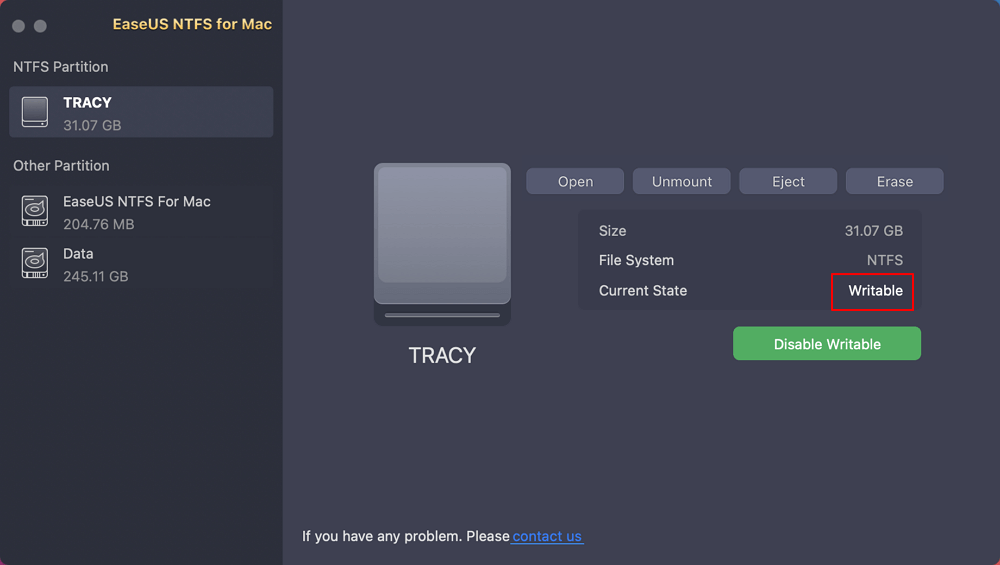
Step 3. When the state of NTFS drives turns into "Writable".
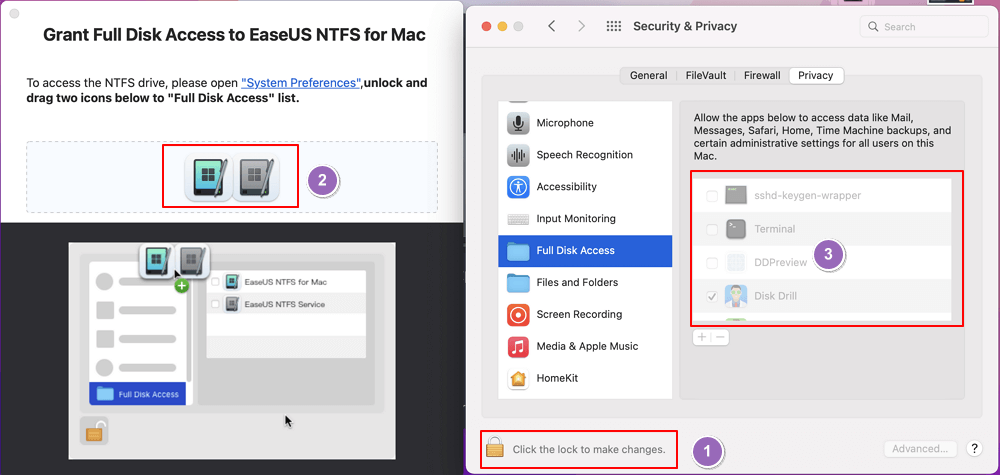
Step 4. EaseUS NTFS for Mac will pops up a window to help Mac get access to the NTFS drive:
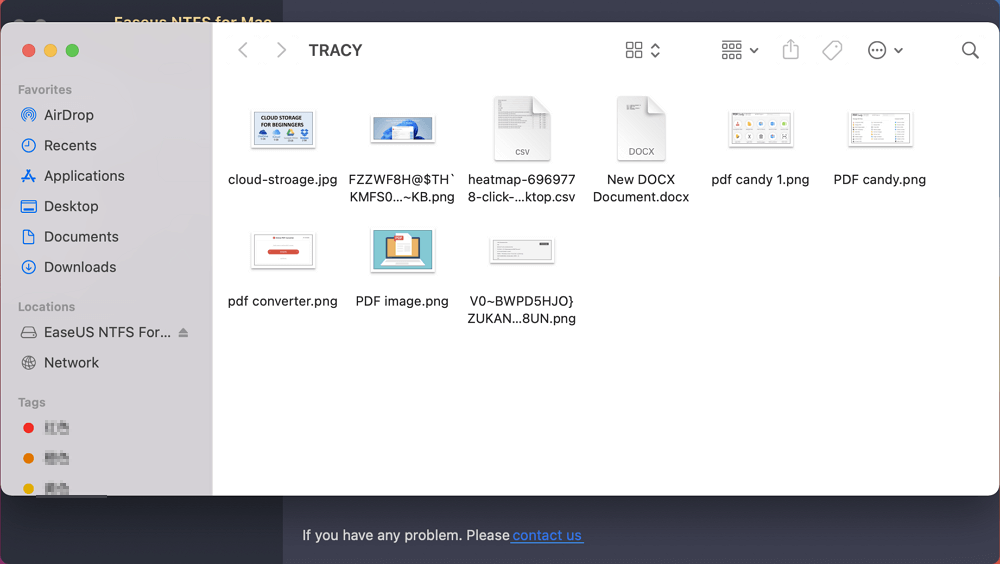
Step 5. When EaseUS NTFS for Mac restarts, you can then open to check, read, write, and even modify saved data on the NTFS device.
Toshiba read-only error on Mac is 100% fixable. If the problem is with the permission settings, one can simply change them from the Finder sidebar.
But if the Toshiba hard drive is NTFS formatted, making it writable on Mac will be complicated. However, thankfully, EaseUS NTFS for Mac has made it easy to run NTFS hard disks in read-write mode.
Besides the read-only error, EaseUS can help with other hard disk mount and unmount errors on Mac. Therefore, if you want to smoothly mount Toshiba hard drives to Mac, try EaseUS NTFS for Mac's free trial today.
Related Articles - ALSO ON EaseUS SOFTWARE
Tutorial: Change Seagate From Read Only on Mac Without Formatting
![]() Sherly/2025-11-11
Sherly/2025-11-11
WD Exteranl Hard Drive Shows Read Only on Mac? Why and How to Fix It
![]() Banu/2025-06-26
Banu/2025-06-26
Solved: the Disk Couldn't Be Ejected Because the Finder Is Using It
![]() Cici/2025-07-07
Cici/2025-07-07
How to Convert NTFS to APFS Without Data Loss
![]() Daisy/2025-06-26
Daisy/2025-06-26

