- Store
-
Support CenterGuides, License, ContactDownloadDownload installerChat SupportChat with a TechnicianPre-Sales InquiryChat with a Sales Rep
Are you looking to format NTFS on a Mac terminal? If yes, read our step-by-step guide to understand how to format drives to NTFS on MAC using the airport with ease.
Table of Contents
Mac OS uses HFS (Hierarchical File System) for the drives. On the other hand, Windows uses NTFS for file storage systems. So, people look for options to format their drives in HFS to NTFS for better compatibility. If you are a Mac user and wondering if you can format drives to NTFS on MAC, then the good news is that you can do it. EaseUS will show you a full guide on formatting drive to NTFS on Mac.
The last part explained why the NTFS format is essential. Usually, operating systems come with disk utility software that allows you to format drives. However, in Mac, the disk utility software does not come with the option for NTFS file format.
Therefore, the Mac users need to use the terminal to format drives to NTFS. Follow the below steps to easily format your drive to NTFS on Mac using a terminal.
Steps to Format Drive to NTFS on Mac using Terminal
Step 1. Select Finder > Applications > Utilities > Terminal.
Step 2. In the terminal, type diskutil list and then hit the enter button.
Here you can see the locations of your attached drives. Pick the one which you need to format to NTFS.
Step 3. Enter diskutil eraseDisk NTFS "LABEL"command to format your drive to NTFS.
Replace "LABEL" with the name that you want to give to your formatted drive. Also, you need to replace with the exact location of your drive. You can get the location name from step 2.
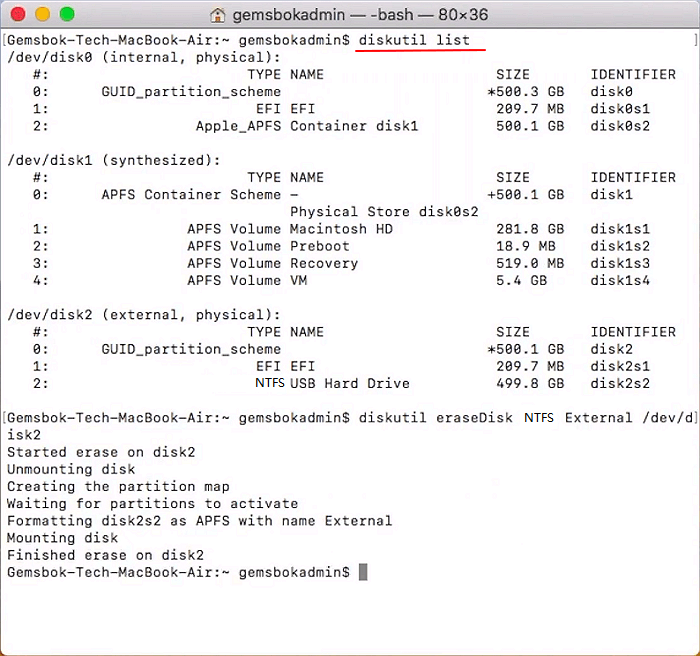
Once done, you will be able to format your disk into NTFS using the Mac terminal.
EaseUS NTFS for Mac is the best 3rd party tool for formatting drives on Mac because of its breakneck speed, powerful features, and full compatibility with all Mac devices. Its "Erase" tool can empower Mac users to format their hard drives to file systems like NTFS, exFAT, FAT32, HFS+, and APFS. You can begin using the software by downloading it from their official website.
Refer to the detailed guide as follows:
Step 1. Launch EaseUS NTFS for Mac on Mac computer, click "I already have a license" to activate this software.
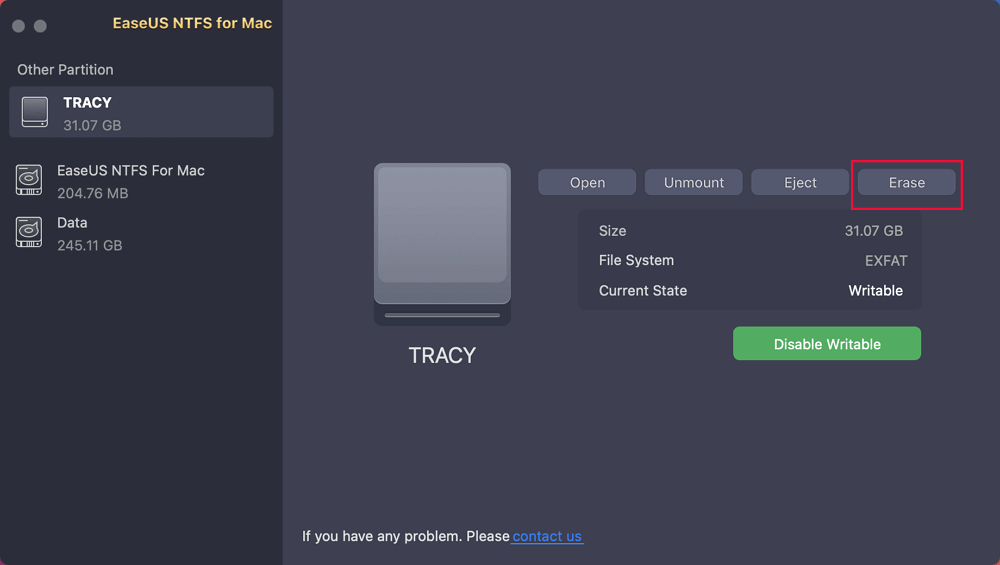
Step 2. Select target disk drive or removable device you tend to erase, and click "Erase" to continue.
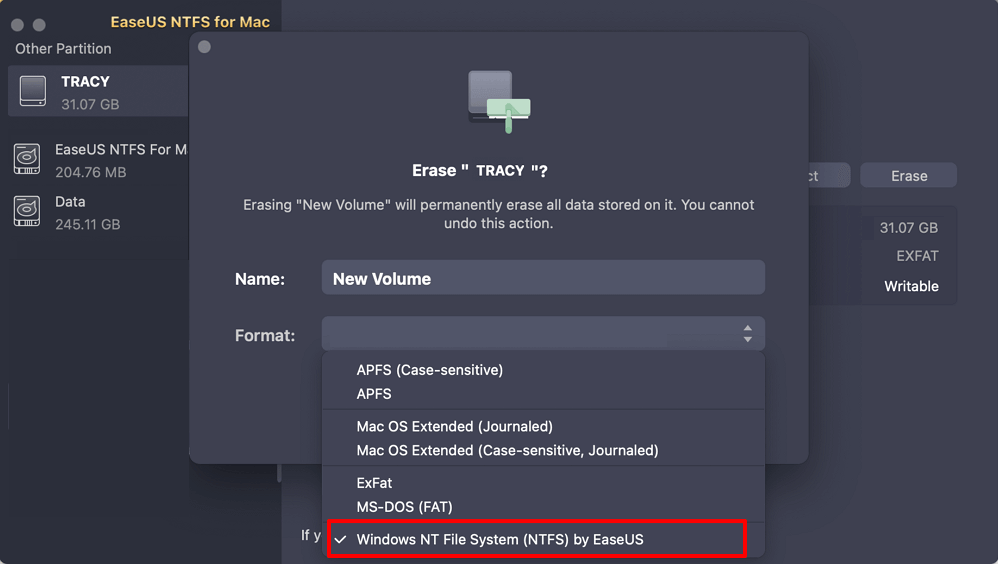
Step 3. Select "Windows NT File System (NTFS) by EaseUS" - NTFS file system as the target file system.
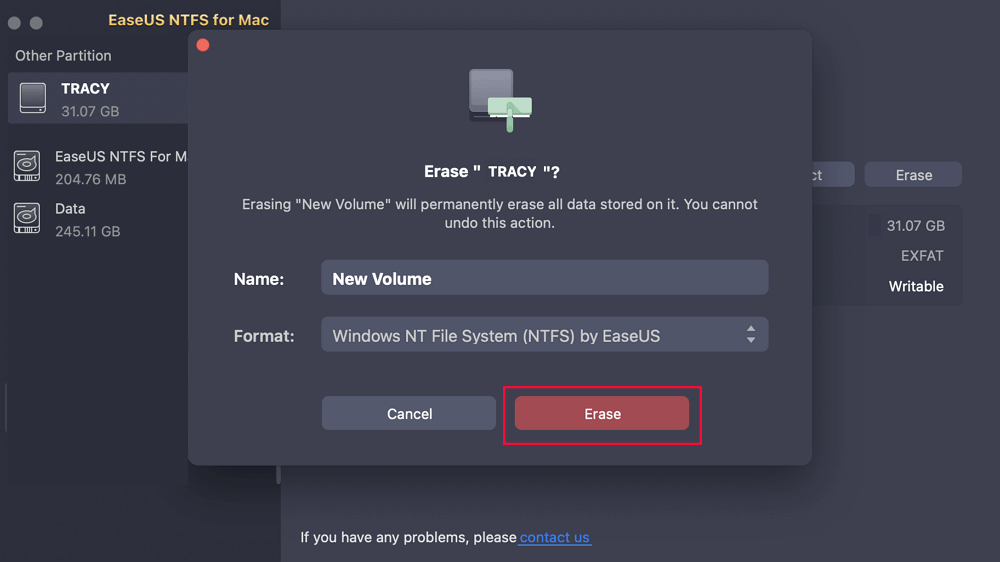
Step 4. Click "Erase" to confirm the formatting and start erasing your target device to NTFS file system.
Why EaseUS NTFS For Mac?
Although many other software programs can help you enable read-write access to NTFS drives in macOS. But, if you wonder why our article recommends EaseUS NTFS for Mac, it is due to its extensive features.
Below are a few of the key features that give EaseUS NTFS For Mac edge over other software:
Download and enjoy the helpful features from today:
NTFS (New Technology File System) is a file storage system that Microsoft introduced. By default, Microsoft uses its Windows NT operating systems to organize, store efficiently, and find files on the drive. That is the reason that enables you to directly attach and work with NTFS drives in the Windows operating system. However, it's not the case with Mac OS. This is because the file system of Mac OS is opposite to Windows OS.
When you connect an NTFS drive with Mac, you cannot perform read and write operations directly. Unfortunately, Mac’s own disk utility software does not provide any direct NTFS format method. You need to format the drive to NTFS using the Mac terminal. Once done, you can use any third-party application to enable read/write access to NTFS drive in Mac.
EaseUS NTFS For Mac
EaseUS NTFS for Mac is a top-notch one-step method for enabling read-write access to NTFS drives in macOS. You don’t have to remember or copy-paste any command to use this software. It simplifies the whole procedure by enabling the read-write access to NTFS with just one simple step.
Step 1. Launch and activate EaseUS NTFS for Mac. Click "I already have a license" to unlock this software.
Step 2. Connect an NTFS drive to Mac, EaseUS NTFS for Mac will automatically detect the device. Select your drive and you'll see it's now marked as 'Read-only". Click "Enable Writable" to add read and write rights to the drive.
Step 3. When the state of NTFS drives turns into "Writable".
Step 4. EaseUS NTFS for Mac will pops up a window to help Mac get access to the NTFS drive:
Step 5. When EaseUS NTFS for Mac restarts, you can then open to check, read, write, and even modify saved data on the NTFS device.
After you see the method to format the drive to NTFS on Mac, let's see some common reasons why people do it in the first place.
1. Hard Drive or External Hard Drive compatibility with Mac and Windows.
If you switch from Windows to Mac or work on both operating systems, you must format the drive to NTFS. When you format your drive to NTFS, you get to make it compatible with both Mac and Windows.
2. Use NTFS to Transfer and Save Big Files.
That drive is useless if you have a substantial NTFS drive and a Mac. The best way around is to make your drive format NTFS in Mac. It will allow you to transfer, store quickly, and share large files.
3. Use NTFS for Specific Usage.
A specific usage for the NTFS file system is to support removable storage devices. For example, on Mac, having the NTFS format available allows you to work your way around with external storage devices.
Below are the social media buttons that you can share this valuable post online:
Microsoft introduced the NTFS file system and supported all Windows NT operating systems. Introducing the NTFS file system aims for better storage, searching, and management. Therefore, the users need other ways to format the disk to NTFS on Mac. You can do it by using a Mac's terminal, which allows formatting disk to NTFS with commands.
Moreover, NTFS For Mac can provide an easier operation and effective formatting process. Once you have the drive in NTFS format, you can use highly reliable software, EaseUS NTFS for Mac, to enable read/write access to NTFS drives on macOS. It is efficient and can do the job with just one simple step.
Related Articles - ALSO ON EaseUS SOFTWARE
External Hard Drive Not Mounting on Mac? Fixes Here!
![]() Banu/2025-06-26
Banu/2025-06-26
Can Mac Use NTFS? 2026 Full Guide Here
![]() Cici/2026-01-05
Cici/2026-01-05
How to Fix Seagate External Hard Drive Read-Only on Mac
![]() Banu/2025-06-26
Banu/2025-06-26
EaseUS NTFS for Mac Cataline/Big Sur and M1 Full Version Free Download with Serial Key
![]() Banu/2025-06-26
Banu/2025-06-26
Copyright © 2004 - 2023 EaseUS. All rights reserved.