- Store
-
Support CenterGuides, License, ContactDownloadDownload installerChat SupportChat with a TechnicianPre-Sales InquiryChat with a Sales Rep
This article introduces the possible methods for Change Permissions on External Hard Drive Mac. Users can learn how to resolve permissions issues and get full control of their external drives.
Table of Contents
File permission on Mac is designed to provide key controls and settings to make changes and move files on the Mac system. In addition, your external hard drive can give you file access if you have valid permission.
EaseUS covers the possible solutions for Change Permissions on External Hard Drive Mac in this article. Users can learn how to resolve permissions issues and get complete control of their external drives.
You must update the permissions if an external Mac hard drive is read-only, and you cannot write to or edit its data. This is a common problem when users frequently use an external drive. They do not have the required permissions to allow their user account to write data to it, so they need to change permissions.
The following possible causes could contribute to the external hard drive's lack of permissions. Here is the list:
The next part will provide six valuable ways to change permissions on an external hard drive Mac. Keep reading to find the best suitable way for you.
Here is the list of the solutions to change permissions on the external hard drive on Mac:
This section covers six different ways to modify the permissions on an external hard drive on Mac. We recommend you use the first method as it is efficient, reliable, and accessible. However, the following ways may be more complicated, so we remind users to be careful when selecting.
EaseUS NTFS for Mac is an effective tool for changing hard drive permissions on Mac. Its easy interface and simple functionality enable users to copy, move, modify, read & write internal or external drives in macOS. It is the most convenient and quick way to write files to the NTFS drive without data loss. In addition, the "Enable writable" feature and compatibility with all macOS versions make it a reliable tool to help Mac users.
Click here to download the accessible version of EaseUS NTFS for Mac, then follow these steps to change permissions on your external hard drive.
Step 1. Launch and activate EaseUS NTFS for Mac. Click "I already have a license" to unlock this software.
Step 2. Connect an NTFS drive to Mac, EaseUS NTFS for Mac will automatically detect the device. Select your drive and you'll see it's now marked as 'Read-only". Click "Enable Writable" to add read and write rights to the drive.
Step 3. When the state of NTFS drives turns into "Writable".
Step 4. EaseUS NTFS for Mac will pops up a window to help Mac get access to the NTFS drive:
Step 5. When EaseUS NTFS for Mac restarts, you can then open to check, read, write, and even modify saved data on the NTFS device.
In addition to changing hard drive permissions on Mac, EaseUS NTFS for Mac has other outstanding functions as follows:
Key feature:
If you want to share the amazing software on your social media, you can use the below one-click share button:
Setting permissions to external drives is a typical security practice to protect stored data. However, if your external drive shows read-only permissions, you must change them to access the files it contains. Here's how to fix it:
Step 1. Make sure your external hard drive is connected correctly.
Step 2. To see the drive's details, navigate and right-click your disk icon and select "Get Info."
Step 3. Check if the golden lock icon is closed at the bottom right corner.
Step 4. Click to unlock it and enter the admin name and password to open the hard drive's permission settings tab.
Step 5. Click the drop-down option next to "Sharing and Permissions."

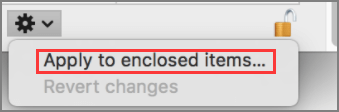
Step 6. After updating the above settings, click the "Gear icon" below the custom access settings.
Step 7. Click "Apply to enclosed items."
Now try to edit or move the data on the drive or follow the next method if you cannot.
This method's process is very similar to the earlier one. However, if you still need to resolve the issue primarily and think that the permission settings of the drive are the main culprit, then this method may help you. Again, you are required to use the drive's permission settings and change to ignore them. Here are the steps:
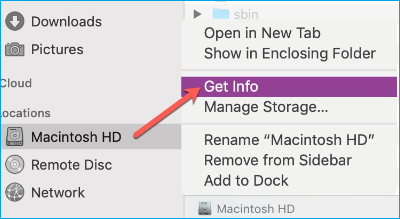
Step 1. Connect the external hard drive to your system, and right-click the complex drive icon on your Mac screen.
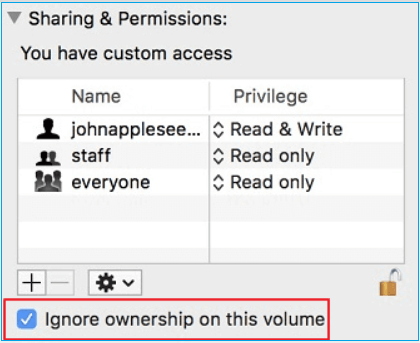
Step 2. Select "Get Info" and click to expand the "Sharing & Permissions" option.
Step 3. Click on the lock icon and enter admin information (if needed).
Step 4. Tick the box next to "Ignore ownership on this volume" and close the window.
Another practical solution to change permission is by assigning permissions to other users. You can do it for existing users, add new users or set permissions for everyone. Let's see how to do it:
Step 1. Right-click the external hard drive on your Mac's desktop, and select "Get Info."
Step 2. Navigate the lock icon at the bottom right and click to unlock it.
Step 3. Enter the name and password to verify yourself as an administrator.
Step 4. Click the "Sharing & Permissions" option to find "Custom access settings."
Step 5. Click on the name of the users to assign permission and select the "Read & Write" option from the list.
Note* You can change the permission to "Read & Write" for everyone. If you want to undo these changes, click the Gear icon, then select "Revert Changes."
You can get write access to your external hard drive using Mac Terminal. It is a command-line interface that enables users to customize multiple options or settings. We advise you to use this method only if you have some technical computer skills. Each step must be executed carefully and with complete knowledge of what you are doing. Please pay attention to the process for changing permissions on the external hard drive using Terminal.
Step 1. Click the "Go" option at the top right corner of your screen.
Step 2. Select "Applications" and then go to the "Utilities" option.
Step 3. Click "Terminal" to open the app.
Step 4. Type or paste sudo nano /etc/fstab to modify the fstab file.
Step 5. Enter your admin password (if any).

Step 6. Type the following command for the fstab file.
LABEL=NAME none ntfs rw,auto,nobrowse
Note* Insert the actual name of your external drive instead of "NAME."

Step 7. Press "Ctrl + O" to save, then "Ctrl + X" to exit the Terminal window.
Disconnect your external drive and reconnect to see if the issue is fixed.
Using your Mac's Disk Utility, you quickly format your external hard drive. Here are the steps:
Note* If you can't find the write permissions on your external hard drive, formatting it should be your last alternative. It will wipe all the data, and you might be unable to access it.
Step 1. Plug in your external hard drive to your Mac.
Step 2. Open the "Applications" and select "Utilities."
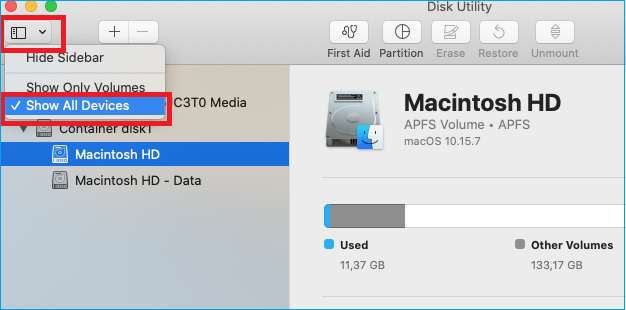
Step 3. Click "View" on the top left corner and select "Show All Devices."
Step 4. Choose "External Hard Drives" and click the drive you want to format.
Step 5. Click the "Erase" option from Disk Utility Sidebar.
Step 6. It will display a warning asking, "Are you sure you want to erase the disk?" You must click "Erase" to proceed.
By comparison, it's not hard to find that EaseUS NTFS for Mac software is much easier and safer. If you want to use this tool to change the permissions on the external hard drive on Mac, click the download button to launch it:
We introduced six organized solutions to change permissions on an external hard drive Mac. For users who do not have a professional computer background, EaseUS NTFS for Mac software can help and enable writable in a few clicks.
If you want to take a further look at the information on change permissions on an external hard drive Mac, click the following article link to learn more:
Please check this FAQs section for answers if you have further questions about changing permissions on an external hard drive Mac.
1. How to get permission on my Seagate external hard drive Mac?
Follow the steps to learn how to fix Seagate external hard drive read-only on Mac:
2. What causes Read-only errors on Mac?
Here are some possible reasons that can cause read-only errors:
3. How do I change my USB drive from read-only on Mac?
You need to learn how to change read-only files on Mac. Follow the steps to do so:
Right-click the USB drive>Get Info>Sharing & Permissions. Change all the permissions to Read & Write.
Related Articles - ALSO ON EaseUS SOFTWARE
Easy Ways to Mount NTFS on Mac | How to Mount NTFS Drive on Mac
![]() Banu/2025-06-26
Banu/2025-06-26
What Is Paragon NTFS for Mac, Pros & Cons, Everything You Should Know
![]() Banu/2025-11-11
Banu/2025-11-11
How to Delete Files from Seagate Exteranl Hard Drive Mac & Windows [2026 Guide]
![]() Banu/2026-01-05
Banu/2026-01-05
How to Change Read and Write Permissions Mac [Step-by-Step]
![]() Cici/2026-01-05
Cici/2026-01-05
Copyright © 2004 - 2023 EaseUS. All rights reserved.


