- Store
-
Support CenterGuides, License, ContactDownloadDownload installerChat SupportChat with a TechnicianPre-Sales InquiryChat with a Sales Rep
Do you have a hard drive formatted in NTFS that you cannot copy or move data into on your Mac? It is because Mac does not support NTFS natively. Find out more about can Mac use NTFS in this guide.
Table of Contents
The question that Mac users ask a lot is whether they can Mac use NTFS or not. It is because many external storage devices are formatted using the NTFS file system. NTFS is the file system used in Windows computers. Since Windows users outnumber Mac users by a large margin, most external storage devices are Windows-friendly.
This article provides a detailed guide on can Mac use NTFS. It also includes the seven most accessible solutions if you have an NTFS drive and want to use it on Mac.
To answer "Can Mac use NTFS," it cannot use NTFS natively. NTFS file system is a product of Microsoft and is primarily used in Windows systems. Since NTFS is a proprietary file system and Apple doesn't have a license to it, thus it doesn't offer native support for NTFS on its device. Apple generally only provides read support for NTFS devices with no write permissions.
However, you can still use NTFS on Mac. There are two common ways to get read and write capabilities on Mac, the first is to use the Mac Terminal, and the other is to get an appropriate third-party tool. A third-party tool is recommended for most users as it is more straightforward. However, advanced users with enough belief in their skills can use Mac Terminal.
Why should you use NTFS? It has many advantages over Mac's file system. Depending on your Mac version, your system's file system will either be HFS+ or APFS. Compared to both file systems, NTFS supports larger file sizes and more transfer speed. It is also ideal for external storage devices compared to Apple's latest APFS.
As mentioned above, while answering can Mac use NTFS, it is possible to use NTFS on Mac even if it doesn't support this file system natively. We have made a list of seven methods to help you choose a way to use NTFS on a Mac:
In addition, we have described seven methods in detail as follows:
When looking for a tool to use NTFS on your Mac, you can't do better than EaseUS NTFS for Mac. It is a lightweight and dedicated NTFS tool that allows you to use NTFS through a few simple clicks. With this tool, reading and writing on NTFS devices becomes straightforward. Moreover, using this tool, you can mount and unmount NTFS Windows drives from Mac's status bar.
EaseUS NTFS for Mac is not only the easiest way to use NTFS on Mac but also the safest way. It ensures that your data isn't damaged when moving data to or from NTFS drives on Mac. Furthermore, this tool gives you the fastest interaction speed with NTFS drives.
Steps to Use NTFS on Mac via EaseUS NTFS for Mac
The process to use NTFS on Mac via EaseUS NTFS for Mac is quick and straightforward. Here are the detailed steps for using NTFS on Mac:
Step 1. Launch and activate EaseUS NTFS for Mac. Click "I already have a license" to unlock this software.
Step 2. Connect an NTFS drive to Mac, EaseUS NTFS for Mac will automatically detect the device. Select your drive and you'll see it's now marked as 'Read-only". Click "Enable Writable" to add read and write rights to the drive.
Step 3. When the state of NTFS drives turns into "Writable".
Step 4. EaseUS NTFS for Mac will pops up a window to help Mac get access to the NTFS drive:
Step 5. When EaseUS NTFS for Mac restarts, you can then open to check, read, write, and even modify saved data on the NTFS device.
In addition, EaseUS NTFS for Mac can handle multiple tasks. Let us briefly introduce its other powerful features:
Key Features of EaseUS NTFS for Mac
EaseUS NTFS for Mac can solve many tough problems, making your life simple and joyful. Download and start experimenting.
One answer to whether Mac can use NTFS is to use the Terminal app on the Mac to get sufficient permissions to read and write NTFS hard drives. It requires you to run commands, and you should use this method if you are comfortable using Terminal. Follow the steps given below to use NTFS on Mac via Mac Terminal Command:
Step 1: Launch Terminal on your Mac through Launchpad from the Dock. Now connect your NTFS drive to the Mac and run the following command in Terminal:
sudo nano /etc/fstab

Step 2: It will open the list of all NTFS files currently your Mac is recognizing. Now scroll down and run the following command:
LABEL=NAME none ntfs rw, auto, nobrowse (Replace "NAME" with your NTFS drive name)

Step 3: First, use the "Ctrl + O" key to save and then "Ctrl + X" to exit. Afterward, disconnect and reconnect the NTFS drive and "Go" from the top menu. Here, in the dropdown menu, select "Go to Folder."
Step 4: In the "Go to Folder" tab, type "/Volumes/NAME" by replacing the "NAME" with your NTFS drive name and press the "Return" key to access the drive. Now you can read and write on an NTFS drive.

Since NTFS is the product of Microsoft and is the default file system of Windows, you can install Windows using a virtual machine on your Mac. A virtual machine is an excellent tool for dealing with NTFS files regularly. You will need to choose and install a third-party virtual machine software. Here is how to use NTFS on Mac via a virtual machine:
Step 1: Download the latest version of VirtualBox on your Mac and install it. Once the VirtualBox is installed, select "Move to Trash" to remove useless files. Now launch the VirtualBox through Applications and click "New."

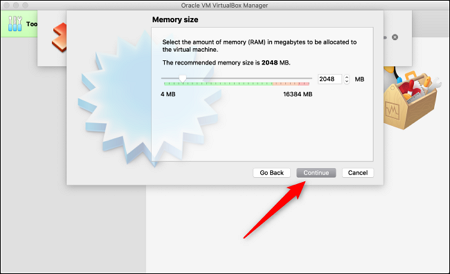
Step 2: Here, name the new operating system, define the location for "Machine Folder," and select the operating system "Type" and "Version." Afterward, click "Continue" and allocate RAM to the virtual machine on the next screen.
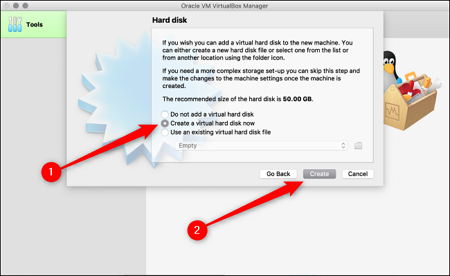
Step 3: After deciding on the RAM, click "Continue" and next choose the hard disk. If it is your first time, select "Create a Virtual Hard Disk Now" and tap "Create." Afterward, select the type of hard disk as "VHD" and press "Continue."
Step 4: Lastly, decide on the size of the hard disk. You can choose "Dynamically Allocated" or "Fixed," depending on your needs. Once done, download the Windows ISO file from Microsoft and hit "Start" in the virtual machine you created.

Step 5: It will automatically detect the Windows ISO file if it doesn't add it manually and set up your Windows machine. Once done, connect the NTFS hard disk to use NTFS on Mac.

Free NTFS drivers are also available online if you want to use something other than a virtual machine or commercial NTFS driver. One of these NTFS drivers is macFUSE which is free and open-source. However, the installation process of this free driver is complex and requires you to use the Terminal application. So instead, use the following steps to use NTFS on Mac via macFUSE:
Step 1: To start, you need to access and launch Terminal through Launchpad on your Mac. In the Terminal, execute the following command to install Xcode on your MacBook:
xcode-select –install
Step 2: Press "Install" when asked to install Xcode. Afterward, run the following command to install Homebrew on your MacBook.
[/usr/bin/ruby -e "$(curl -fsSL
https://raw.githubusercontent.com/Homebrew/install/master/install)"
Step 3: Once Homebrew is installed, download and install macFuse from its official website. With macFuse installed, go back to the Terminal window and type the following command to install NTFS-3G:
brew install homebrew/fuse/ntfs-3g
Step 4: You need to disable System Integrity Protection or SIP on Mac. It is a security measure in Mac that protects against unauthorized changes. To disable it, you will need to reboot the MacBook and press the "Command + R" key after you see the Apple logo. Then, open Terminal and use this command to disable SIP:
csrutil disable
Step 5: After disabling SIP, reboot your MacBook. Once it is done, reboot, access, and open Terminal through Launchpad and run the following command to enable NTFS to read and write.
sudo mv /sbin/mount_ntfs /sbin/mount_ntfs.original
sudo ln -s /usr/local/sbin/mount_ntfs /sbin/mount_ntfs
If you have to deal with NTFS files regularly but don't want to use a VM, you can install Windows on your Mac. Apple provides a dedicated utility called Boot Camp to facilitate the installation of Windows. You will need to use the Administrator profile and have the MacBook updated to the latest version. These are steps to use NTFS via the Boot Camp on Mac:
Step 1: Start by downloading the ISO file for Windows from the Microsoft website. After it is downloaded, launch Boot Camp Assistant from "Utilities" in "Applications" on your Mac. Finally, press "Continue" on the intro screen to initiate the process.

Step 2: Now, choose the Windows ISO image and define the partition where you want the Windows to be installed. If you have only one internal disk, use the divider to allocate space to Windows. You need at least 20 GB, while recommended is 55 GB.
Step 3: In case of more than multiple internal disks, choose the desired one and follow on-screen instructions to format the disk. Afterward, follow the instruction to install Windows on your Mac. Once Windows is installed, the Boot Camp on Mac will begin.

Step 4: Install the Boot Camp using the on-screen instructions. Your Mac will restart automatically with Windows. Now connect the NTFS drive to the Mac to access the files.

While you might need clarification about whether can Mac use NTFS, the one thing where you can access and share NTFS files with surety is a cloud service. You can upload the NTFS files through any cloud service like iCloud, Google Drive, or OneDrive. Since iCloud is the default service for Mac users, it is recommended. You can use these steps to move NTFS files to the cloud:
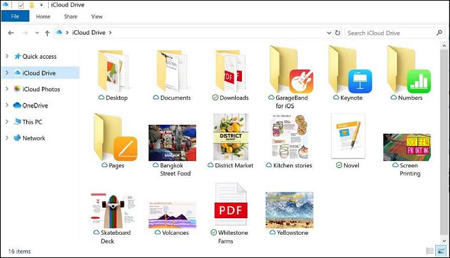
Step 1: After installing Windows on your Mac, open your Windows drive in Finder to access iCloud. Here, copy and paste the NTFS files to the iCloud drive.
Step 2: The files will automatically sync to iCloud once you have copied the files in the drive. To share the file through a link, right-click on the file and select "Share."
Lastly, if the external storage drive matters, not the data, you can format the external hard disk on Mac with a more suitable file system like exFAT Mac. Your Mac provides full support for these file systems, and you can easily read or write files from your external storage drive. The steps needed to use NTFS on Mac by formatting drive are following:
Step 1: After connecting your NTFS hard drive to the Mac, navigate to "Disk Utility" through "Utilities" in the "Applications" and launch it. Select the NTFS drive and click "Erase" from the top bar.

Step 2: In the formatting windows, tap the "Format" option and select your desired file system. Afterward, tap "Erase" to start the formatting process.

In conclusion, NTFS is an overall file system; you will likely need to deal with it as a Mac user. Thus, knowing answers to the questions like can Mac use NTFS and how to use NTFS on Mac is essential.
As we have found in this article, the best and easiest way is to use EaseUS NTFS for Mac. It is a lightweight and secure way to access your MacBook fully NTFS. If you want to learn more information about can Mac use NTFS, click the below links to find the answer:
Can Mac use NTFS? It is a confusing topic, and it is understandable if you have more questions. That's why we have answered a few FAQs from the internet on the topic of can Mac use NTFS below:
1. How to format NTFS on Mac?
Use these steps to format an NTFS drive on your Mac:
Step 1: Connect the NTFS drive to the Mac and launch 'Disk Utility' through 'Applications.' Click 'Erase' and select the desired file format.
Step 2: After selecting the desired file format, click 'Erase' to start the process. Once it is completed, you can use the drive without issues.
2. How to read and write NTFS Mac?
Follow these steps to enable read and write for NTFS on Mac:
Step 1: Launch Terminal and run the sudo nano /etc/fstab command after connecting the NTFS drive to the Mac.
Step 2: Once all the NTFS files are listed, run the command LABEL=NAME none ntfs rw, auto, nobrowse to enable NTFS permissions. Following this, replace the 'NAME' with the drive name.
3. Is NTFS compatible with Mac?
NTFS is incompatible with Mac as it is a file system primarily used in Windows. Since it is a proprietary file system of Microsoft, Apple doesn't have its license. Natively, Mac only provides read-only support for the NTFS file system.
Related Articles - ALSO ON EaseUS SOFTWARE
How to Delete Files from Seagate Exteranl Hard Drive Mac & Windows [2026 Guide]
![]() Banu/2026-01-05
Banu/2026-01-05
Fixed: Can't Add Files to Seagate Hard Drive on Mac
![]() Cici/2025-07-07
Cici/2025-07-07
Can Mac Read exFAT [Quick Answered 2023]
![]() Sherly/2025-06-26
Sherly/2025-06-26
How to Fix Toshiba Read Only on Mac Error in 2026
![]() Banu/2026-01-05
Banu/2026-01-05
Copyright © 2004 - 2023 EaseUS. All rights reserved.


