- Store
-
Support CenterGuides, License, ContactDownloadDownload installerChat SupportChat with a TechnicianPre-Sales InquiryChat with a Sales Rep
This guide provides seven effective methods to mount external hard drive Mac. It will help you overcome persistent problems and smoothly use your external drive on Mac.
Table of Contents
It can be annoying when you intend to access data from your external hard drive but find the drive unmounted to your Mac. You unplug and plug in the drive again, but the system cannot mount it. If you are experiencing a mount external hard drive Mac issue, let us help you to take corrective action to fix it. In this post, EaseUS has covered multiple solutions to make your external hard drive mountable and connect it to access your data seamlessly.
This section will cover seven alternative ways to mount an external hard drive on Mac. You can use any method to resolve the problems with your unmounted hard disk. However, I strongly advise you to consider the first alternative because it provides a professional and effective means of completing the assignment.
Here is a table summarizing the seven approaches we will cover in this section. It includes details such as duration, difficulty level, and effectiveness.
| Workable Solutions | ⏰Duration | 💻Difficulty | 🚀Effectiveness |
|---|---|---|---|
| 5 Mins | Lowest | Highest | |
| 10 Mins | Medium | Low | |
| 15 Mins | High | Low | |
| 8 Mins | Medium | High | |
| 10 Mins | Medium | Medium | |
| 15 Mins | High | Medium | |
| 15 Mins | High | Low |
The easiest method to mount an external hard drive is using EaseUS NTFS for Mac. It is the quickest and most efficient mounter for Mac users to read or write NTFS drives with no hassle. If you are unfamiliar with manual mounting procedures, we recommend you try this mounter tool for minimal delays. It is compatible with all Mac versions that let you mount any NTFS-formatted drive in one click. To avoid data loss after the successful mount of your drive, we advise you to use the safe exit features to prevent potential data loss.
Refer to the detailed instruction below to mount an external hard drive Mac:
Step 1. Launch EaseUS NTFS for Mac on Mac computer, and click "I already have a license" to enter your code for unlocking the software.
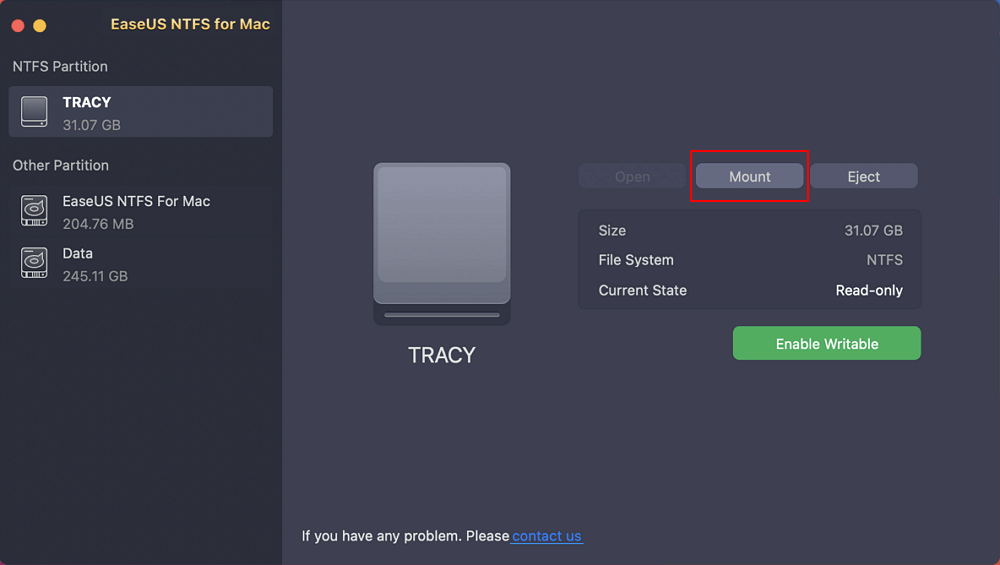
Step 2. Connect your NTFS external storage device to Mac, and let EaseUS NTFS for Mac to detect it. Once it detects your drive, select the drive and click "Mount".
After this, EaseUS NTFS for Mac will mount this drive on Mac and you shall be able to open and view its content.
The Advantages of EaseUS NTFS for Mac:
I highly recommend users try EaseUS NTFS for Mac for trouble-free mounting to NTFS drives on Mac systems.
Relaunching your Finder is another practical way to show your unmounted external hard drive on your Mac. This method is easy to use when your Finder fails to mount your external drives. Here are the steps:
Step 1: Go to Finder and right-click on it.
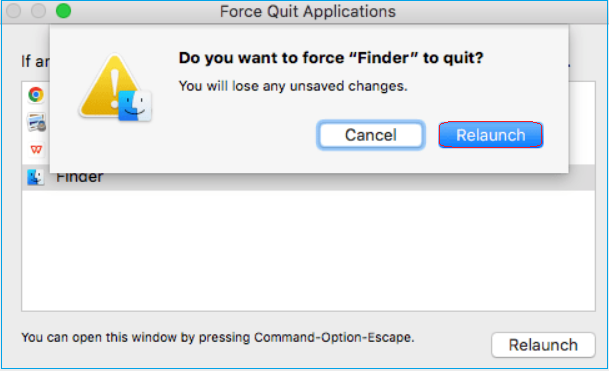
Step 2: Click the "Relaunch" button.
A message will appear "Do you want to force "Finder" to quit?"
Step 3: Select "Relaunch" to confirm the relaunching process.
Your external hard drive may fail to mount due to its unreadable file system. You can resolve the issue by reformatting the hard drive to make it supported by macOS. You can do it using the inbuilt functionality of your Mac. Here is how you can do it:
Step 1: Open "Finder" and select "Utilities" under Applications.
Step 2: Launch the "Disk Utility" app.
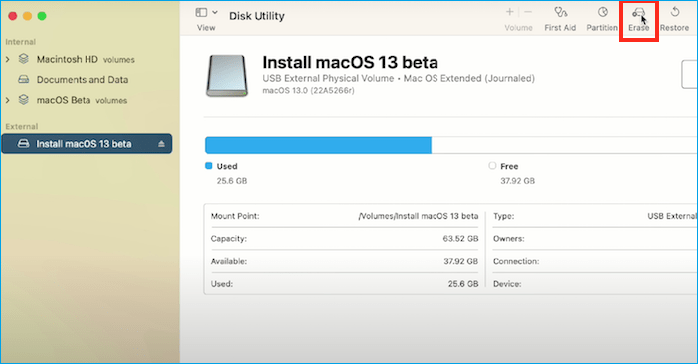
Step 3: Select your unmounted drive under "External" and click the "Erase" button from the top toolbar.
Step 4: Select an appropriate format in the dialog box. We recommend choosing the "Mac OS Extended (Journaled)" file format.
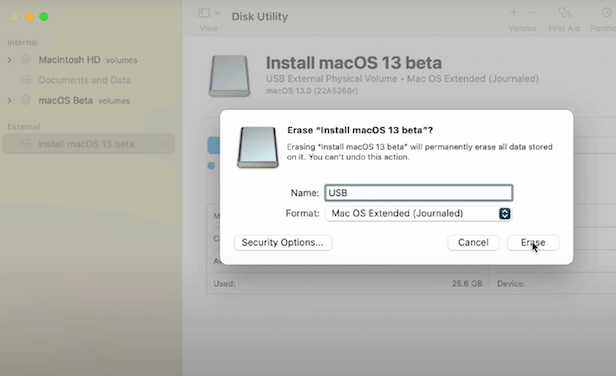
Step 5: Provide a name to your drive, and click the "Erase" button to begin the reformatting process.
Step 6: Click "Done" after the process completion popup appears.

The drive will mount as it includes a Mac-compatible system. Reconnect your external drive to check if it is working.
Adjust the display settings to see if the external drive is mounted in the macOS Disk Utility. The drive may sometimes function properly, but due to optimal display settings, the system fails to detect it. The steps to make your external drive mountable on your Mac are as follows:
Step 1: Click "Finder" from your Mac's desktop.
Step 2: Select "Preferences" under the drop-down menu.

Click preferences to change display settings on Mac.
Step 3: Click the "General" tab and tick the box next to "External disks."

Step 4: Select the Locations section under the Sidebar tab.

Step 5: To mount your desired drive click the checkbox "External disks" in the sidebar of "Finder."
First Aid is an inbuilt Mac utility designed to fix hard drive-related errors. This convenient storage device functionality may quickly check and fix any internal file system problems causing the unmount issue. Let's see how to address this problem with First Aid:
Step 1: Go to "Finder," then "Application," and select "Utilities."
Step 2: Click to launch the "Disk Utility" app.
Step 3: Choose your external hard drive from the left sidebar.
Step 4: Click the "First Aid" option from the top menu.

Step 5: Confirm the repair process by clicking the "Run" button.
Once the process is over, eject your drive and restart your computer. Connect your drive to see if mounted.
Disk Utility offers the "Mount" features to mount the external drive forcefully. However, this method is applicable if the external drive appears on the Disk Utility. The steps below will help you to mount your external hard drive using Disk Utility.
Step 1: Go to Mac Finder and click to open "Applications."
Step 2: Select the "Utilities" option under Application.
Step 3: Choose "Disk Utility" and click "Continue" to proceed.
Step 4: Select the external hard drive from the sidebar and click the "Mount" option from the top menu.
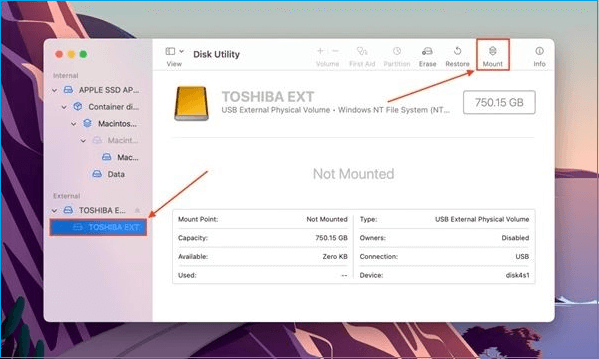
Once the process finishes, your drive will be mounted on the "Finder."
If you are familiar with the basics of computer functioning, you can try using Mac Terminal commands to mount your external drive. The issue can be successfully repaired, although requiring a challenging installation procedure. Connect your external hard drive, then use the instructions in Mac Terminal to mount it.
Step 1: Open "Finder" and click Terminal to run the app.
Step 2: Paste or write the following command in the Terminal window, and hit "Enter."
diskutil list
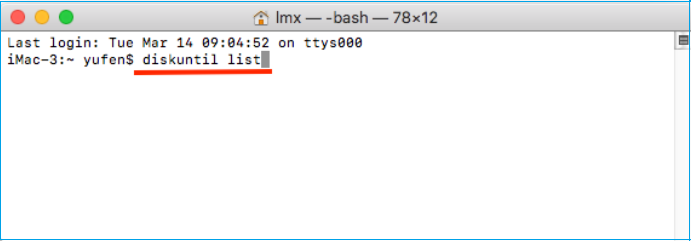
It will show the list of mounted and unmounted devices on your Mac.
Step 3: Find your unmounted external drive on the list.

Step 4: Type the command and hit "Enter."
sudo mkdir /Volume/disk1.
Note* Replace "disk1" with the name of your unmounted drive.

Step 5: Insert the admin password if asked.
Step 6: Type this command and press "Enter" to proceed:
sudo mount -t hfs /dev/disk1 /Volumes/usb
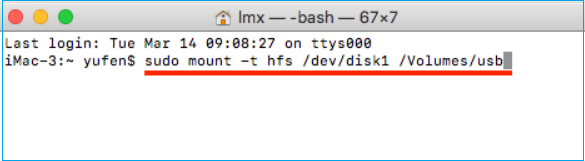
Step 7: Close the Terminal window and see if the drive is mounted successfully.
Mounting an external hard drive on Mac enables macOS to identify and access the file system format. When the external hard drive mounts, it is integrated into the local file system to allow you to access and use the contents of your external disk. This procedure ensures accurate data interpretation and security against data loss when using the drive.
You can share this useful post about mounting an external hard drive on your social media, which can help other users that struggle with the same issue:
You should know why this problem arises even if you have mounted your external on a Mac. Here are a few primary causes why your external hard drive won't mount on a Mac.
Sometimes, dust particles can get into USB connectors or ports. It may reduce the potential of an external hard drive connecting to your Mac's USB ports. Another significant factor that may hinder connectivity is loose USB connectors. As a result of poor connectivity, your Mac might not be able to mount the external disk.
You may have accidentally turned off the display setting for the drive. Due to this, you won't receive any notifications about mounting external USB drives on your Mac since you turned off the display settings. Therefore, you only need to enable the display settings to show the drive.
You may have to check the file system format of the external storage device. Mac will not recognize an external storage device if its file system format is not supported.
A corrupted hard drive is the other common cause of problems mounting an external drive on a Mac. An external hard drive partition can corrupt due to power surges, overheating, or mechanical issues.
To sum up, we have introduced seven sold ways to help you mount an external hard drive on Mac. With these workable solutions, you might no longer find it troublesome to mount an external disk. Among them, EaseUS NTFS for Mac is the most convenient and highly effective tool that enables experienced users and beginners to cope with Mac's unmounted external hard drive issue. Install EaseUS NTFS for Mac and give it a try today. If you want to have a further understanding of other key features of EaseUS NTFS for Mac, read the following related articles:
Please check out this FAQ section for further questions about mounting an external hard drive Mac.
1. How do I mount a USB drive on a Mac?
To mount your USB drive, open Applications under Mac Finder and click "Utilities." Select Disk Utilities > Continue, click your USB drive from the sidebar, and select "Mount" from the top menu.
2. How to access my external hard drive on my Mac?
To access your external drive, connect it to the Mac's USB port. The external hard drive should appear on your desktop or the Finder sidebar. Then, like any other storage device, you may open it and access its data.
3. What does mounting an external hard drive mean?
Making an external hard disk accessible and connected to your computer or other device refers to mounting the drive. You can access the contents of the external hard drive by mounting. It enables the operating system to identify the disk as a storage device.
Related Articles - ALSO ON EaseUS SOFTWARE
Mac Writing to NTFS: How to Enable Mac to Write NTFS
![]() Banu/2025-06-26
Banu/2025-06-26
How to Safely Force Eject External Hard Drive on Mac
![]() Banu/2025-06-26
Banu/2025-06-26
Solved: Can't Save to External Hard Drive Mac
![]() Oliver/2025-11-11
Oliver/2025-11-11
How to Format Disk to NTFS on Mac Using Terminal [2026 Full Guide]
![]() Banu/2026-01-05
Banu/2026-01-05
Copyright © 2004 - 2023 EaseUS. All rights reserved.