- Store
-
Support CenterGuides, License, ContactDownloadDownload installerChat SupportChat with a TechnicianPre-Sales InquiryChat with a Sales Rep
How to change read-only files on Mac? Don't worry. This article focuses on this issue, lists the reasons behind the issue, and provides detailed ways to fix this error.
Table of Contents
According to most Mac users, it is a common error that their files always appear read-only, making things tough. Users can't change the contents or the locations of their files. But take it easy; on this page, you can get three efficient ways to change read-only files on Mac:
Most users will meet the "read-only" error, and there are many causes, such as:
Permission error:
Macs allow users to modify shares and permissions to determine who can edit or delete files or other data on an external hard drive. Therefore, if you make the drive read-only, you cannot write to or modify it on your Mac.
Hard drive internal error:
Sometimes, formatting issues on the external hard drive does not allow the Mac to write or modify it. But be careful when repairing; if you want to reformat the hard disk, it will cause data loss. Click this page to learn how to fix external hard drive read only error without formatting.
NTFS format:
The NTFS file format is one of the common causes of read-only errors on Mac. If the drive is formatted as an NTFS file format, it can only be opened in read-only mode on a Mac. Files on the drive are also in read-only format.
To figure out the cause of the read-only file error, you can open your hard drive again and see if Mac warns you:
After determining the possible reason, try the following fixes in the next part to remove this error.
Following the corresponding method and complete tutorial guide, you can successfully resolve the read-only drive issue of the storage device on Mac. Now we start to learn the first method.
If it's just for permission reasons, you may get an error like "the operation can't be completed because you don't have the necessary permission." We can simply change the disk permission settings from Finder as follows:
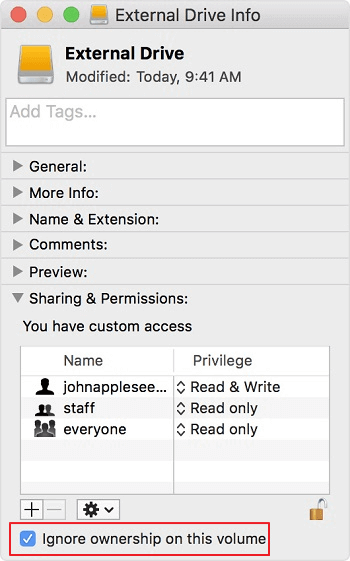
Step 1. Select the external hard drive icon in the Finder sidebar. Then, press Command + I to get information about the drive.
Step 2. At the bottom of the window, click the arrow next to the Sharing & Permissions tab.
Step 3. Choose the Ignore ownership on this volume check box or turn it off. If you want to enable the write mode, it can ask for your Mac's password.
If your Mac says there are formatting issues with your external hard drive, use Disk Utility to highlight and fix those errors with the First Aid option. Here are the steps:
Step 1. Press Command + Space keys and type "disk utility" to search.
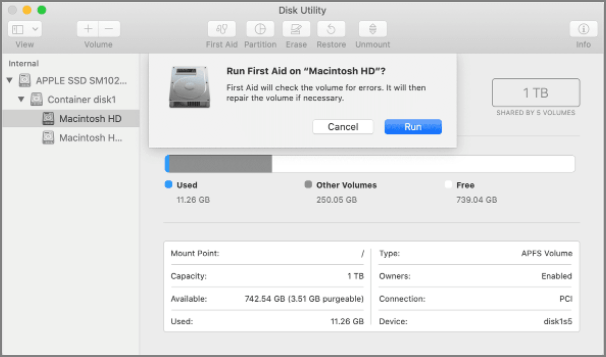
Step 2. Select the target hard drive, click First Aid, and then click Run to locate and fix errors.
On the other hand, you can also try to format the external hard drive to remove the errors. However, you need to be careful if there are important files on your hard drive since formatting makes it easy to lose data. Click the link below to learn more:
How to Format External Hard Drive in Mac (Monterey) 2023 Guide
On this page, we'll discuss when you need to format an external hard drive and show you the complete process of formatting it in Mac Monterey, Big Sur, Catalina, etc.
When your drive is formatted with the NTFS file system, Macs sometimes detect the drive as read-only to protect saved data. Also, when your drive contains important files, you cannot format the drive.
To resolve this issue, you can enable NTFS on your Mac to allow the Mac computer to access the USB drive. To do so, EaseUS NTFS for Mac can help.
Step 1. Launch and activate EaseUS NTFS for Mac. Click "I already have a license" to unlock this software.
Step 2. Connect an NTFS drive to Mac, EaseUS NTFS for Mac will automatically detect the device. Select your drive and you'll see it's now marked as 'Read-only". Click "Enable Writable" to add read and write rights to the drive.
Step 3. When the state of NTFS drives turns into "Writable".
Step 4. EaseUS NTFS for Mac will pops up a window to help Mac get access to the NTFS drive:
Step 5. When EaseUS NTFS for Mac restarts, you can then open to check, read, write, and even modify saved data on the NTFS device.
Read Also:
File read-only error on Mac is 100% fixable. If the problem is with the permission settings, just change them from the Finder sidebar, but if the format incompatibility problem is caused by NTFS, we recommend using EaseUS NTFS for Mac. In addition to read-only errors, EaseUS can also help solve Other hard disk installation and unmount errors. So, if you want to install a hard drive or connect an external hard drive to Mac, try the free trial version of EaseUS NTFS for Mac now.
Files will become read-only once you don't set the correct permission or there is a problem with the file system. Check the answers below to get more details about our topic today:
1. How to change permissions via Terminal?
Follow these steps to use Terminal to change permissions:
Step 1. Open the Terminal application.
Step 2. Type ls –l, and then hit Return. The symbolic permissions of your files will be displayed.
Step 3. Type chmod 755 foldername, and then hit Return again, which changes the permissions to rwxr-xr-x.
2. Why is everything on my Mac read-only?
In addition to your Mac's permission settings, when connecting an external hard drive to Mac, you'll find it set to read-only. This happens because the drive is formatted with Microsoft's NTFS file system, which is not supported by default on macOS.
3. How to change permissions on an external hard drive mac without formatting?
You can change permissions on an external hard drive on Mac without formatting. To do so, follow the steps below:
Step 1. Connect your external hard drive to the target Mac.
Step 2. Right-click on your disk and choose Get Info.
Step 3. On the bottom right corner of the window, you can see a lock icon. Then check the "Ignore ownership of this volume" box. If it's locked, click it to unlock it. Enter the administrator name and password(if asked). Expand the Sharing and Permissions tab.
Related Articles - ALSO ON EaseUS SOFTWARE
Quick Fixes: External SSD Not Mounting Mac
![]() Cici/2026-01-05
Cici/2026-01-05
How to Change Hard Drive from Read Only on Mac [100% Working]
![]() Banu/2026-01-05
Banu/2026-01-05
Can Mac Use NTFS? 2026 Full Guide Here
![]() Cici/2026-01-05
Cici/2026-01-05
5 Quick Fixes - New SSD Not Showing Up in Disk Utility
![]() Sherly/2025-07-07
Sherly/2025-07-07
Copyright © 2004 - 2023 EaseUS. All rights reserved.


