- Store
-
Support CenterGuides, License, ContactDownloadDownload installerChat SupportChat with a TechnicianPre-Sales InquiryChat with a Sales Rep
Are you looking to mount an external hard drive on Mac using Terminal? This article will guide you with proper details and steps to proceed along with an alternative.
Table of Contents
Mac is currently owned and used by millions across the world. This is because Mac is fast, efficient, and a much reliable device when it comes to multitasking or handling complex queries. However, your Mac may need more internal storage with the rise in data and increased use cases. Henceforth, you have to mount an external hard drive Mac Terminal.
This way, you can store your data on an external hard drive. Thus, your Mac will not have low storage issues again, and you can continue to use your Mac for other vital purposes. EaseUS will provide detailed instructions for using Terminal to mount an external hard drive on Mac and introduce its best alternative in this article.
Storage issues on your Mac device can be problematic, especially if you perform heavy-duty tasks like gaming, software development, or video editing that consume a lot of space on your device.
You need to mount an external hard drive Mac Terminal to overcome this issue. But don't know how to use Terminal and what commands are used for this purpose? Follow simple and easy steps here to complete the mounting process:
Step 1: First, connect the external hard drive to Mac PC using the data cable. Afterward, press the "Launchpad" icon in the Dock, type and search Terminal, and click it. This opens the macOS Terminal on your device.
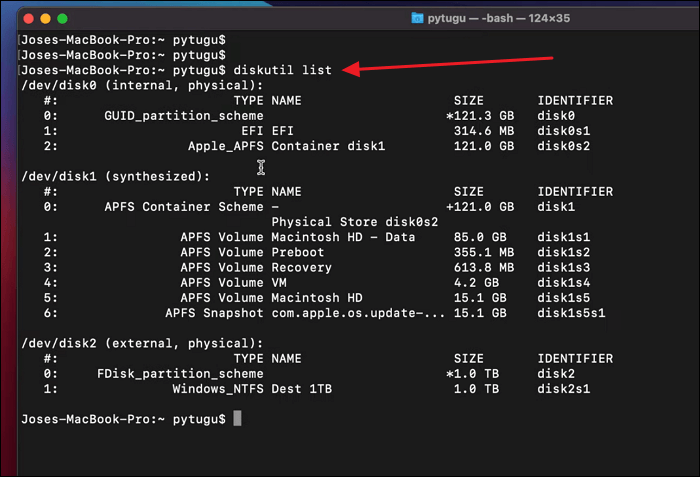
Step 2: Type diskutil list in the command and press "Enter" to list the number of disks, including their disk size and identifier. Next, locate the external hard drive and its identifier because one mistake can corrupt or erase your physical drive data.
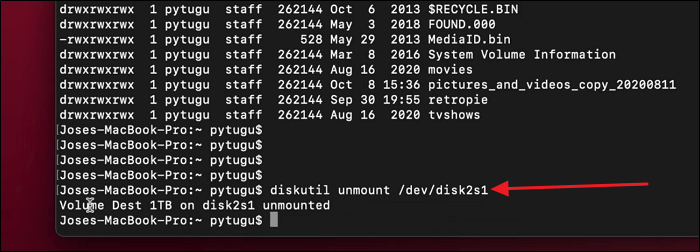
Step 3: Unmount the external hard drive using the diskutil unmount /dev/diskX command and then mount it with the help of the "diskutil mount /dev/diskX" command. The "X" in these commands should be replaced with the identifier you identified in Step 2.
Share this post on your social media to assist other users who want to mount an external hard drive using the Mac terminal:
If you find this method difficult to understand and perform, don't worry because we will also provide the best alternative to Terminal in the next part of this article.
Ideally, the process mentioned above is very complex and time-consuming. Meanwhile, a perfect alternative to the macOS Terminal exists, which is EaseUS NTFS for Mac. Find here the comparison table between the macOS Terminal and EaseUS NTFS for Mac, including detailed information on this fantastic alternative:
| Comparison | Mac Terminal | EaseUS NTFS for Mac |
|---|---|---|
| ⏰Duration | 10-15 Minutes |
3-5 Minutes |
| 🔒Difficulty Level | High | Low |
| 🧰Effectiveness | Low: Complicated process with risks of mistakes | High: Guarantees optimal results with consistency |
| 🧑💼Suitable Users | Developers, experienced users | All users, especially beginners |
NTFS is a file system driver through which macOS can read and write the NTFS drives. EaseUS NTFS for Mac is the software compatible with all external drives, including NTFS-formatted drives. Moreover, the EaseUS NTFS for Mac allows you to quickly and conveniently mount, unmount, copy, write, read, delete, import, and even export files without the need to reformat drives. The software generally comes with a clean interface that leverages easy tool navigation. Thus, you can access different functions and tools without worrying about usability difficulties.
Following are some of the basic instructions that you need to follow to mount your external drive with EaseUS for NTFS:
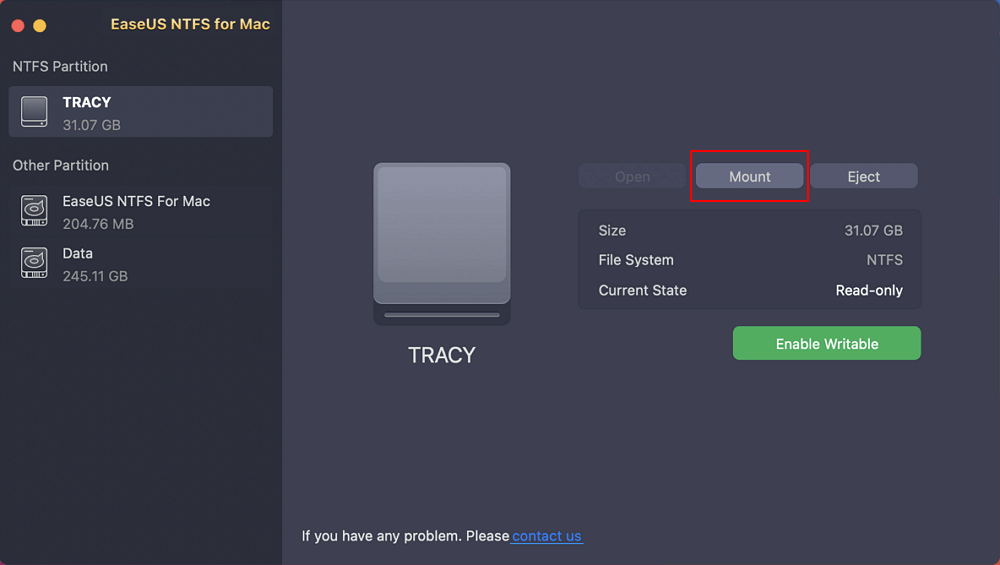
Step 1. Launch EaseUS NTFS for Mac on Mac computer, and click "I already have a license" to enter your code for unlocking the software.
Step 2. Connect your NTFS external storage device to Mac, and let EaseUS NTFS for Mac to detect it. Once it detects your drive, select the drive and click "Mount".
After this, EaseUS NTFS for Mac will mount this drive on Mac and you shall be able to open and view its content.
If you have encountered scenarios that need to use the mentioned features of EaseUS NTFS for Mac, install it and have a try:
Facing low storage issues on Mac is something no one wants to witness. After all, it adds disruption to your daily life workflows. In this regard, an external hard drive is an excellent assistance altogether. This article discussed ways to mount an external hard drive on Mac using Terminal and EaseUS NTFS for Mac. The better and most reliable option is EaseUS NTFS for Mac when mounting an external hard drive Mac Terminal.
The reason behind recommending this tool is that it is easy to use, and even if you are new to the macOS ecosystem, you can quickly learn and use it to perform your tasks easier. Moreover, it will make the data transfer process faster for you. Download this great macOS tool today and make your external hard drives more accessible. Here are some other applicable scenarios of EaseUS NTFS for Mac:
Although this article briefly discussed mounting an external hard drive Mac with a Terminal. If you still need more details, these FAQs will help clear your doubts:
1. How to force unmount an external hard drive in Mac Terminal?
To force unmount the external hard drive on the Mac Terminal, follow the simple and easy steps here:
Step 1: Locate and open the macOS Terminal to start the process. You can access it from the "Utilities" folder within the "Applications" tab by default. You can also use Spotlight search by pressing the "Command + Space" keys and typing Terminal. Continue to type the command diskutil list.
Step 2: Once you've identified the external hard drive's identifier, use the diskutil command with the "unmountDisk" option to force unmount it. The final command for this process would be diskutil unmountDisk force /dev/diskX, where replace "X" with the identifier.
2. How to manually mount a USB drive on a Mac?
To manually mount a USB drive on the Mac device, these steps will help you move forward:
Step 1: Move into the "Utilities" on your Mac and select "Disk Utility." Press the "View" option and choose "Show all devices."
Step 2: Click on the name of your USB flash drive and choose "Mount" from the menu at the top.
3. How to fix my external hard drive not detected on my Mac?
After connecting the external hard drive to the Mac, it should appear automatically in the Finder under the Locations section. However, in most cases, the hard drive fails to get detected. But how to fix this issue? These steps can be of great assistance to you in this matter:
Instruction: Move into the "Preferences" category from the Finder menu. From the "General" tab, the tick marks the external disks option. The external drives will get detected and start appearing on the system.
Related Articles - ALSO ON EaseUS SOFTWARE
How to Change Read and Write Permissions Mac [Step-by-Step]
![]() Cici/2026-01-05
Cici/2026-01-05
Quick Fixes: External SSD Not Mounting Mac
![]() Cici/2026-01-05
Cici/2026-01-05
How to Delete Files from Seagate Exteranl Hard Drive Mac & Windows [2026 Guide]
![]() Banu/2026-01-05
Banu/2026-01-05
How to Force Erase Disk Mac Terminal [Quick Guide]
![]() Cici/2025-11-11
Cici/2025-11-11
Copyright © 2004 - 2023 EaseUS. All rights reserved.