- Store
-
Support CenterGuides, License, ContactDownloadDownload installerChat SupportChat with a TechnicianPre-Sales InquiryChat with a Sales Rep
Are you going to format NTFS drive on Mac? Here is a detailed procedure; check this guide to avoid any data loss before getting started.
Table of Contents
Imagine a situation where one might have brought a new external hard drive or an SSD for use on a Mac. But, somehow, you find that the drive fails to work on the Mac device, and you may get frustrated. Have you ever found out what stops the drive from working on Mac? Well, it is formatted with the Windows NT File System or NTFS. The Mac systems do not work with the NTFS drives, and thus it may be needed to format them to some other supported format. In this post, we will learn how to format the NTFS drive to work on Mac.
It may be essential to enable the read and write support for the NTFS drive on Mac. If you want to make the NTFS drive work on the Mac device, you need to format it to a compatible format. But before formatting it, it should be essential to back up the data on the drive.
But, how would it be possible to enable the read and write functionality for the NTFS drive on Mac when a mac device will not detect and work with Mac? This is where a tool such as EaseUS NTFS for Mac can come in quite handy. It does enable the read and write capability on the NTFS drive on your Mac device. The best part with the tool is that it enables the capability for seven days under the free plan. Beyond that, it is advisable to subscribe to the paid choices.
Some of the advanced features that you can get access to on the EaseUS NTFS for Mac can be summarised as:
You would find it providing access to a much faster speed to access your files on the NTFS drive. A safer data transfer coupled with a seamless user experience should make it one of the unique options ever.
Developed with the experience of over 17 years in file management and data recovery services, the EaseUS NTFS for Mac should be a perfect choice for practically every requirement in taking control over the NTFS drive, even on Mac. Although the NTFS drive is not fully compatible with a Mac, the software tool should be pretty practical and helpful in almost every respect. A powerful solution trusted by more than 530 million customers, it is 100 percent secure in almost every respect. You would also get access to complete technical support for almost every need that you may have.
Step 1. Launch and activate EaseUS NTFS for Mac. Click "I already have a license" to unlock this software.
Step 2. Connect an NTFS drive to Mac, EaseUS NTFS for Mac will automatically detect the device. Select your drive and you'll see it's now marked as 'Read-only". Click "Enable Writable" to add read and write rights to the drive.
Step 3. When the state of NTFS drives turns into "Writable".
Step 4. EaseUS NTFS for Mac will pops up a window to help Mac get access to the NTFS drive:
Step 5. When EaseUS NTFS for Mac restarts, you can then open to check, read, write, and even modify saved data on the NTFS device.
Once the data has been backed up on the NTFS drive on the Mac, you can choose to format it to the compatible format to be used on the Mac without any issues. One of the excellent methods for formatting the NTFS drives is to use EaseUS NTFS for Mac. And another is the built-in tool - Disk Utility.
The best format for use on a Mac should ideally be FAT32. It can be one of the excellent and simple options that can be put to practical use for saving your data on a mac. Here are the steps to format NTFS on Mac:
As a reliable third-party software, EaseUS NTFS for Mac can solve all the problems of incompatibility between macOS and NTFS format. You can use this tool to enable NTFS format before formatting it to FAT32 format by following the steps below:
Step 1. Launch EaseUS NTFS for Mac on an Mac, click "I already have a license" to activate this software.
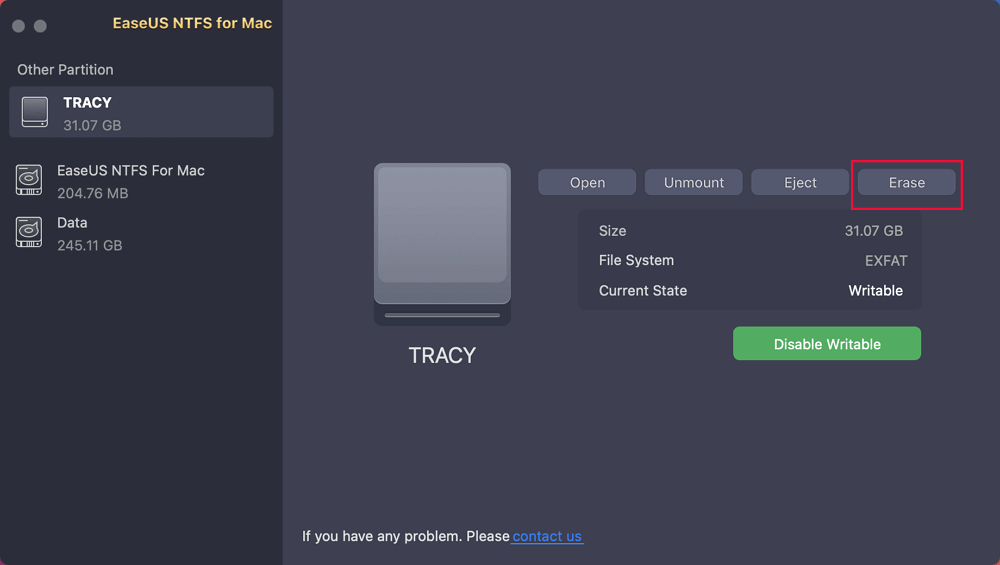
Step 2. Select target disk drive or removable device you tend to erase on the left side, and click "Erase" to continue.
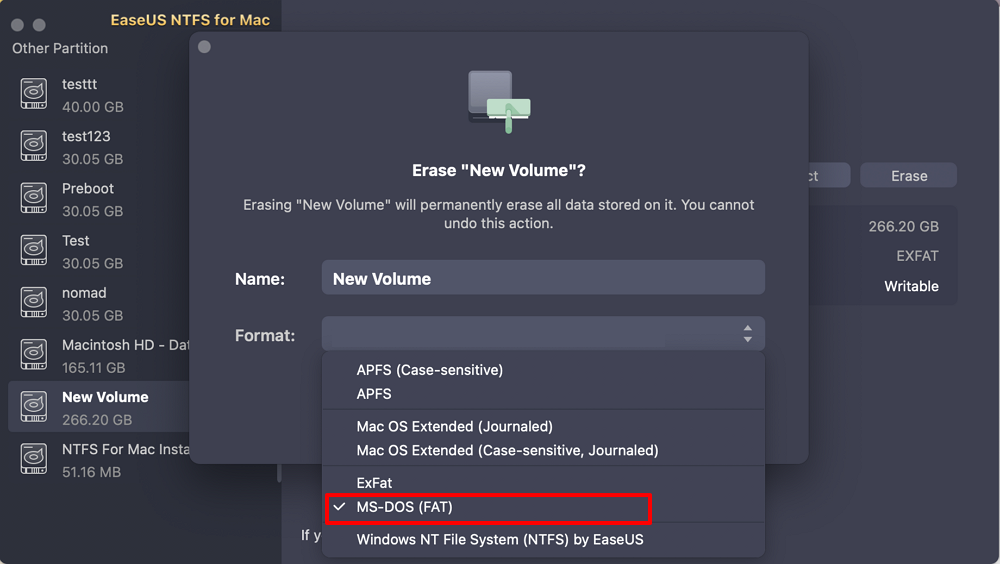
Step 3. From the drop-down box, select "MS-DOS(FAT)" as the target file system.
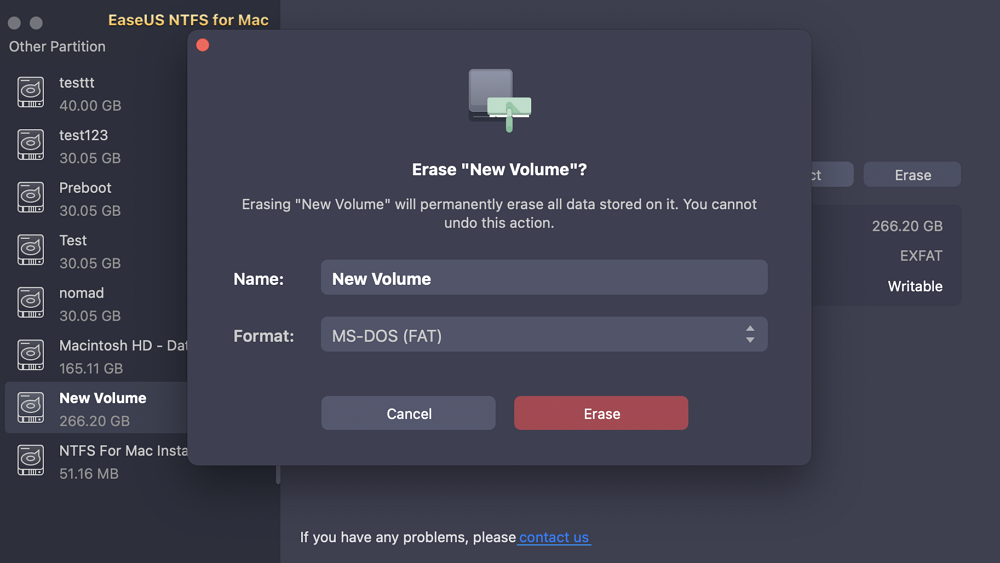
Step 4. Click "Erase" to confirm the formatting action and start erasing your target device to FAT file system.
Here is how to format NTFS on Mac using the disk utility –
Wait patiently to get the delete and format process on the drive. Please note that all of your existing data on the drive will be erased.
If you are a regular user of Mac, it is important to be aware that the NTFS drivers do not work with Mac devices perfectly. If you want to get a Mac device to read or write to NTFS devices, you are expected to use third-party software for the purpose. If anybody wants to continue using NTFS drive on their Mac, the best option should be to format it to the compatible file format. The Disk Utility on the Mac should be one of the unique options that can prove helpful in formatting the NTFS drive for free. It is also a perfect and uncomplicated way to format the drive compatible with Mac devices.
However, there are chances that one would not be using the NTFS drive only on the Mac. If you are likely to use it on both Mac and Windows PCs and do not want to format the NTFS drive, EaseUS NTFS for Mac should be the best bet for enabling the read and write support for the NTFS drive on Mac. With the help of EaseUS NTFS for Mac, you can gain complete control over the NTFS drives on the Mac.
Related Articles - ALSO ON EaseUS SOFTWARE
NTFS-3G for macOS Free Download and Install Tutorial
![]() Banu/2025-06-26
Banu/2025-06-26
Sabrent External Hard Drive Not Recognized Mac | 5 Solutions
![]() Oliver/2025-06-26
Oliver/2025-06-26
How to WD Elements Not Showing up Mac [2025🔥]
![]() Cici/2025-06-26
Cici/2025-06-26
How Do I Wipe a NTFS Drive on Mac and Windows [2023 Guide]
![]() Daisy/2025-06-26
Daisy/2025-06-26
Copyright © 2004 - 2023 EaseUS. All rights reserved.