- Store
-
Support CenterGuides, License, ContactDownloadDownload installerChat SupportChat with a TechnicianPre-Sales InquiryChat with a Sales Rep
If you just bought a Sabrent external drive for your Mac computer, but it doesn't show up on your Mac, what can you do? Continue reading this post, and find your solutions to resolve the 'Sabrent external hard drive not recognized Mac.'
Table of Contents
If you have purchased a Sabrent HDD or SSD recently and find it not detected by your Mac desktop or laptop, you are in the right place. Here in this article from EaseUS, you will get 5 solutions to fix the problem and full control over your Sabrent hard drive on Mac. Now, read on and learn how to resolve the "Sabrent external hard drive not recognized Mac."
| Workable Solutions | Step-by-step Troubleshooting |
|---|---|
| Solution 1. Check the Cable | Under this circumstance, you should check if the...Full steps |
| Solution 2. Adjust Finder Preferences | Step 1. Locate Finder on the menu bar and open it. Step 2. Select "Preferences."...Full steps |
| Solution 3. Mount Sabrent Drive |
Step 1. Launch EaseUS NTFS for Mac on Mac computer, and click "I already have a license" to...Full steps |
| Solution 4. Run First Aid |
Step 1. Connect Sabrent external hard drive to Mac properly. Step 2. Open Disk Utility under...Full steps |
| Solution 5. Use Terminal to Eject Sabrent Drive |
Step 1. Open Terminal under Utilities. Step 2. Type diskutil list. Then...Full steps |
Sometimes, users encounter this problem simply because of the bad connection of the hard drive cable. Under this circumstance, you should check if the cable is properly inserted into the correct port. Try reconnecting the cable and restarting the Mac to see if your hard drive will show up normally.
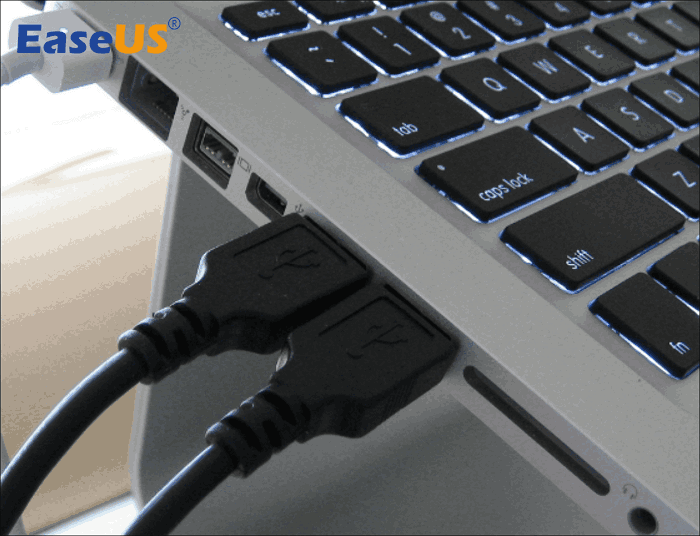
However, if the cable is too old or damaged, you'll be unable to access the Sabrent hard drive properly.
Another possible reason why your external hard drive is not showing up is that you mistakenly configured the settings in Finder. Incorrect settings may prevent the hard drive from displaying on the desktop. Fortunately, you can adjust the preferences in Finder manually and fix the issue easily.
Step 1. Locate Finder on the menu bar and open it.
Step 2. Select "Preferences." Choose the "General" tab and tick the items to show external disks on your desktop.
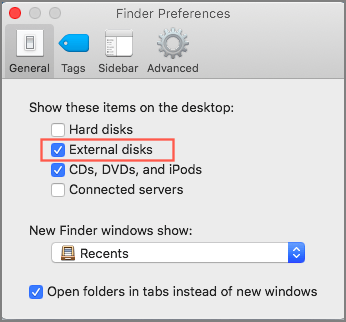
After this, you should be able to see your Sabrent external hard drive on the desktop as long as it's a healthy disk.
Before you can access the external hard drive on macOS, you will be required to mount the external drive on Mac. As a macOS built-in tool, Disk Utility offers many functions to help users resolve various Mac issues. However, if it's an NTFS format drive, it cannot be mounted in a writable mode for Mac via Disk Utility. Hence, we recommend you use a professional tool - EaseUS NTFS for Mac.
This software is more powerful than Disk Utility since it can mount the NTFS drive on Mac and enable writable for it in a few clicks. Below are the steps to mount the Sabrent drive.
Step 1. Launch EaseUS NTFS for Mac on Mac computer, and click "I already have a license" to enter your code for unlocking the software.
Step 2. Connect your NTFS external storage device to Mac, and let EaseUS NTFS for Mac to detect it. Once it detects your drive, select the drive and click "Mount".
After this, EaseUS NTFS for Mac will mount this drive on Mac and you shall be able to open and view its content.
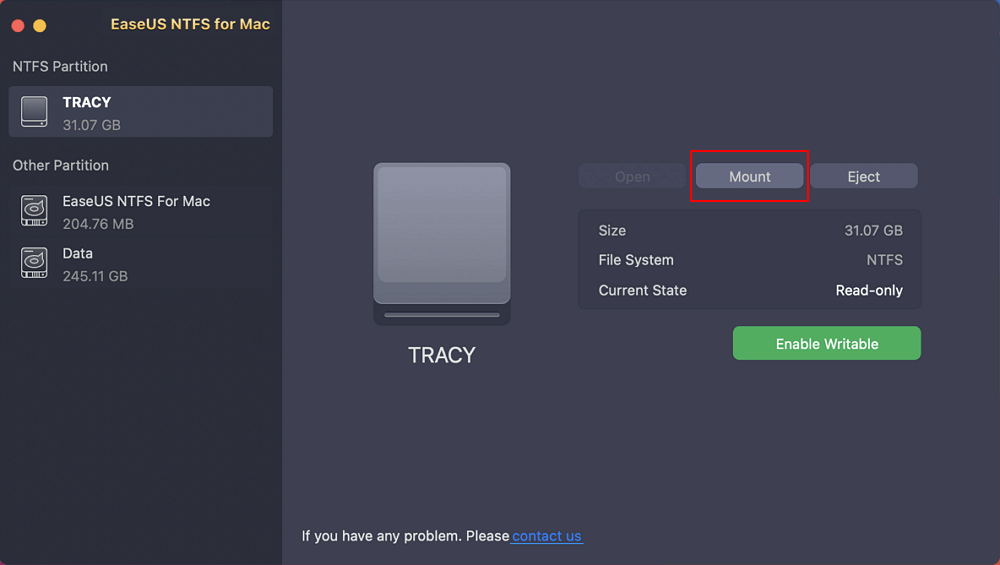
The Sabrent drive should be visible right now. However, you may have no permission to write to the external hard drive now. If you need to access the NTFS drive edit and write files in it, you should give read and write rights to the drive. Here's the guide on enabling writable for your NTFS drive via EaseUS NTFS for Mac.
Step 1. Launch and activate EaseUS NTFS for Mac. Click "I already have a license" to unlock this software.
Step 2. Connect an NTFS drive to Mac, EaseUS NTFS for Mac will automatically detect the device. Select your drive and you'll see it's now marked as 'Read-only". Click "Enable Writable" to add read and write rights to the drive.
Step 3. When the state of NTFS drives turns into "Writable".
Step 4. EaseUS NTFS for Mac will pops up a window to help Mac get access to the NTFS drive:
Step 5. When EaseUS NTFS for Mac restarts, you can then open to check, read, write, and even modify saved data on the NTFS device.
Now, you have full access to the file. You are allowed to edit, delete files, or move files between the NTFS drive and your Mac computer.
Feel free to share this convenient tool with your friends who also use macOS.
If the external drive is still not recognized by Mac, you are probably dealing with a disk error. To fix issues like this, you can resort to First Aid. It can detect faults on your disk that prevent the Sabrent external hard drive from being mounted on your Mac and fix them automatically. Here are the steps to run First Aid.
Step 1. Connect Sabrent external hard drive to Mac properly.
Step 2. Open Disk Utility under Utilities.
Step 3. Select the target external hard drive and hit "First Aid" on the top.
Step 4. Hit "Run" to perform First Aid on your drive. After that, click "Done" to finish the process.
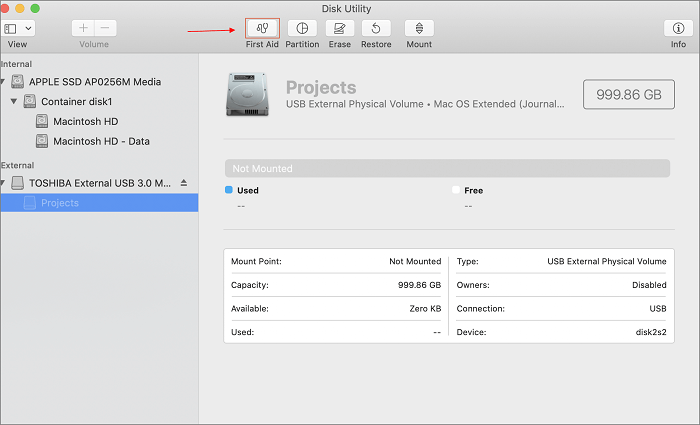
Step 5. Safely eject the external drive and restart the computer. Then, reconnect your external hard drive to your Mac.
You should be able to see the external hard drive on the desktop now.
Read also:
As a Mac built-in utility, Terminal is a powerful but complicated utility that can configure your Mac computers and storage devices. But do not worry. We will show you a detailed guide on how to use it in the following content.
Step 1. Open Terminal under Utilities.
Step 2. Type diskutil list. Then, locate /dev/diskX (external, physical)
("X" represents the digit of your disk.)
You will now see the information about the Sabrent hard drive if it's recognized by the system.

Step 3. Type diskutil eject diskX to eject the disk.

Step 4. Disconnect your drive and reconnect it if the drive information is still on the diskutil list.
Then, you should be able to see the external hard drive display on the desktop.
If this article is helpful on Sabren external hard drive not recognized on Mac, don't forget to share it on your social media!
This article offers 5 solutions to help you resolve the Sabrent external hard drive not recognized on Mac. From the simple check to the complex Terminal, each is practical and allows you to fix the issue from different directions.
If you are unfamiliar with macOS or looking for a simple way to resolve the problem, EaseUS NTFS for Mac is your best choice. It has a friendly interface and comprehensive functions that can help you manage the storage devices for your Mac. Download it now and get a better experience on Mac.
If you still have other questions, you can check the FAQs here. You may find something you are interested in.
1. Why is my external hard drive not readable on Mac?
If you use an external hard drive formatted in NTFS, you will encounter the "USB not readable Mac" issue. Commonly, Mac users have to use an external hard drive, SD card, USB streak drive, or different gadgets that are formatted in the FAT32 file system.
2. How do I initialize a new external hard drive on a Mac?
You can initialize a new external hard drive on Mac via Disk Utility.
3. Can macOS write on NTFS?
By default, devices formatted in NTFS are restricted on macOS. You have to use third-party software like EaseUS NTFS for Mac to enable NTFS writing permission on Mac.
Related Articles - ALSO ON EaseUS SOFTWARE
Solved: Can't Delete Photos From SD Card on Mac - 2023 New
![]() Sherly/2025-11-11
Sherly/2025-11-11
Mac Writing to NTFS: How to Enable Mac to Write NTFS
![]() Banu/2025-06-26
Banu/2025-06-26
Toshiba NTFS Driver for Mac! Enable Read and Write Toshiba External Hard Drive
![]() Banu/2025-11-11
Banu/2025-11-11
3 Reliable Ways to Format SD Card to FAT32 on Mac
![]() Banu/2025-11-11
Banu/2025-11-11
Copyright © 2004 - 2023 EaseUS. All rights reserved.