- Store
-
Support CenterGuides, License, ContactDownloadDownload installerChat SupportChat with a TechnicianPre-Sales InquiryChat with a Sales Rep
If you are unable to see your LaCie hard drive on your Mac's desktop, check out the easy solutions to fix LaCie hard drives not showing up on your Mac.
Table of Contents
LaCie is a popular external hard drive brand. It is compatible with all the leading devices and performs very well with swift raw transfer speed.
LaCie is the main peripheral interface standard in the Apple Computer. But Apple users still can encounter the LaCie hard drive not showing up on your Mac issue.
It is annoying when you can't access your external hard drive on your computer. But you can fix this problem by using the following options:
Usually, when you insert a LaCie hard drive or any other external drive into your Mac, it appears on the desktop or in the left column below the device.
However, sometimes your external hard drive isn't recognized by your Mac or LaCie drive can't be displayed in Disk Utility. This, in return, can create the problem of the LaCie hard drive not showing on your Mac.
There are many reasons behind LaCie hard drive not appearing on your computer, such as:
However, it isn't that hard to fix the LaCie hard drive not showing up on Mac. There are many ways to fix this problem, and here, some of the best solutions are discussed ahead for you to try.
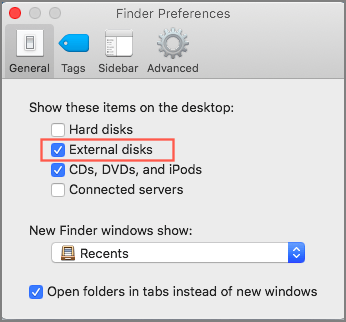
When you connect the LaCie hard drive to your Mac, it shows up in Finder under the Locations. However, if Finder doesn’t detect your external hard drive, you have to change a few settings in Preferences. Here's how you can edit the Finder Preferences:
Step 1. Navigate to the Finder menu > Preferences.
Step 2. Click on the External disks under the General tab to make sure that it shows up on the desktop.
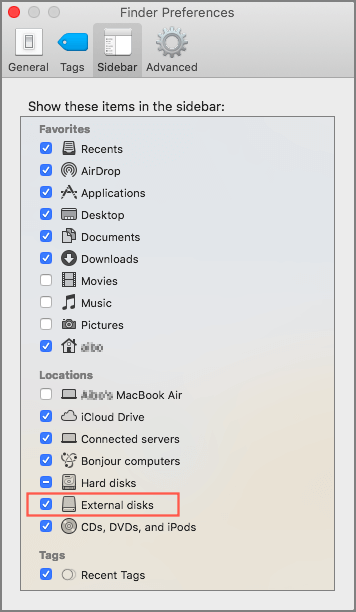
Step 3. Under the Sidebar tab, select which folders and external devices to show up in the left-hand column in the Finder window.
In most cases, small problems like a damaged USB cable or unstable power supply are why LaCie does not show up on Mac. Therefore, you should first run some basic checks before trying other options to fix the problem. The common basic checks you should do are:
When basic checks don't fix the hard drive not showing up the issue, you can try disconnecting the drive and again remounting it via Terminal. Here's how you can fix a hard drive via Terminal:
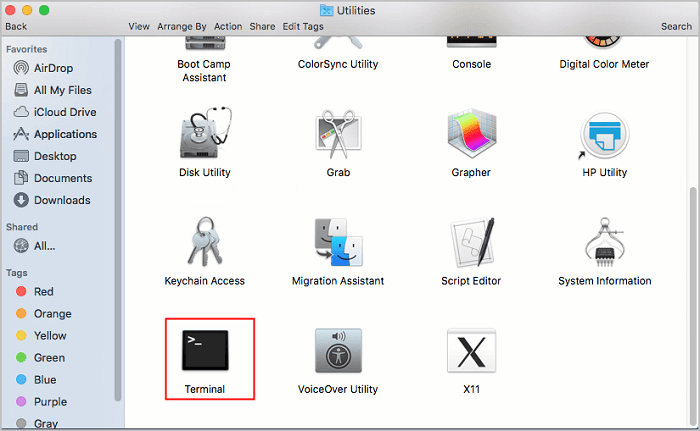
Step 1. Go to the Finder > Application > Utilities > Launch Terminal.
Step 2. Type diskutil list and hit the Return key on your keyboard. Now, all the mounted drives list will appear on your screen.
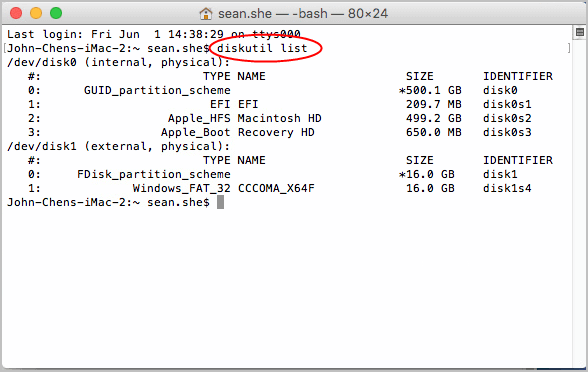
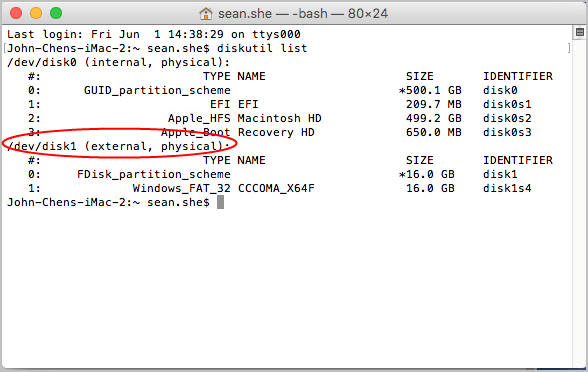
Step 3. Find dev/disk[number] (external, physical). The number depends upon the specific numerical digit allotted to the LaCie drive by your system. Remember this number as you will be required in the next steps.
Step 4. Type diskutil info disk[number], hit the Return key. Change the number with the number representing your external disk, such as 1, 2, etc.
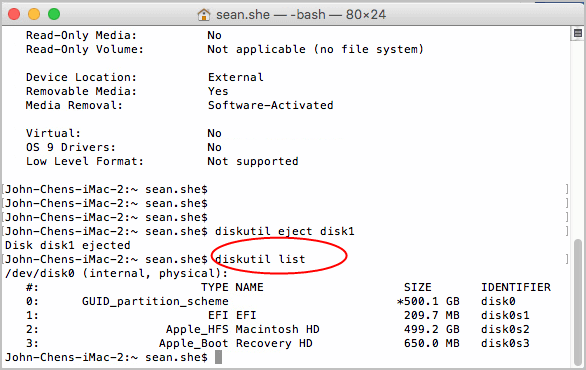
Step 5. Now, type diskutil eject disk[number], press the Return key. After this, the drive will eject to your Mac.

Step 6. Once again, type diskutil list, but this time you won't see dev/disk[number] (external, physical).
Step 7. Remove the LaCie hard drive and reconnect to your Mac. This will probably show up on the hard drive on your desktop.
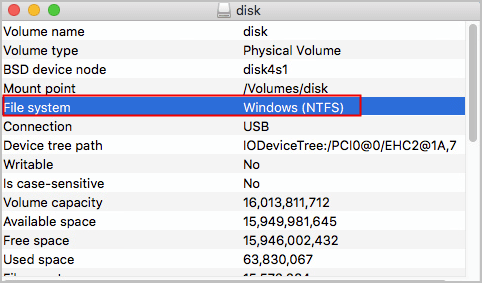
If your LaCie drive is formatted in NTFS, your Mac won't recognize it. That's because the NTFS format is not officially supported by OS X.
Foremost, you should check whether your drive is NTFS formatted or not. To do so:
Step 1. Go to the search icon on your desktop and click on open the Spotlight Search.
Step 2. Enter Disk Utility and press the Return key.
Step 3. On the Sidebar, select the Info tab.
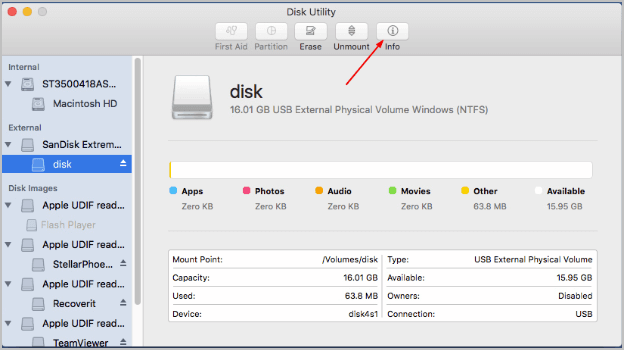
Step 4. Check if the File system says Windows (NTFS).
When it confirms your LaCie hard drive is in NTFS format, you have two options to fix this:
EaseUS NTFS for Mac is a powerful software that can mount and unmount your Windows NTFS volumes from your Mac status bar. It also allows you to read and write NTFS formatted external drives on your Mac. This software offers 7 days free trial for zero cost that you can book today.
EaseUS NTFS for Mac offers many great features, like:
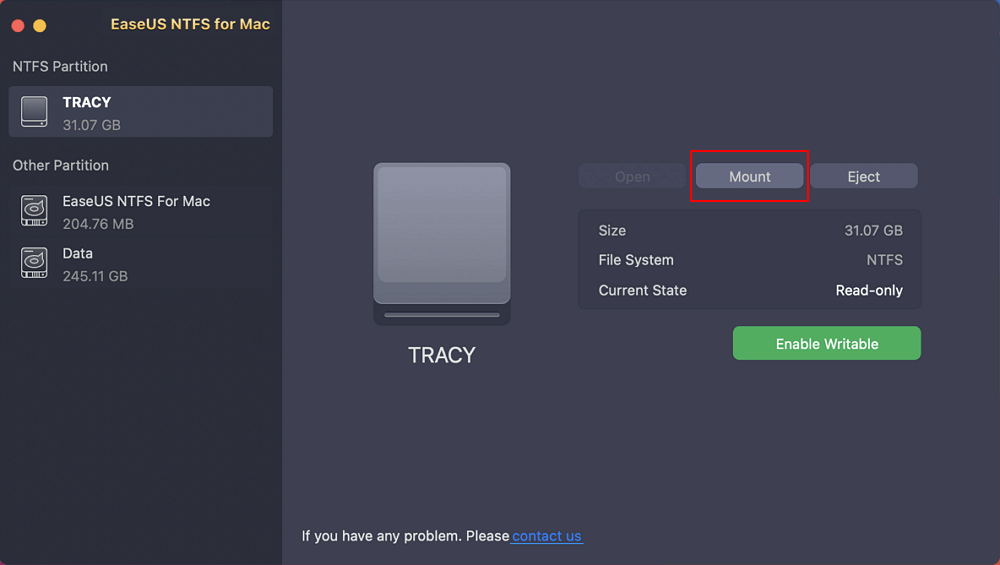
Step 1. Launch EaseUS NTFS for Mac on Mac computer, and click "I already have a license" to enter your code for unlocking the software.
Step 2. Connect your NTFS external storage device to Mac, and let EaseUS NTFS for Mac to detect it. Once it detects your drive, select the drive and click "Mount".
After this, EaseUS NTFS for Mac will mount this drive on Mac and you shall be able to open and view its content.
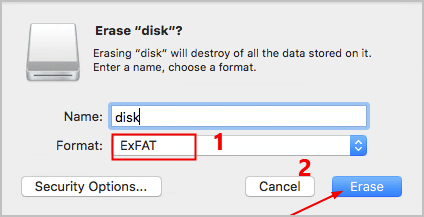
Using the Disk Utility, you can also convert NTFS formatted drives to the Mac-friendly format. However, this method can delete all the data present on your drive. So, if you don't have any important data on your LaCie drive, you can follow these steps to show:
Step 1. Launch Disk Utility > Select Erase tab from the Sidebar.
Step 2. Choose the ExFAT format and click on the Erase. The process will take a few minutes to complete. Check if the external drive appears now.
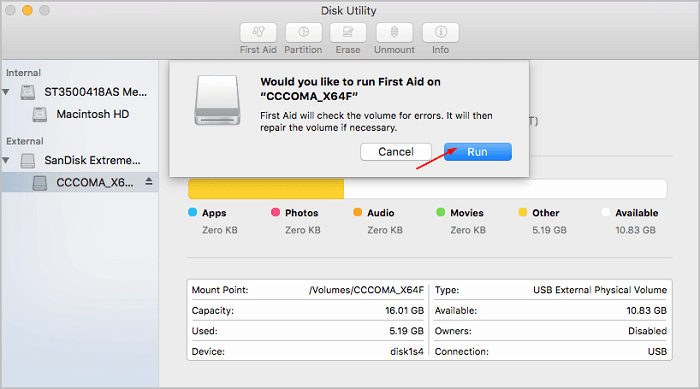
If the corrupted files are the problem here, you can run First Aid to repair the issue. For this, follow these steps:
Step 1. Launch Disk Utility.
Step 2. Select the external drive from the left pane and click on the First Aid tab.
Step 3. Click on the Run to repair the errors. This must show LaCie on your Mac.
The LaCie hard drive might be one of the most popular and expensive hard drives in the market. But if it's optimized for NTFS format or your Mac's flash port is damaged, the LaCie hard drive will not show up on your Mac.
Therefore, always make sure your LaCie drive, Mac settings, and other hardware are fully optimized.
If you need help with mounting or unmounting NTFS drives, you can easily install EaseUS NTFS for Mac and smoothly connect the LaCie hard drive to your Mac.
Related Articles - ALSO ON EaseUS SOFTWARE
How to Format Disk to NTFS on Mac Using Terminal [2026 Full Guide]
![]() Banu/2026-01-05
Banu/2026-01-05
How Do I Wipe a NTFS Drive on Mac and Windows [2023 Guide]
![]() Daisy/2025-06-26
Daisy/2025-06-26
NTFS-3G for macOS Free Download and Install Tutorial
![]() Banu/2026-01-05
Banu/2026-01-05
How to Use G-Drive External Hard Drive on Mac [Set Up Guide]
![]() Banu/2025-06-26
Banu/2025-06-26
Copyright © 2004 - 2023 EaseUS. All rights reserved.