Is your USB drive not working properly? Are you looking to fix your slow USB drive? Here's how to format USB drive on Mac to solve any drive-related errors that you may face on Macs.
Table of Contents
Have you ever experienced a sluggish USB drive on your Mac that needs a full reset? Moreover, formatting is frequently necessary for the FAT32 file system to guarantee that USB drives work with Mac and Windows computers. However, formatting to FAT32 on Mac can be challenging due to it not being a native file system.
But you do not have to worry because you have come to the correct place if you have ever wondered how to format a USB drive on a Mac. EaseUS will assist you in three effortless ways in this article, so don't worry if it seems a little complex.
Have you ever wondered which file system is best for your Mac computer? The purpose of this part is to assist you in exploring different popular file systems so that you may choose the one that best meets your needs.
It is necessary to know what options are available when formatting your disk. Generally, the following file systems are used with USB flash devices:
Now, you will see some social sharing buttons that can help you spread this guide to other users who have the same trouble:
You will walk through the detailed process of formatting a USB drive on your Mac here. This section offers everything you need to revive your USB drive and make it work with different operating systems. Unfortunately, formatting will erase any essential data on the drive, so backup everything before you begin.
So, grab your Mac computer and the USB drive you wish to format, and get ready to discover how to format a USB drive on a Mac:
The first method to format your USB drive on a Mac is EaseUS NTFS for Mac. This professional Mac disk format tool is your answer to hassle-free USB drive formatting. With this tool, you can easily tackle compatibility issues between Mac and Windows systems. As an effective and fast third-party tool, it enables you to easily edit, remove, and write files on NTFS devices.
The program also excels at ejecting NTFS drives safely and without data loss, and it is 100% compatible with the newest M1/M2 Macs and macOS Ventura 13.0. So, what are you holding out for? Download this program from the official EaseUS NTFS for Mac website:
Follow the steps below to learn how to format a USB drive on Mac using this tool:
Step 1. Launch EaseUS NTFS for Mac on Mac computer, click "I already have a license" to activate this software.
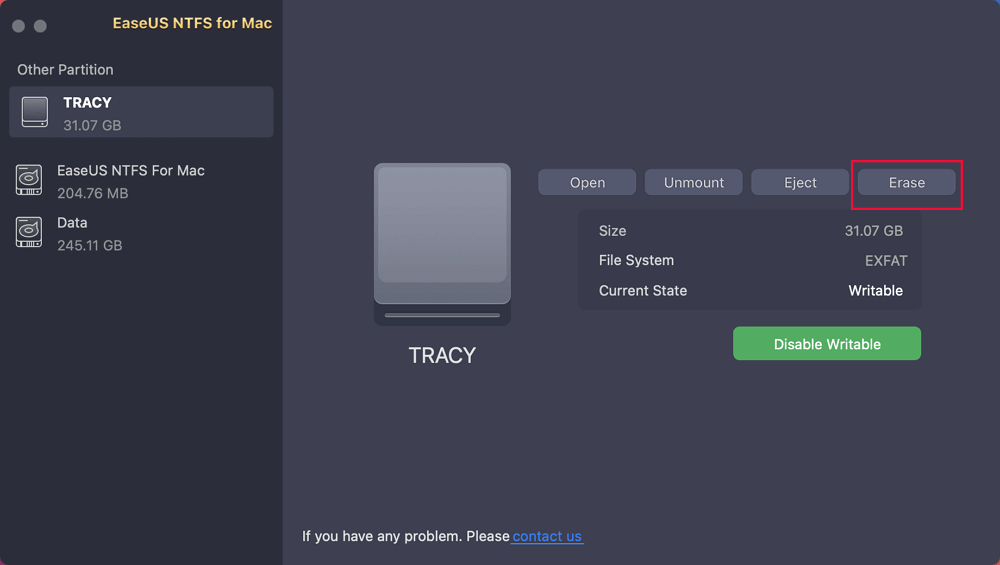
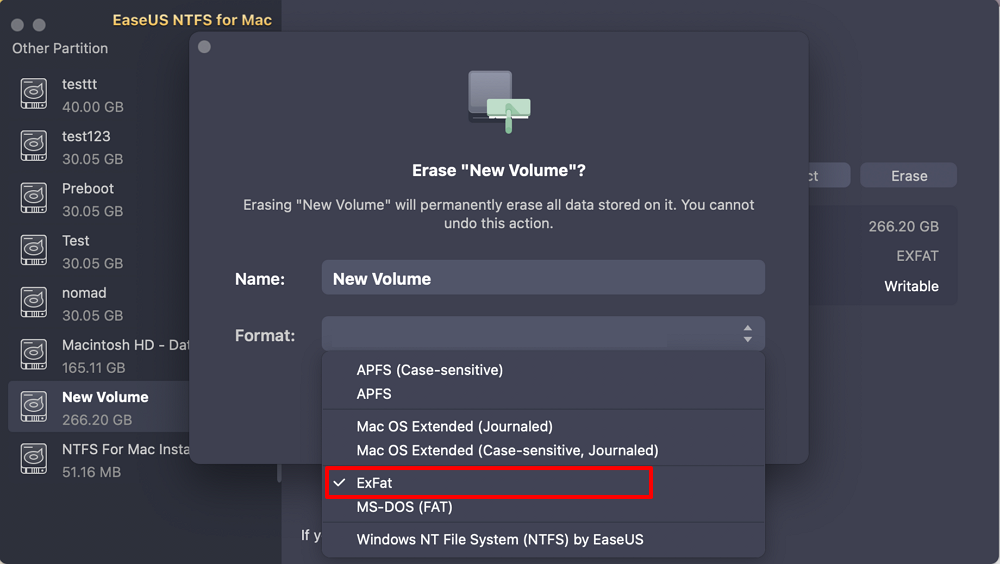
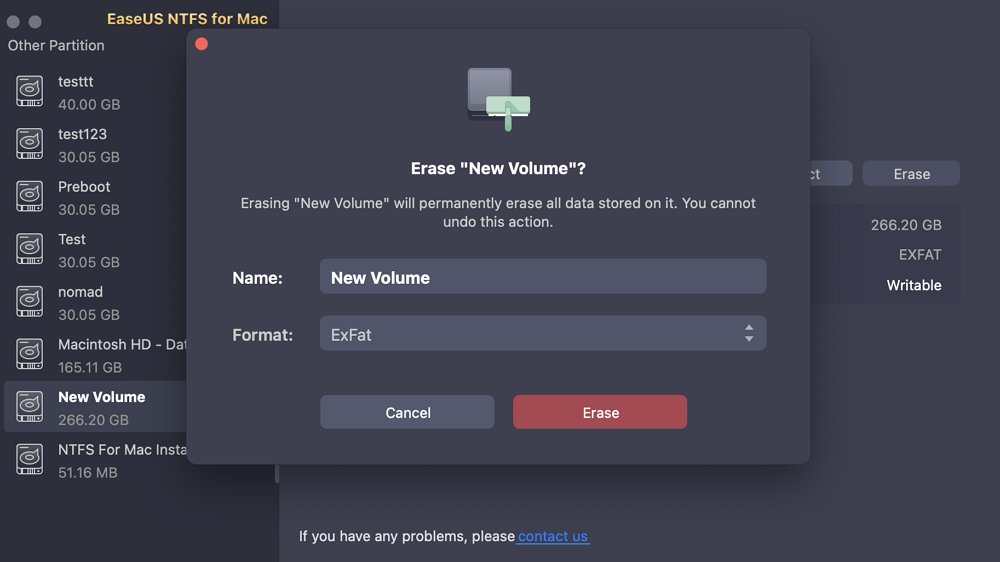
Step 2. Select target disk drive or removable device you want to erase, and click "Erase."
Step 3. In the Format section, select ExFAT as your target file system from the drop-down box.
Step 4. Click the "Erase" button to confirm the format process and erase all data stored on the external storage device.
Don't hesitate anymore. Try this versatile software today:
Disk Utility is another option for formatting a USB disk on a Mac. While it isn't as easy to use as EaseUS NTFS For Mac, it's still a good alternative for individuals who prefer native Mac solutions.
Follow the steps given below to apply disk utility:
Step 1. Connect your USB drive to your Mac.
Step 2. Open Disk Utility and select your USB drive from the given list on the left in its window.
Step 3. Click the "Erase" button at the top.

Step 4. Choose a format for your USB drive, such as FAT32, exFAT, or Mac OS Extended (Journaled).
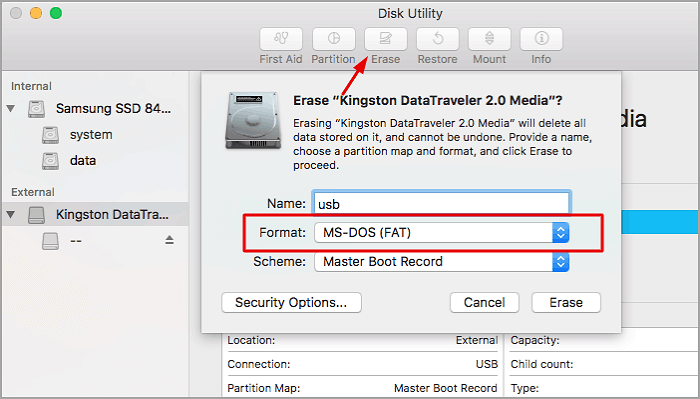
Step 5. Name your drive and hit the "Erase" button to start the formatting process.
While Disk Utility is a valid way for formatting USB sticks on Mac, it is likely to be more complicated and less adaptable than way 1. You can also take reference from the following guideline if you meet the "unable to write to USB on a Mac" problem:
Fix "Unable to Write to USB Drive on Mac" Successfully
This guideline aims to assist users in solving the "unable to write to a USB drive on a Mac" problem in multiple simple ways.
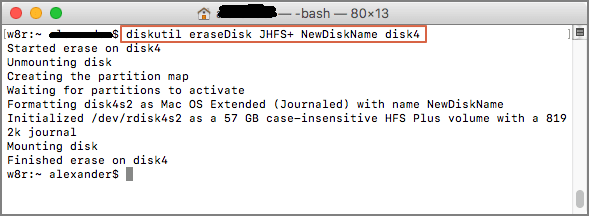
If you're familiar with command-line tools and prefer a more hands-on approach, you can format your USB drive using Terminal on Mac. While this technique provides excellent control, some users may find it too complicated and scary.
Adhere to the steps given below:
Step 1. Connect your USB drive to your Mac.
Step 2. Launch Terminal (it's in the "Utilities" folder under the "Applications" folder).
Step 3. To list all accessible disks, type diskutil list and press Enter.
Step 4. Locate your USB drive in the list; it should be named "/dev/diskX" (X is the drive number).
Step 5. To format the drive, type diskutil eraseDisk [format] [name] /dev/diskX. Replace "[format]" with the format you want (e.g., "FAT32"), "[name]" with the drive name you want, and "diskX" with the drive identification.
If you want to learn more details regarding the different formats that are mentioned in the first part, you can go through the articles below:
This complete tutorial on how to format a USB drive on your Mac has covered the need for formatting, the significance of several file systems, and three techniques to guide how to format a USB drive on a Mac. While Disk Utility and Terminal for Mac are viable options, EaseUS NTFS stands out as a user-friendly, flexible, and efficient solution.
EaseUS NTFS for Mac is highly recommended for a smooth USB disk formatting experience and better cross-platform compatibility. Its ease of use and full NTFS compatibility make it the ideal choice for Mac and Windows users. So go ahead and simplify your USB drive formatting and share this utility with your friends.
If you still have questions or encounter issues formatting your USB drive on Mac, check out these FAQs for quick solutions.
1. Why can't I format my USB flash drive on a Mac?
If you can't format your USB flash drive on a Mac, it might be because of write protection. Check that the drive is not locked and try again.
2. How to format a USB to FAT32 on a Mac?
To erase a USB flash drive to FAT32 on Mac:
Step 1. Enter Disk Utility, and select your USB drive.
Step 2. Choose "Erase," like "MS-DOS (FAT)" as the format, and click "Erase."
3. How do you format exFAT to FAT32 on Mac?
To convert a USB drive from exFAT to FAT32 on Mac:
Step 1. Back up your data from the USB drive.
Step 2. Navigate to Disk Utility and choose the USB drive.
Step 3. Choose "MS-DOS (FAT)" as the format and click "Erase" to complete the conversion.
Related Articles - ALSO ON EaseUS SOFTWARE
How to Format SSD to exFAT on Mac? Full Guide Here
![]() Tracy King/2024-10-22
Tracy King/2024-10-22
3 Reliable Ways to Format SD Card to FAT32 on Mac
![]() Tracy King/2024-10-21
Tracy King/2024-10-21
Can Mac Read exFAT [Quick Answered 2023]
![]() Sherly/2024-01-16
Sherly/2024-01-16
How to Format USB to FAT32 on Mac Using 3 Methods with Pictures
![]() Oliver/2024-04-19
Oliver/2024-04-19
Copyright © 2004 - 2023 EaseUS. All rights reserved.