- Products
- Store
- Partner
-
Support
Support CenterGuides, License, ContactDownloadDownload installerChat SupportChat with a TechnicianPre-Sales InquiryChat with a Sales Rep
Table of Contents
Formatting a USB drive on Mac may be required if you are experiencing issues with the drive or want to use it on another operating system.
If you are wondering whether or not can I format USB to fat32 on Mac, then read on.
One of the main reasons for formatting a USB drive is compatibility issues between different operating systems. In order to access files from both Mac and Windows operating systems, users format their flash drives to the FAT32 file system.
Unfortunately, it is not a native file system on macOS, so it seems quite challenging to format USB to FAT32 on Mac. So how can you do this? This article will show several practical methods about how to format a USB drive to FAT32 on Mac.
The reason why FAT32 is not an option on Mac might be that the preference is not available in the USB drive you are trying to format. For instance, Mac doesn't allow you to format 32 GB and smaller SD cards as FAT32.
If you are wondering how to format USB to fat32, follow these steps, show you three ways to format a flash drive to FAT32 on Mac. If you need to recover lost or deleted files after formatting the drive or extracting files from the drive before formatting, you can also use a USB file recovery tool.
If you want to format USB to FAT32 quickly and efficiently, try EaseUS NTFS for Mac. The tool provides all the formats so that you can use it on your Mac. With its "Erase" feature in a simple interface, you can format USB/external hard drive to FAT32/exFAT/NTFS format.
This tool is suitable for all users, even if you are a beginner. Free download this format tool and follow the steps below:
Step 1. Launch EaseUS NTFS for Mac on an Mac, click "I already have a license" to activate this software.
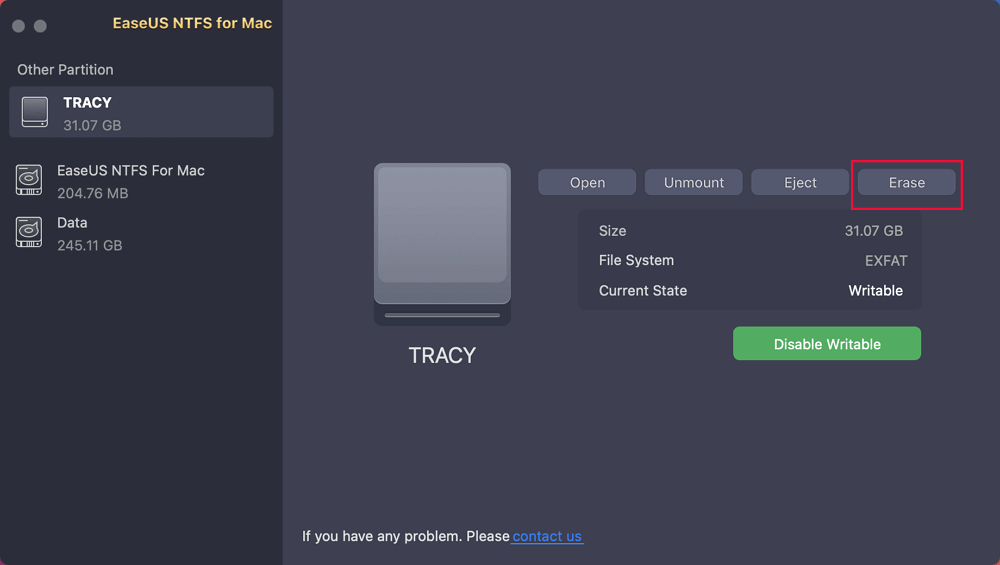
Step 2. Select target disk drive or removable device you tend to erase on the left side, and click "Erase" to continue.
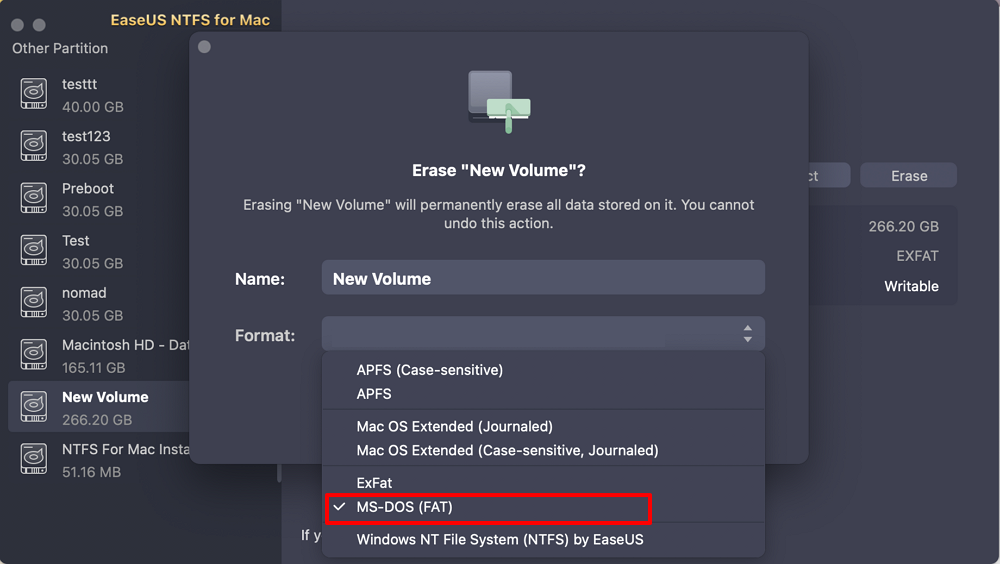
Step 3. From the drop-down box, select "MS-DOS(FAT)" as the target file system.
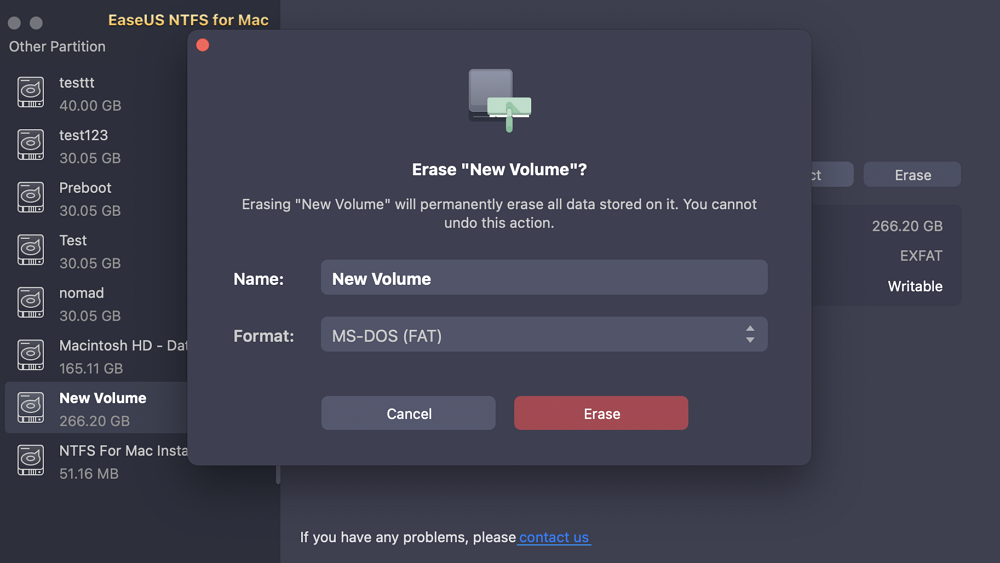
Step 4. Click "Erase" to confirm the formatting action and start erasing your target device to FAT file system.
Step 1. Connect the flash drive to your Mac computer using the USB port.
Step 2. Choose Applications > Utilities > Disk Utility.

Step 3. Hit the Erase button on the top of the connected USB drive.
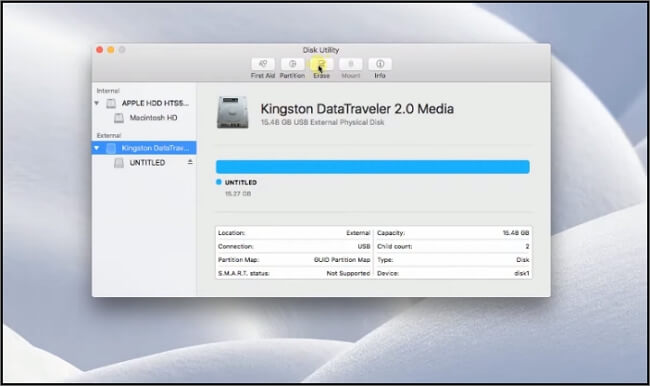
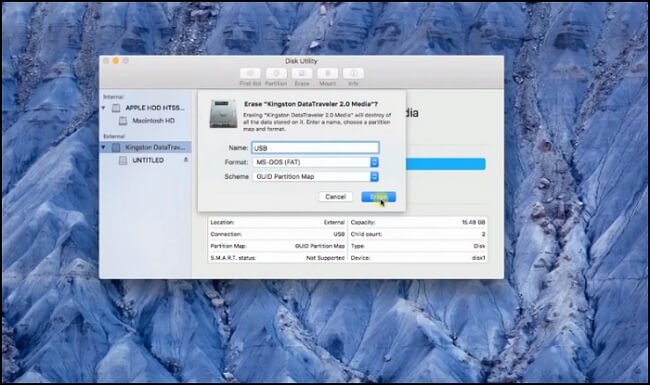
Step 4. Using the Erase tab, rename your USB flash drive if needed. Select FAT32 for format.
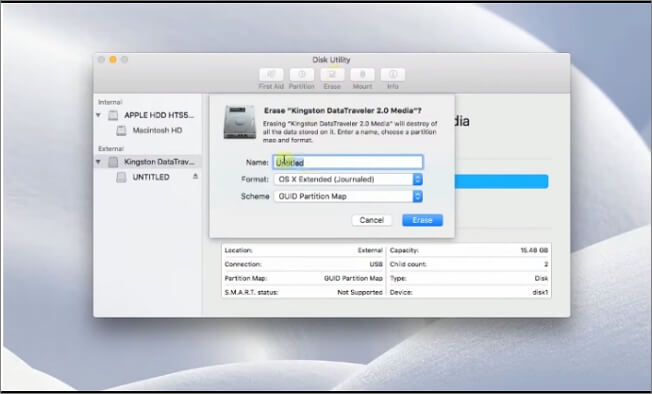
Step 5. Hit the blue Erase button.
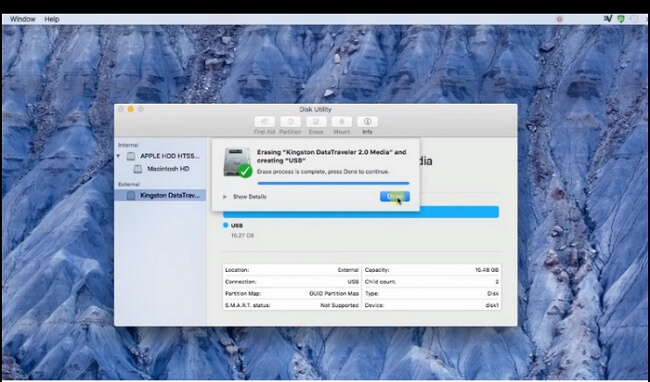
Step 6. When you're finished with the format process, click Done.
If option one doesn't work for formatting your USB drive, try formatting a USB drive to FAT32 with Terminal Command.
Step 1. Plug your USB drive into your Mac.
Step 2. Open and run Terminal.

Step 3. Enter command diskutil to find the location of your USB drive.
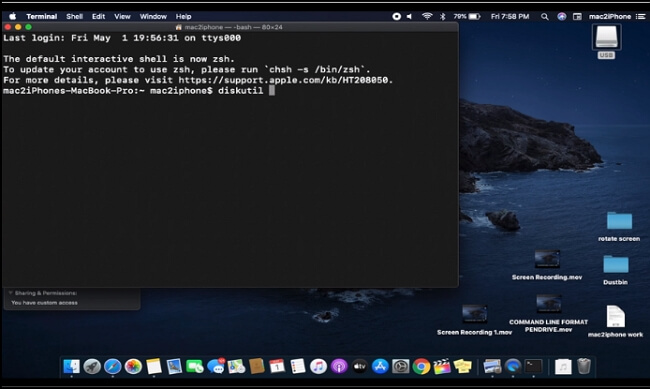
Step 4. You will see a list of drives attached to your Mac. For instance, the drive is in /dev/disk4s2.
Step 5. You'll need to run the command diskutil erase Disk FAT32 MBR Format /dev/disk4s2. (disk identifier).
Step 6. The disk name and identifier (mentioned above) must be typed in correctly, or else you might end up formatting some other disk.
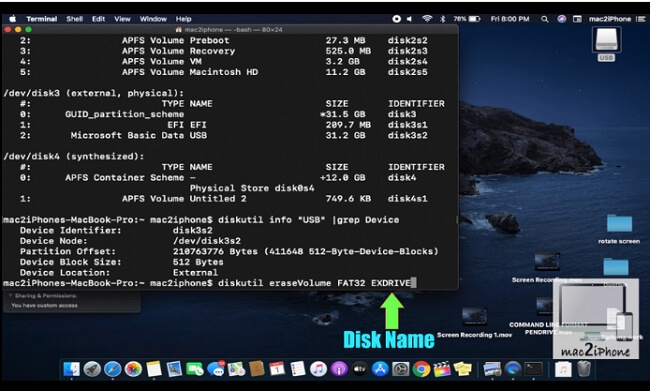
Step 7. To check the info about your disk, you can use the command "diskutil info "USB" | grep Device."
Step 8. Click the Enter key. The USB drive will be formatted to FAT32; It will also show you the progress while formatting.
Step 9. If you want to check if your disk is formatted properly, use the command "diskutil" after it is finished.
If you have an NTFS drive and want to use it on Mac without formatting to another file system, you can try a smart NTFS writer - EaseUS NTFS for Mac. With this tool, you can read/write NTFS partitions as well as recover deleted data from NTFS formatted hard drives on Mac. It will be the best solution if you have important information stored in the external hard drives that are formatted with Windows OS or any other system.
1. EaseUS Can Mount & Unmount NTFS Drives From Mac Status Bar
EaseUS NTFS for Mac is a great application that allows you to mount and unmount NTFS drives on Mac. It is feasible and convenient. You can use it to mount/unmount your NTFS drive from the status bar in seconds.
2. EaseUS Can Read/Write NTFS Partition On Mac
EaseUS Data Recovery utility for Mac is a comprehensive data recovery software for Mac users to recover files from NTFS partitions. This tool can recover lost, or deleted files from Windows drives on your Mac. It's not only an NTFS reader but also an NTFS writer. You can write, edit, copy, move and remove files on Microsoft NTFS. You can do every single thing with Windows drives on your Mac!
3. EaseUS NTFS Driver For External Hard Drive On Mac
EaseUS NTFS for Mac offers a solution to help you read and write external hard drives previously formatted for Windows from other known hard drive manufacturers as an NTFS driver as well.
Here are clear steps about how to enable writable to NTFS Drive on Mac:
Step 1. Launch and activate EaseUS NTFS for Mac. Click "I already have a license" to unlock this software.
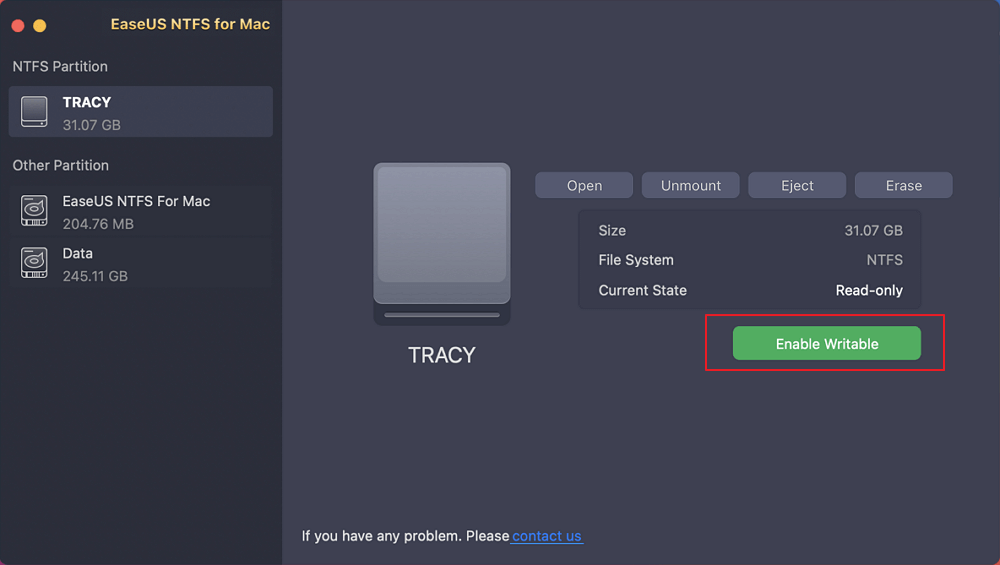
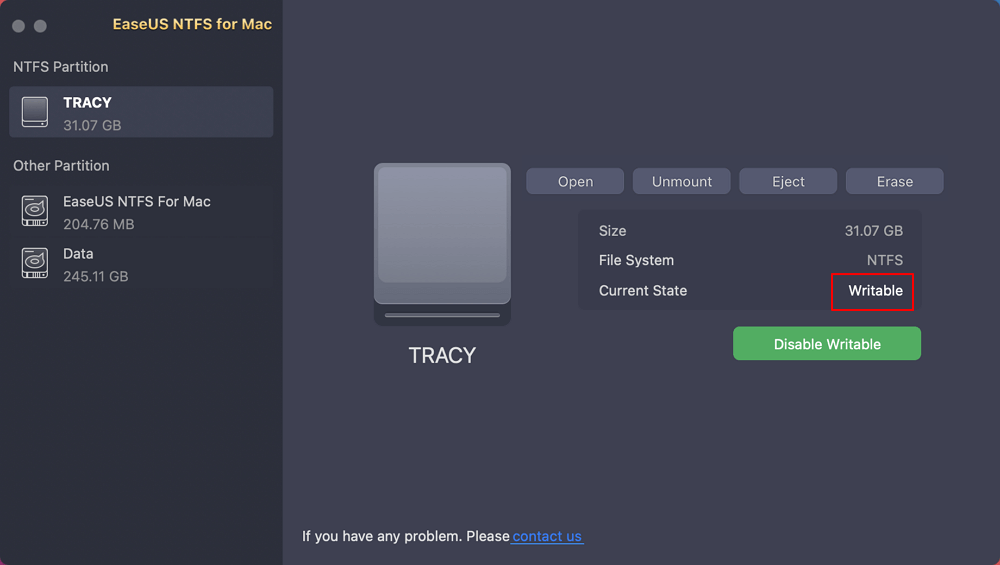
Step 2. Connect an NTFS drive to Mac, EaseUS NTFS for Mac will automatically detect the device. Select your drive and you'll see it's now marked as 'Read-only". Click "Enable Writable" to add read and write rights to the drive.
Step 3. When the state of NTFS drives turns into "Writable".
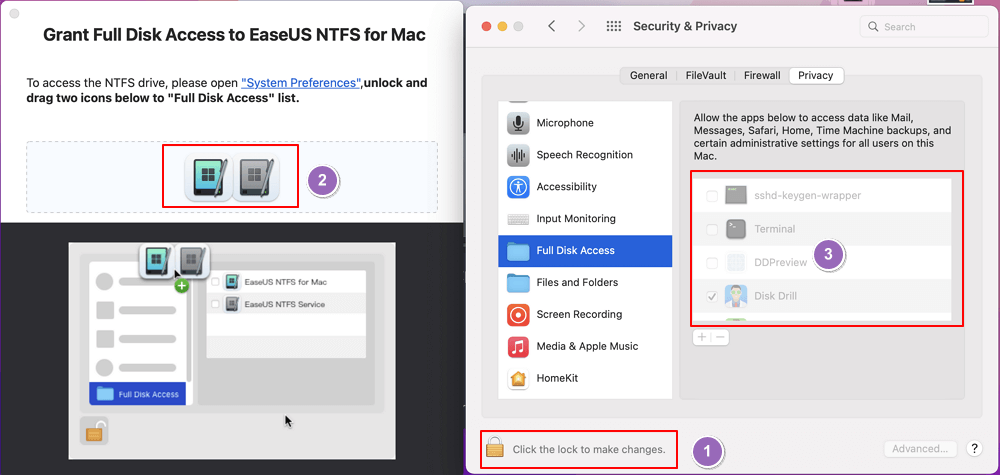
Step 4. EaseUS NTFS for Mac will pops up a window to help Mac get access to the NTFS drive:
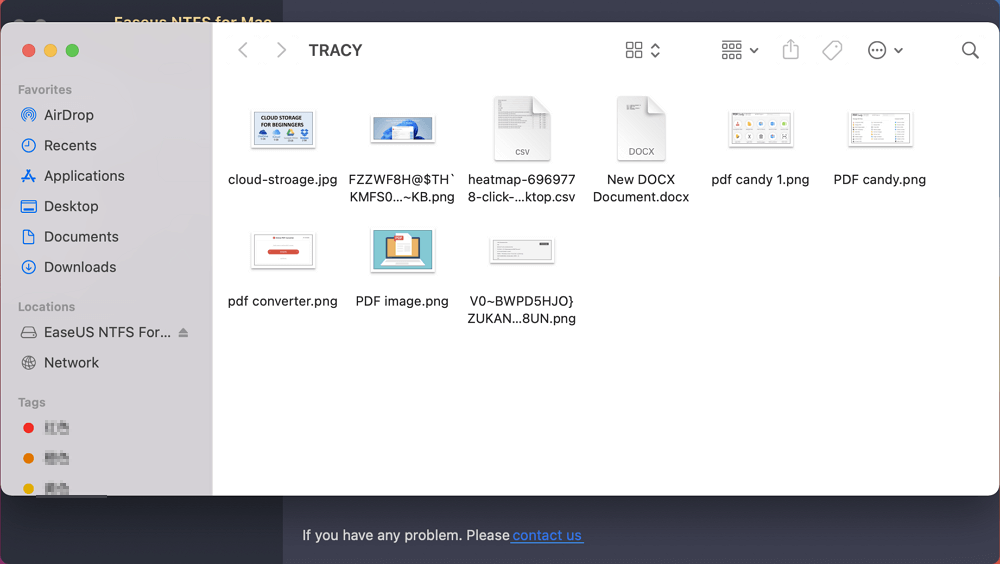
Step 5. When EaseUS NTFS for Mac restarts, you can then open to check, read, write, and even modify saved data on the NTFS device.
In conclusion, if you need to format a USB drive to FAT32 on Mac, the best solution is EaseUS NTFS for Mac. It is easy to use and can help you format any USB drive or SD card as FAT32 without losing data. With it, you no longer need to worry about compatibility issues when using different devices with your Mac computer at home or in the office.
Related Articles - ALSO ON EaseUS SOFTWARE
How to Fix Seagate External Hard Drive Read-Only on Mac
![]() Banu/2025-06-26
Banu/2025-06-26
Get NTFS for Mac on Seagate and Fix Seagate External Hard Drive Read-only Mac
![]() Banu/2025-06-26
Banu/2025-06-26
How to Delete Files from External Hard Drive Mac
![]() Banu/2025-06-26
Banu/2025-06-26
How to Enable NTFS on Mac - 3 Detailed Ways 🔥
![]() Banu/2025-06-26
Banu/2025-06-26

