- Store
-
Support CenterGuides, License, ContactDownloadDownload installerChat SupportChat with a TechnicianPre-Sales InquiryChat with a Sales Rep
In general, if you have a formatted drive as an NTFS file system, then Mac only allows you to read the NTFS hard drive instead of write, edit, delete, copy, and more. It is an inconvenience. So in this article, we will teach you how to enable mac writing to NTFS.
Table of Contents
"Hi, is there any kind to write into an NTFS USB on macOS Sierra, with any terminal instructions or installed additional software? Thanks a lot."
macOS doesn't support write to NTFS drive. Some tutorials recommend format drive to exFAT which has to write support on Windows and Mac. However, if you already have important data on the disk, you will need to back it up and then format the disk into another format, such as exFAT. This method is time-consuming than other methods in this article. The terminal instruction and third-party software can enable Mac to write NTFS.
| Workable Solutions | Step-by-step Troubleshooting |
|---|---|
| Fix 1. EaseUS NTFS for Mac | Step 1. Launch and activate EaseUS NTFS for Mac. Click "I already have a license" to unlock this software...Full steps |
| Fix 2. Terminal | Step 1. Open Terminal on your Mac; Step 2. Connect the NTFS drive to the Mac desktop or laptop...Full steps |
| Fix 3. macFUSE | Step 1. Download and Install Xcode; Step 2. Download and Install Homebrew; Step 3. Download and Install...Full steps |
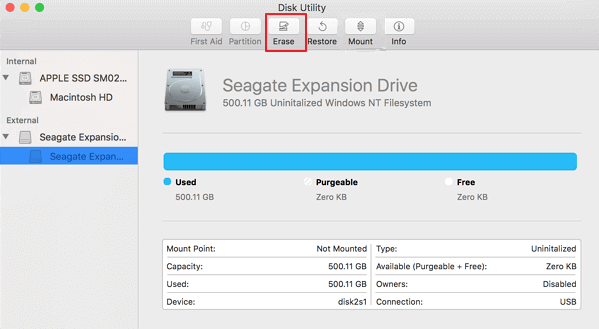
Obviously, no matter what Mac operating system you are using, like macOS Monterey Beta, macOS Big Sur, macOS Catalina, macOS High Sierra, macOS Mojave, or whether it is a laptop or desktop, you can only read the NTFS drive includes USB flash drive, SD card, external hard drive, and memory sticks.
In this part, you can have one automatic third-party NTFS manager, one apple native program, and one free NTFS driver. Both support read-write NTFS driver for mac.
Applies to: Secure NTFS manager for beginners.
To easily manage your NTFS on mac, EaseUS NTFS for Mac is the necessary tool you can download to read and write NTFS drive on Mac, manually switch to read-only mode, mount and unmount NTFS volumes, securely exit to avoid data loss.
This NTFS manager tool will mount your NTFS volumes on the background and you can directly do the write, read, mount target volumes without running software. What you need to do is to download the software and activate it. After starting the program once, EaseUS NTFS for Mac is minimized to the tray by default.
NTFS for Mac Free Download:
How to Use EaseUS NTFS for Mac:
Step 1. Launch and activate EaseUS NTFS for Mac. Click "I already have a license" to unlock this software.
Step 2. Connect an NTFS drive to Mac, EaseUS NTFS for Mac will automatically detect the device. Select your drive and you'll see it's now marked as 'Read-only". Click "Enable Writable" to add read and write rights to the drive.
Step 3. When the state of NTFS drives turns into "Writable".
Step 4. EaseUS NTFS for Mac will pops up a window to help Mac get access to the NTFS drive:
Step 5. When EaseUS NTFS for Mac restarts, you can then open to check, read, write, and even modify saved data on the NTFS device.
![]()
Enable read/write support on WD My Password driver and master a manual to format WD device.
Applies to: Apple native tool for professional users.
If you often use Terminal, you should be accustomed to this command prompt system, which lets you take full control of your operating system. It is possible to change the permission in this direct way, but it may damage your files and device.
How to Enable Read/Write Permissions on your NTFS Partition:
Step 1. Open Terminal on your Mac.
How to find Terminal:
Step 2. Connect the NTFS drive to the Mac desktop or laptop.
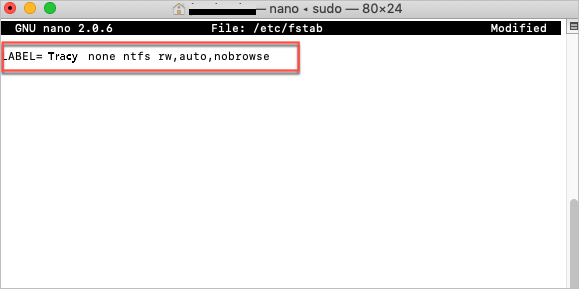
Step 3. Type command line and hit Enter: sudo nano /etc/fstab
This command will open the /etc/fstab files. If it asks to enter the password, input the one you remember.

Step 4. Type the command on the end of the NTFS file list: LABEL=NAME none ntfs rw, auto, nobrowse (You can change the NAME to the name of NTFS drive.
Step 5. Press Ctrl + O shortcut on your keyboard and press Enter to save.
Step 6. Press Ctrl + X to exit.
Step 7. Next, reconnect the NTFS drive on Mac.
Step 8. Click the Go tab and select "Go to Folder..."
Step 9. In the "Go to Folder" window, input /Volumes and click the Go button.
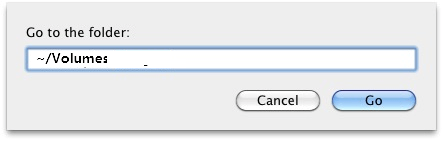
Step 10. You can see the NTFS volume and enable write support on it.
Applies to: free software but is hard to operate with many steps.
macFUSE is an integrated program compatible with Mac operating system, which is able to access the NTFS file system. So you can use it to mount NTFS in read/write mode. However, the steps are not friendly to beginners. See how to set up with macFUSE:
Step 1. Download and Install Xcode
Navigate to Finder > Applications > Terminal > Type the command line: xcode-select –install.
The pop window will prompt to install command line developer tool. Click Install to go on.
Step 2. Download and Install Homebrew
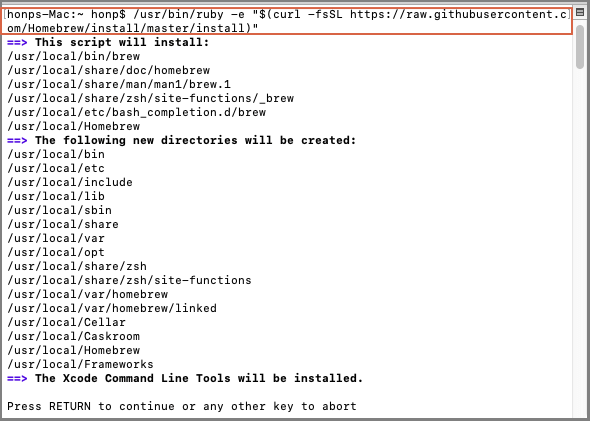
Type command line and hit Enter on Terminal window: /usr/bin/ruby -e "$(curl -fsSL https://raw.githubusercontent.com/Homebrew/install/master/install)"
Step 3. Download and Install macFUSE.
Step 4. Install NTFS-3G
Type command line and hit Enter: brew install ntfs-3g
Step 5. Disable System Integrity Protection
Restart Mac > Press Command + R shortcut on keyboard to see Apple logo > Utilities > Terminal > Type command line and press Enter: csrutil disable > Reboot Mac
Step 6. Type command line to read and write NTFS
Finder > Applications > Utilities > Terminal
Input command line and hit Enter:
sudo mv /sbin/mount_ntfs /sbin/mount_ntfs.original
sudo ln -s /usr/local/sbin/mount_ntfs /sbin/mount_ntfs
In this article, 3 methods can enable read and write mode for NTFS driver on Mac. To get the easiest, we recommend using EaseUS NTFS for Mac. The other two also require read and write mode for advanced users. Pick the one that is suitable for you.
Related Articles - ALSO ON EaseUS SOFTWARE
Toshiba NTFS Driver for Mac! Enable Read and Write Toshiba External Hard Drive
![]() Banu/2025-11-11
Banu/2025-11-11
Free Download NTFS for Mac Software with Serial Number 2026
![]() Banu/2026-01-05
Banu/2026-01-05
Tutorial: Change Seagate From Read Only on Mac Without Formatting
![]() Sherly/2025-11-11
Sherly/2025-11-11
How to Change Hard Drive from Read Only on Mac [100% Working]
![]() Banu/2026-01-05
Banu/2026-01-05
Copyright © 2004 - 2023 EaseUS. All rights reserved.