- Store
-
Support CenterGuides, License, ContactDownloadDownload installerChat SupportChat with a TechnicianPre-Sales InquiryChat with a Sales Rep
Are you facing Read-only issues when connecting the Seagate Drive on your Mac? Various reasons, such as permission issues, disk errors, etc., can cause this problem. Luckily, multiple solutions can help you change Seagate from read only on Mac without formatting without the loss of critical data.
Table of Contents
Are you facing a read-only issue while plugging the Seagate Drive on your Mac? The Seagate hard drive is a widely popular external hard drive. It works perfectly with Mac and Windows, allowing users to store a good amount of data.
However, several users have reported the discovery of the Seagate drive being read-only on Mac. There is simply no way to carry out written actions on the drive. These include transferring files to the external hard drive, creating new files, deleting data, etc. Besides, videos, music files, photos, etc., could become locked on the drive.
In this article, we will offer fixes on How to change Seagate from read-only on Mac without formatting.
Before we proceed with the solutions to ensure you can conduct written actions, you need to know the reasons. Knowing why the Seagate drive has become read-only is vital. That way, you can apply the best solution. Here are the reasons as follows.
1. Permission settings
Permission issues are one of the most straightforward reasons for the drive being read-only. Mac offers users to determine who can access what file or data on the system. These include external hard drives as well. You might have forgotten to change the external drive permission.
Therefore, the permission setting is one of the reasons that cause the drive to be read-only. You can share this passage to let more people know the reason.
2. NTFS-based Seagate (external) hard drives
In most cases, the cause of the read-only situation is the pre-formatting of the drive to NTFS. Manufacturers often pre-format the drive to the NTFS or the Windows NT file system. That is why the write actions on Mac don't work.
Besides, Mac has pulled off the default NTFS write support. Users can only read data if an NTFS-based Seagate hard drive is connected to Mac. You cannot make any changes.
Remember to format the Seagate hard drive to change the read-only status. But that will lead to a loss of data on the drive. The section below discusses three ways to change Seagate from read-only on Mac without formatting or data loss.
You may want to learn about the following article:
Users can adopt three different solutions to change Seagate from read-only on Mac without formatting. Let's take a look at them.
Next, you can read these three helpful ways provided with detailed steps for you to change Seagate from read-only on Mac without formatting. This way also works if you meet the issue below:
One of the most straightforward solutions to change the Seagate drive's read-only status is to change permissions. For that, follow these steps.
Step 1. Connect the Seagate external drive to your system.
Step 2. Press Command and I keys to learn more about the hard drive once it appears on your system.
Step 3. Scroll down to Sharing & Permissions and click on the inverted triangle option.
Step 4. Select the lock icon.
Step 5. Enter the admin password.
Step 6. Tickmark the box Ignore ownership on this volume.
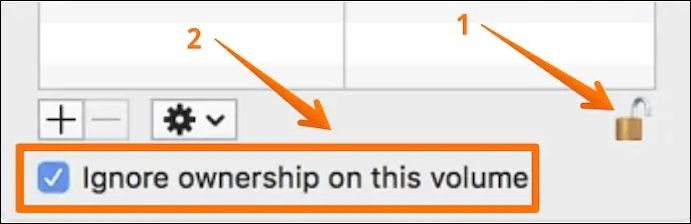
Step 7. Press the gear button.
Step 8. Select Apply to enclosed items.
Another excellent solution to change Seagate from Read Only is to use EaseUS NTFS for Mac. The best NTFS driver allows Mac users to read and write NTFS drives on Mac. The user-friendly interface allows you to export and import different data on NTFS drives. Here, you don't have to worry about formatting the drive.
There are some features of the EaseUS NTFS for Mac, and you read about them as follows:
Besides the above features EaseUS NTFS for Mac can provide for users, it can also help users change NTFS to FAT32 without formatting on Mac. Do you want to know how to use EaseUS NTFS for Mac? Check out the steps listed here.
Step 1. Launch and activate EaseUS NTFS for Mac. Click "I already have a license" to unlock this software.
Step 2. Connect an NTFS drive to Mac, EaseUS NTFS for Mac will automatically detect the device. Select your drive and you'll see it's now marked as 'Read-only". Click "Enable Writable" to add read and write rights to the drive.
Step 3. When the state of NTFS drives turns into "Writable".
Step 4. EaseUS NTFS for Mac will pops up a window to help Mac get access to the NTFS drive:
Step 5. When EaseUS NTFS for Mac restarts, you can then open to check, read, write, and even modify saved data on the NTFS device.
In a word, EaseUS NTFS for Mac is a good option for users to change Seagate from read-only on Mac without formatting. Therefore, it is strongly recommended that you can try this software to fix your problem.
Most people are unaware, but you can use Terminal to change the Seagate drive from read-only. Here are the steps you can follow.
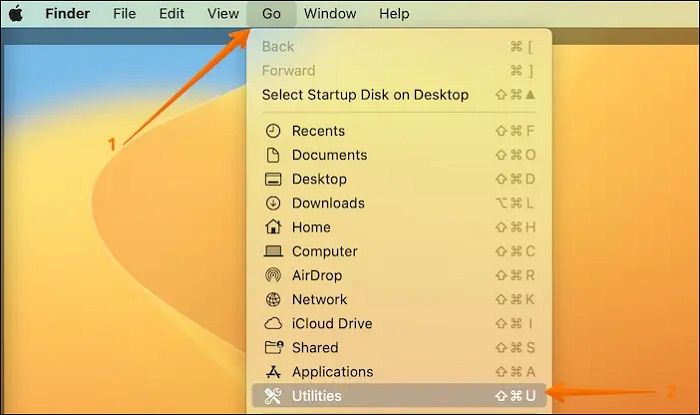
Step 1. Open Terminal. For that, click on Go from the Finder menu. A drop-down will appear, choose Utilities and find the Terminal app.
Step 2. Type nano etc/fstab.
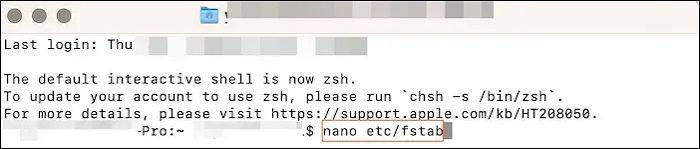
Step 3. Type LABEL=DRIVENAME none ntfs rw, auto,nobrowse. Make sure to change DRIVENAME with the drive name where you want to change permission settings.
Step 4. Press Control and O keys to save the file.
Step 5. After that, press Control and X keys to close Nano.
Step 6. Disconnect the drive.
Step 7. Reconnect it again.
Step 8. Now check and see if the issue is resolved.
Related articles are as follows:
Often users have encountered read-only status of the Seagate external hard drive. It prevents users from conducting any write actions. However, there are several solutions you can use to change the read-only status. While you can always format the drive and change settings, it will lead to data loss.
One of the best ways to change Seagate from read-only on Mac without formatting is to change permission settings. You can also use command lines on the Terminal. Another reliable solution is to opt for EaseUS NTFS for Mac. The software is easy to use and changes the read-only status with ease.
Different ways to change Seagate from read-only on Mac without formatting exist. To know more, read the questions and answers listed which are listed as below.
1. How to change the hard drive from a read-only Mac without erasing it?
To change the hard drive from a read-only Mac without erasing it, you can follow these steps
Step 1. First, open Terminal and type nano etc/fstab to edit the fstab file.
Step 2. Next, type in the command LABEL=DRIVENAME none ntfs rw, auto, nobrowse where you replace DRIVENAME with the actual name of your hard drive.
Step 3. After that, press Ctrl+O to save the file and exit nano.
Step 4. Finally, disconnect and reconnect the hard drive to complete the process.
2. How to change permissions on Seagate external hard drive Mac?
If you need to change permissions on a Seagate external hard drive on a Mac, there are several steps you should follow.
Step 1. First, open Finder and right-click on the Seagate external hard drive.
Step 2. Then, select Get Info from the context menu.
Step 3. In the Info window that appears, click on the tab labeled Sharing and Permissions.
Step 4. Next, scroll down to the bottom of the window and locate the option labeled Ignore ownership on this volume.
Step 5. Check the box next to this option to enable it.
You can change permissions on your Seagate external hard drive on a Mac by completing these steps.
3. How to fix Seagate's external hard drive read-only on Windows 10?
If you are experiencing read-only issues with your Seagate external hard drive on a Windows 10 system, there are several steps you can take to resolve the problem.
Step 1. First, open the Diskpart program as an administrator.
Step 2. Then, type list disk and press Enter to display a list of available disks.
Step 3. Identify the disk corresponding to your Seagate external hard drive, type select disk X, where X is the number of your disk, and press Enter.
Step 4. Next, type attributes disk clear read-only and press Enter to clear the read-only attribute from the disk. Wait for the message Diskpart attributes cleared successfully to appear.
Step 5. Finally, type exit to close the program.
By following these steps, you can fix the read-only issue with your Seagate external hard drive on a Windows 10 system.
Related Articles - ALSO ON EaseUS SOFTWARE
3 Best Mac NTFS Writers 2026 Free Download
![]() Banu/2026-01-05
Banu/2026-01-05
Solved: Can't Save to External Hard Drive Mac
![]() Oliver/2025-11-11
Oliver/2025-11-11
(Solved!) Samsung Portable SSD Not Detected Mac
![]() Oliver/2025-06-26
Oliver/2025-06-26
How to Safely Force Eject External Hard Drive on Mac
![]() Banu/2025-06-26
Banu/2025-06-26
Copyright © 2004 - 2023 EaseUS. All rights reserved.


