- Store
-
Support CenterGuides, License, ContactDownloadDownload installerChat SupportChat with a TechnicianPre-Sales InquiryChat with a Sales Rep
Do you want to delete files from WD elements on Mac? Here is a step-by-step guide you can follow to delete WD elements on Mac.
Table of Contents
WD or Western Digital drive is a famous hard drive with big capacity and fast data transfer speed. It is one of the most preferred storage devices brands as it stores data rapidly. Still, sometimes it gets essential to delete the partition when you reinstall the operating system or any other possible reason.
This guide will discuss the two best possible methods that can help you delete or recover your WD files from your Mac device.
| Workable Solutions | Step-by-step Troubleshooting |
|---|---|
| Fix 1. Run Third-Party NTFS Reader to Delete Files | Step 1. Launch and activate EaseUS NTFS for Mac. Click "I already have a license"...Full steps |
| Fix 2. Format WD Elements on Disk Utility | Step 1. Open Your Disk Utility...Full steps |
While many external hard drives have excessive space, you may notice your storage devices getting full when you backup your files on your computer or store large files on your WD drive. When you delete those files from your Mac device, the OS only deletes the path to access that file.
Explaining it further, the OS deallocates the deleted files and makes it hard to access, but those files remain on the hard drive, and there is no way to overwrite these drives, especially if they are NTFS formatted as Mac doesn’t support NTFS read-write, edit or delete.
To make sure that your files are deleted and completely wiped off from your Mac devices, you need to make sure that your devices are NTFS formatted or not.
"I have bought a new WD external hard drive, and I need to make some space on it by emptying some of my backups from the external drive. But for some reason, it keeps giving me an error saying, "Cannot delete items because they have been locked."
Is there a way I can free up space on my WD drive? I have tried all the methods, but it keeps giving me the error. Any help?"
Most of you have faced these or similar issues when trying to delete your WD files from your Mac devices, but this happens when your drive is in NTFS format your Mac device cannot write anything to it or delete any items from it without third-party freeware software.
If you don't want to deal with the hassle of installing third-party software, then try reformatting your drive with Disk Utility. It will make it more compatible with Mac backup software than if it's left in NTFS format.
Thus to help you permanently delete and secure data from your WD drive on your Mac, we will provide you with detailed steps of using these two methods to help you Delete WD file elements on Mac so that you can be sure about the deletion of your files from WD elements.
It is wise to use professional third-party software that lets you read NTFS to delete files. Use powerful software to quickly and safely let you delete a file from WD elements on Mac.
With this software, you can conveniently format your files from your WD elements portable hard drive by following the instructions mentioned. EaseUS NTFS for Mac is a safe and straightforward software that enables writing to NTFS drive. This tool is handy with an easy-to-use interface that lets the users enjoy a seamless experience.
This software, along with the convenience of use provides the users with some exceptional features, including:
To use this innovative and simple software, download, install and follow the instructions mentioned to use this software.
Step 1. Launch and activate EaseUS NTFS for Mac. Click "I already have a license" to unlock this software.
Step 2. Connect an NTFS drive to Mac, EaseUS NTFS for Mac will automatically detect the device. Select your drive and you'll see it's now marked as 'Read-only". Click "Enable Writable" to add read and write rights to the drive.
Step 3. When the state of NTFS drives turns into "Writable".
Step 4. EaseUS NTFS for Mac will pops up a window to help Mac get access to the NTFS drive:
Step 5. When EaseUS NTFS for Mac restarts, you can then open to check, read, write, and even modify saved data on the NTFS device.
After this, you are free to delete, edit, copy, transfer files in WD Elements disk on Mac:
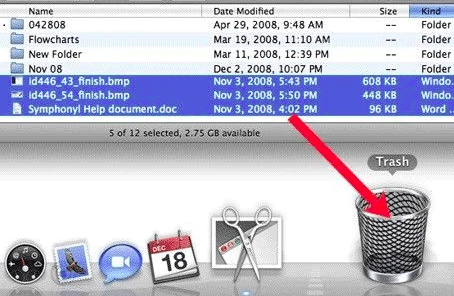
Open WD Elements disk on Mac > Right-click and select "Move to Trash" or Drag files to Trash.
Disk Utility is software pre-installed in your Mac device that lets you reformat your drive. Formatting your drive on Disk Utility means that it will wipe everything off from your WD drive. This is a very convenient method as you don’t need any other software to use it also it's free to use.
Note: Back up data first. Formatting will delete all files
Steps to format drive on Disk Utility
Once you have backed up your data, you can now follow these steps to format WD Elements on your Disk Utility.
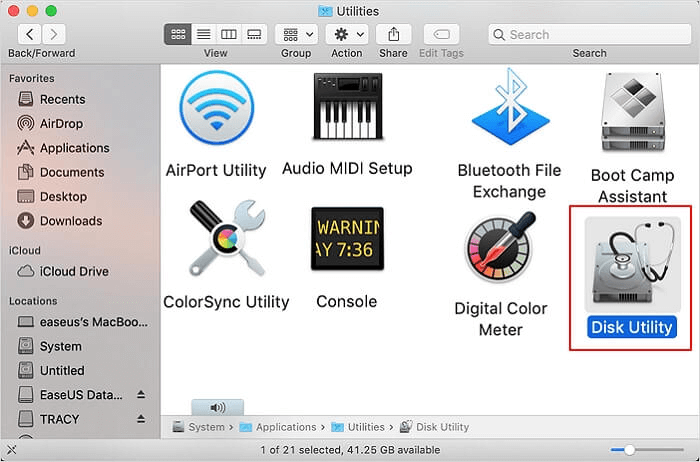
Step 1. Open Your Disk Utility
Disk Utility is found in your device within the folder called Utilities.
To open your Disk Utility click on Finder, Select "Application" then from the dropdown menu choose "Utilities" and then open your Disk Utilities.
Step 2. Mac Internal Drive
Once you have opened your Disk Utility, you’ll find the list of Mac external drives on the left of your screen. Under the heading, you'll see your WD elements drive.
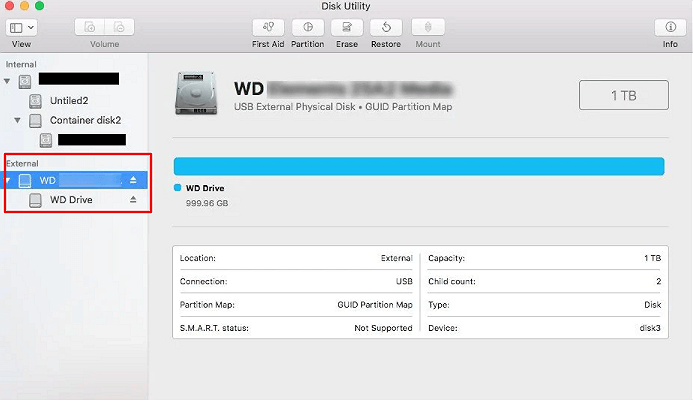
Step 3.Choose Your WD elements
Once you have selected your WD elements, click on “Erase.” Here you will select the format in which you want your disk to be formatted
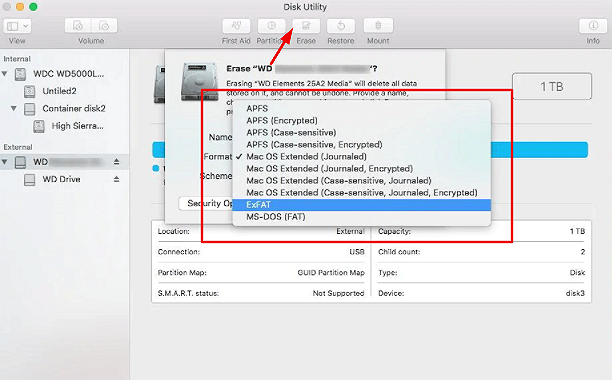
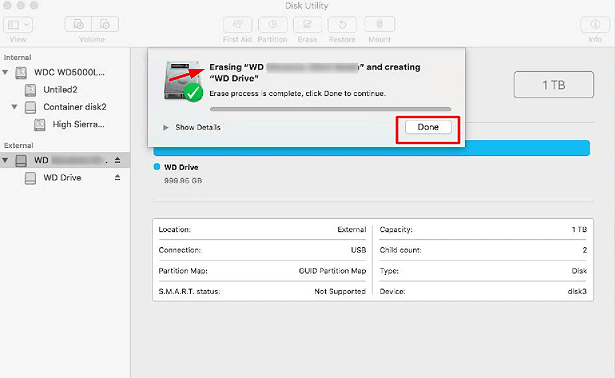
Step 4. Click on Erase
Click on erase to format your WD drive.
These simple steps will let you easily wipe off your data from your WD elements on Mac. Just make sure that you have made a backup so that you lose any of your essential data.
It is important to delete your files from your WD drives especially if you have any confidential information stored as these deleted files are easily recoverable from the drive. We have found two methods to let you delete your files from your WD elements on your Mac device. These steps are very clear and easy to understand.
If you don’t want to use any external software on your Mac device, it is best to use Disk Utility to delete your files. Disk Utility will let you delete your files safely without any hassle; you have to make sure that you have created a backup to avoid losing any of your essential data.
EaseUS NTFS for Mac is a fast and easily accessible software that lets you quickly format files from your WD hard drive. This software is trusted by its users for the ease and convenience it provides. Also, using this software will free you from the fear of losing your data. As you can quickly get your data from the EaseUS.
Follow these steps and make your best choice!
Related Articles - ALSO ON EaseUS SOFTWARE
Mount External Hard Drive Mac Terminal [All Details You Need]
![]() Cici/2025-11-11
Cici/2025-11-11
How Do I Fix USB Read Only on Mac? Your Reliable Fixes Are Here
![]() Banu/2025-06-26
Banu/2025-06-26
How to Change Hard Drive from Read Only on Mac [100% Working]
![]() Banu/2026-01-05
Banu/2026-01-05
How to Enable NTFS on Mac - 3 Detailed Ways 🔥
![]() Banu/2025-06-26
Banu/2025-06-26
Copyright © 2004 - 2023 EaseUS. All rights reserved.


