- Store
-
Support CenterGuides, License, ContactDownloadDownload installerChat SupportChat with a TechnicianPre-Sales InquiryChat with a Sales Rep
Check out the full guide to convert NTFS to FAT32 on Mac without losing data. EaseUS NTFS for Mac and backing up data is the best option to access NTFS on Mac without data loss.
Table of Contents
Want to use NTFS drives on a Mac? Then, it is possible.
Mac users can access an NTFS drive by easily converting it to Mac supported FAT32 file format. This guide will share all the possible options to convert NTFS to FAT32 on Mac without losing data. So, let's get started.
Yes, you can convert NTFS to FAT32 on Mac devices. But we will recommend users not to rush to format NTFS drives to FAT32. That's because:
In short, it is possible to change your hard drive from NTFS to FAT32 on Mac. But don't try it unless you have explored all other solutions. Let's scroll down to check out a few tips to convert NTFS to FAT32 file format.
By default, Apple only allows users to access NTFS files in read-only mode on Mac. But thankfully, it is easy to convert an NTFS drive to FAT32 without losing data on Mac.
Here's how to change the NTFS drive to FAT32:
Apple might not have officially supported NTFS, but it is possible to access NTFS files on Mac without formatting. By downloading EaseUS NTFS for Mac, users can enable NTFS drive writable with a click on Mac.
EaseUS NTFS for Mac is fully Macintosh compatible software to mount, unmount and get full read-write access to NTFS drives in macOS. The tool can also allow Mac users to:
Step 1. Launch and activate EaseUS NTFS for Mac. Click "I already have a license" to unlock this software.
Step 2. Connect an NTFS drive to Mac, EaseUS NTFS for Mac will automatically detect the device. Select your drive and you'll see it's now marked as 'Read-only". Click "Enable Writable" to add read and write rights to the drive.
Step 3. When the state of NTFS drives turns into "Writable".
Step 4. EaseUS NTFS for Mac will pops up a window to help Mac get access to the NTFS drive:
Step 5. When EaseUS NTFS for Mac restarts, you can then open to check, read, write, and even modify saved data on the NTFS device.
Formatting NTFS drives to FAT32 or any other file system isn't recommended. But if there's no other option to access NTFS on Mac, ensure to back up vital NTFS drive content on Mac before formatting. This way, you can easily revive back NTFS files after formatting.
For backing up files on Mac, users have three options:
For the first option, you have to enable the NTFS to write support for Mac, which we will discuss ahead.
But to store NTFS files on iCloud, there's no restriction. Simply open the Windows drive in Finder, copy and paste an NTFS file to the location on iCloud Drive.
Once the NTFS drive content is backed up on the safe location, Mac users can format the NTFS drive to FAT32 with Disk Utility. Remember this method will erase all data present on NTFS flash drives.
Follow these steps to format the USB drive to FAT32:
Step 1. Connect the NTFS USB drive to a Mac computer.
Step 2. Go to Applications > Utilities > Double-click on the Disk Utility.
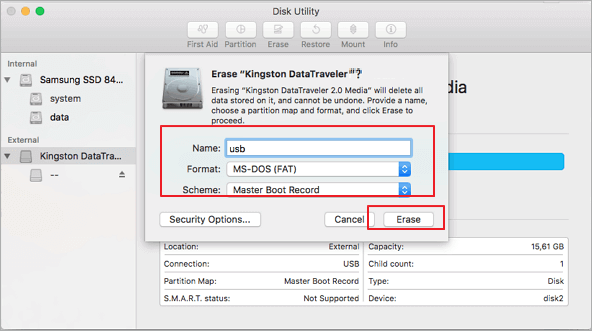
Step 3. Choose the USB drive from the side and select the Erase.
Step 4. Rename the NTFS drive if you want to.
Step 5. Under the Format field, select the MS-DOS (FAT) and Master Boot Record for the Scheme field. Now, click on the Erase button to format the NTFS to FAT32. Once the process is done, safely eject the drive and remount to access it on Mac.
Besides the solutions mentioned above, Mac users have many other options to convert NTFS to FAT32 on Mac, such as:
Today, we have a tool for every problem. Since Mac does not support NTFS file format is a huge problem; thus, several third-party software is available to convert NTFS to FAT32.
Getting a converter tool is useful for the users who often transfer content between Mac and Windows. There are multiple NTFS to FAT32 converter tools available in the market, but one should select a tool after considering:
Based on these criteria, EaseUS Partition Master is a perfect tool to convert NTFS to FAT32 without data loss. This software can even format partitions larger than 32GB to FAT32.
Similar to the Disk Utility option, Mac users can also use the commands in Terminal to erase the data. Thus, it is essential to backup NTFS drives content before using this method.
Here are steps to convert NTFS to FAT32 using Terminal:
Step 1. Connect the NTFS flash drive to a Mac computer.
Step 2. Go to Spotlight by using cmd + space keys.
Step 3. Type "terminal" in the Spotlight search field and hit Enter.

Step 4. Type "diskutil list" to find out the USB drives connected to the computer.
Step 5. Type "sudo diskutil eraseDisk FAT32 MBRFormat /dev/disk2".
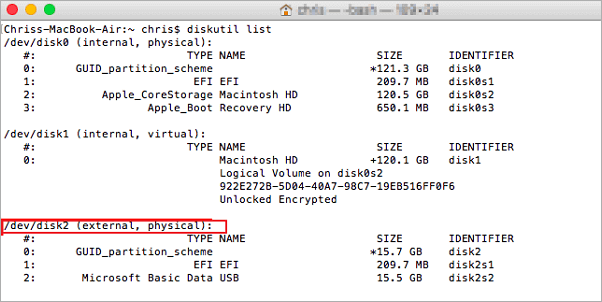
Step 6. Once the process is complete, type "diskutil list" to check if the formatting has been done properly.
Converting NTFS to FAT32 on Mac is easy. But we can't ignore the fact that formatting the USB can erase the data on it completely. Therefore, to prevent NTFS drive's data, make sure to create a backup on your Mac or iCloud.
However, Mac users can avoid all backup hassle if they EaseUS NTFS for Mac to access the external drive on Mac. In addition, the software can allow users to read-write NTFS files on Mac without data loss.
In short, there are two options to access NTFS drives on Mac - back up the drive's data to a safe location or use EaseUS NTFS for Mac.
Now, use your intelligence and select the right option to convert NTFS to FAT32 on Mac.
Related Articles - ALSO ON EaseUS SOFTWARE
Can't Delete Folders/Files from External Hard Drive on Mac [Fixed]
![]() Banu/2025-11-11
Banu/2025-11-11
How Do I Read and Write NTFS Drives on Mac? 3 Best Solutions Available to Help
![]() Banu/2025-06-26
Banu/2025-06-26
How to Read and Format NTFS Drives on Mac
![]() Banu/2025-06-26
Banu/2025-06-26
Solved: the Disk Couldn't Be Ejected Because the Finder Is Using It
![]() Cici/2025-07-07
Cici/2025-07-07
Copyright © 2004 - 2023 EaseUS. All rights reserved.


