- Store
-
Support CenterGuides, License, ContactDownloadDownload installerChat SupportChat with a TechnicianPre-Sales InquiryChat with a Sales Rep
Discover five fast solutions to troubleshoot and resolve issues when your new SSD is not detected in Mac's Disk Utility. Fix the "New SSD Not Showing Up in Disk Utility" issue easily.
Table of Contents
Have you recently purchased a brand-new SSD only to be left scratching your head in irritation when the Disk Utility on your Mac fails to recognize it?
Don't panic! Thanks to this article, you don't need to worry about the "New SSD Not Showing Up in Disk Utility" problem. EaseUS will guide you through five straightforward methods to help you detect and incorporate the SSD into your system.
Are you ready to take hold of the SSD controls and get your new SSD up and running? Roll up your sleeves, explore the options, and get your SSD functioning.
With the five feasible methods in this article, you can solve the "New SSD Not Showing Up in Disk Utility" issue efficiently and fast. Make sure to go over each option to ensure your SSD works perfectly with your Mac system.
Ensuring compatibility between your SSD and Mac is critical for a seamless integration procedure. In Disk Utility, mismatched specifications might cause detection difficulties. So, double-check the specifications for seamless SSD recognition.
Here is what you can do:
Step 1. Visit Apple's official website and make sure your Mac's macOS version supports your SSD.
Step 2. Match the connection type of your SSD (e.g., SATA, NVMe) to the supported kinds on your Mac.
Step 3. To obtain the necessary drivers for your new SSD, update your software to the latest macOS version.
If your SSD is compatible with your Mac, proceed to the next fix. If not, upgrade your macOS version or choose a compatible SSD. If these fix work on your device, share this article and let more users know about them.
A faulty or unstable connection can often cause an SSD's failure to appear in Disk Utility. Here’s how to fix this:
Check the cable:
Switch ports:
Switch cables:
If the issue persists after confirming the connection, move on to the next fix.
You May Also Like:
Formatting the SSD in Terminal might offer an alternative when conventional methods are not working. It can correct any discrepancies in the SSD file system to align it with macOS requirements.
However, if you find it difficult to use the Terminal, you can skip this method and try formatting your SSD using a third-party tool mentioned in Fix 5 of this article.
The steps to follow for resolving the "New SSD Not Showing Up in Disk Utility" issue with SSD formatting using Terminal are given below:
Step 1. In the Mac Terminal, type "diskutil list" to view all connected devices.

Step 2. Locate your SSD.
Step 3. Run the command "diskutil eraseDisk JHFS+ NewSSD /dev/disk2."
Note: Enter your SSD identifier in place of "/dev/disk2" and replace "NewSSD" with your preferred name.
Step 4. When prompted for confirmation, type 'y' and hit Enter.
Now that the SSD is formatted using Terminal check if it appears in Disk Utility. If not, proceed to the next fix for further troubleshooting.
In many cases, SSD and disk utility compatibility problems can be improved by updating the old firmware on your SSD.
You can start by visiting the SSD manufacturer's official website to find the model of your SSD. Now, look for any firmware upgrades available. If available, follow the manufacturer's guide to download and execute the updated firmware on your SSD. Make sure to maintain a steady connection during the process.
Once you have updated the SSD firmware, check in Disk Utility to see if the SSD is now detected. If not, move on to the next repair to carry out more troubleshooting.
Are you still struggling with the new SSD not showing up in Disk Utility? Do not worry; EaseUS NTFS for Mac is at your rescue. Using this third-party software to format the SSD guarantees a simple, command-free approach accessible to all users. This approach makes disk formatting easier, fixes problems with Disk Utility detection, and provides a handy substitute for Terminal commands - especially for those looking for a simple fix. It provides the "Erase" function to format your SSD seamlessly.
So, download EaseUS NTFS for Mac and follow the steps given below:
Step 1. Launch EaseUS NTFS for Mac on your Mac, click "I already have a license" and enter your code to activate this software.
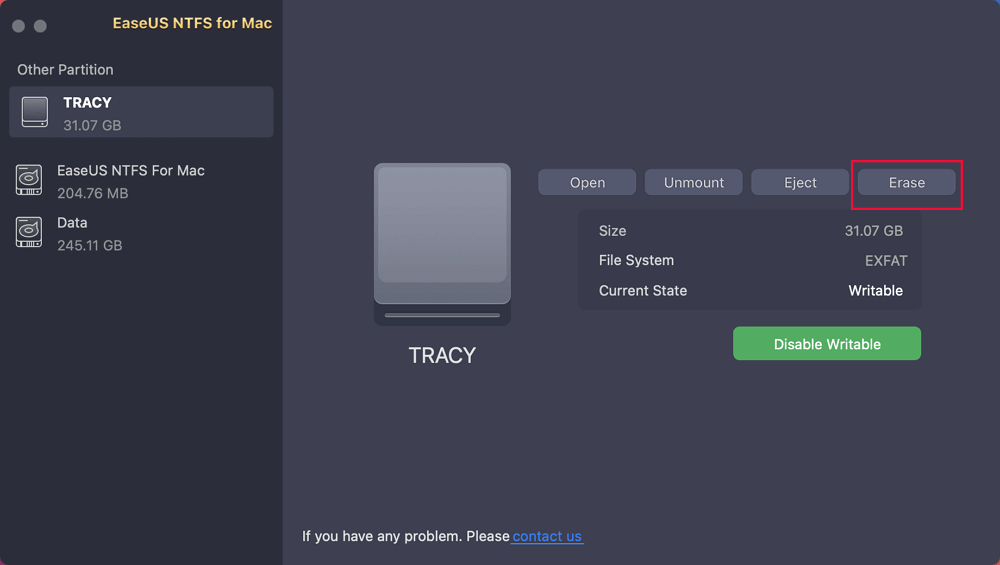
Step 2. Connect the target external hard disk to your Mac, locate it and choose "Erase" to move on.
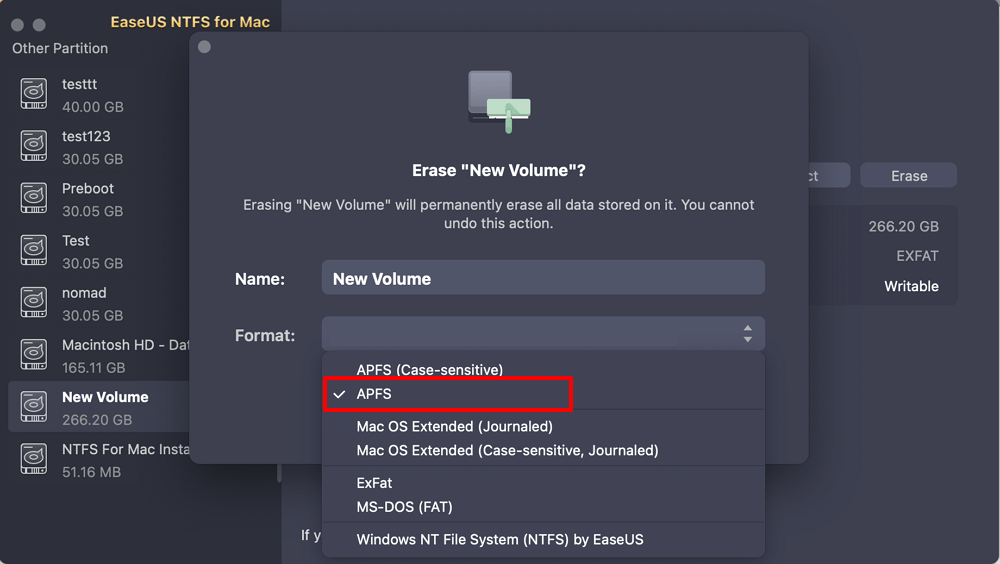
Step 3. In the Format box, select the "APFS" option in the scroll down menu as the new file system.
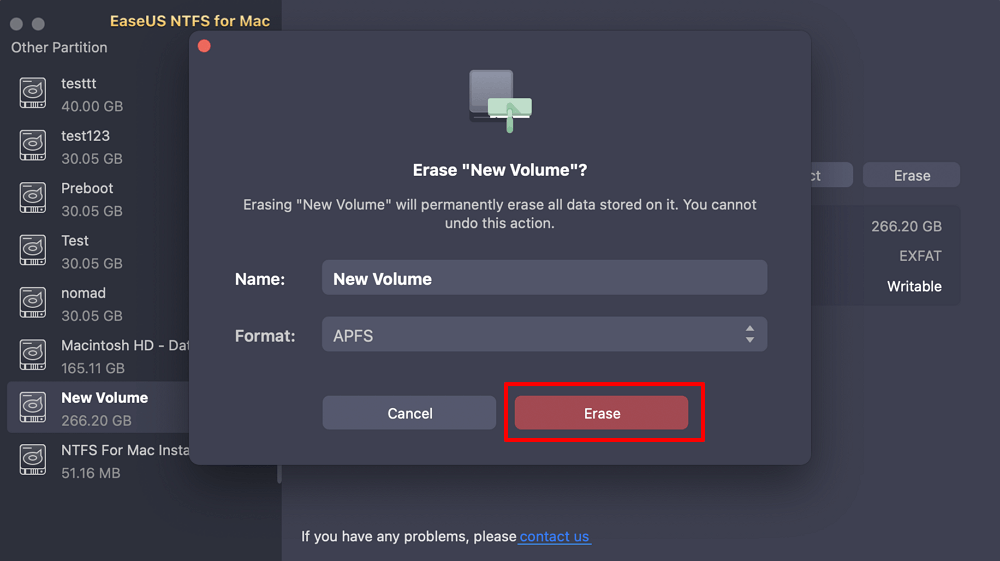
Step 4. Hit on the "Erase" button to confirm the format action and erase all data stored on this external storage device.
EaseUS NTFS for Mac simplifies formatting for new SSDs, providing read-and-write access and compatibility with all drives, including NTFS-formatted drives, and resolving disk utility recognition issues.
Beyond being annoying, it is a waste of money if your storage upgrade is not working when a brand-new SSD does not appear in Disk Utility. This article has given you five potential methods to solve this issue.
However, you must also be aware of the reasons behind this problem. Here are the causes leading to your new SSD not showing up in Disk Utility:
To access your SSD, identify the possible cause of the new SSD not showing up in Disk Utility and take the appropriate action. Additionally, if you find this article useful, share it with your friends who might need guidance with SSDs not showing up on Mac.
In conclusion, if you want to get the most out of your storage investment, you need to figure out why your new SSD is not showing up in Disk Utility. Of the five effective and easy solutions in this article, EaseUS NTFS for Mac is the most recommended option for beginners, especially those looking for a quick and command-free fix. Its easy-to-use interface and "Erase" feature make the formatting simpler and guarantee a flawless interaction with Disk Utility.
So, what are you waiting for? Take control of your new SSD and enjoy the power of your storage investment.
Are you still having problems accessing your new SSD? Read the frequently asked questions listed below to learn more about why your new SSD is not appearing in the disk utility.
1. Why is my internal SSD not showing up in Disk Utility?
Incompatible settings or loose connections may be the cause of internal SSD non-detection. Verify safe connections and compatibility with the requirements of your Mac.
2. How do I get my Mac to recognize my SSD?
Ensure compatibility, update your macOS, upgrade the SSD firmware, and check connections to get your Mac to recognize your SSD.
3. How do I get Windows to recognize my new SSD?
For Windows to recognize your SSD, follow these steps:
Step 1. Connect the SSD to your device.
Step 2. Open Disk Management.
Step 3. Locate the SSD, right-click, and initialize it.
Step 4. Create a new simple volume and format the SSD as needed.
Related Articles - ALSO ON EaseUS SOFTWARE
How to Fix LaCie Hard Drive Not Showing Up on Mac (5 Practical Methods)
![]() Banu/2025-06-26
Banu/2025-06-26
3 Reliable Ways to Format SD Card to FAT32 on Mac
![]() Banu/2025-11-11
Banu/2025-11-11
How to Format FAT32 to NTFS on Mac
![]() Banu/2025-06-26
Banu/2025-06-26
Is NTFS Compatible with Mac? Check Your Answer Here
![]() Banu/2025-11-11
Banu/2025-11-11
Copyright © 2004 - 2023 EaseUS. All rights reserved.