- Store
-
Support CenterGuides, License, ContactDownloadDownload installerChat SupportChat with a TechnicianPre-Sales InquiryChat with a Sales Rep
Apple M1 Mac won't enable writing to Windows-formatted NTFS drive. So a free NTFS driver for Mac is important. In this article, you can easily enjoy read-write access, mount, safely eject, and more features on Apple Silicon M1 Mac.
Table of Contents
| Workable Solutions | Step-by-step Troubleshooting |
|---|---|
| Option 1. Run EaseUS NTFS for Mac | Step 1. Launch and activate EaseUS NTFS for Mac. Click "I already have a license" to unlock this software...Full steps |
| Option 2. Get Write Access with Terminal | Step 1. Click on the Finder icon > Choose the Application > Locate and click Utilities > Find and open...Full steps |
| Option 3. Format NTFS Drive in Disk Utility | Step 1. Click on the Finder icon, find Application from the left panel, scroll down to find Utilities...Full steps |
The Newest Mac computer with an M1 chip has been released since Nov. 2020. We all knew that Mac can only enable read access to NTFS drive. However, even worse, some users discussed on the forum that the new M1-based computer cannot see the files or folders. All was blank as the below case shows:
"Just got a new Mac Mini M1, pretty impressed until I connected my old external NTFS USB drive. It's mounted, can see it in Finder, Disk Utility etc but no files or folders are visible, just blank space, connected to Windows PC all the files are there, it worked fine on my old Mini, only read but that's expected......Any ideas???"
To fix such an issue, you need an NTFS for Mac M1 free software which can let you edit or transfer files normally. More than that, two manual methods also read and write to NTFS drive.
Here are three methods, compatible with M1-chip Mac, enable read-write on NTFS external hard drive.
If you search Mac NTFS driver, it will show several results that can help you. But not all software can work with an M1-based computer.
EaseUS NTFS for Mac is a reliable NTFS for Mac software that allows M1 mac to read and write external storage devices, like a USB drive. Once it running, you can easily read, write, delete, add, transfer files. It is so convenient that you don't need to fiddle with complex command lines and wait for the result. When you finish software activation, this software will reside in the Mac status bar that can automatically mount the NTFS drive. If you want to eject the drive, the software allows you to safely eject the device without any data loss.
Download EaseUS NTFS for Mac (Available to macOS Big Sur 11 ~ macOS Sierra 10.12):
How to Use EaseUS NTFS for Mac:
Step 1. Launch and activate EaseUS NTFS for Mac. Click "I already have a license" to unlock this software.
Step 2. Connect an NTFS drive to Mac, EaseUS NTFS for Mac will automatically detect the device. Select your drive and you'll see it's now marked as 'Read-only". Click "Enable Writable" to add read and write rights to the drive.
Step 3. When the state of NTFS drives turns into "Writable".
Step 4. EaseUS NTFS for Mac will pops up a window to help Mac get access to the NTFS drive:
Step 5. When EaseUS NTFS for Mac restarts, you can then open to check, read, write, and even modify saved data on the NTFS device.
How Much Does NTFS for Mac Cost
$0 order for 7 days. The paid version costs $14.95 for a month. But you can attend a free sale for now. Even though it is not free for a lifetime than other manual methods, this software is more stable than the Terminal and Format options.
Related articles:
How to Write to NTFS on Mac? Don't Missing Free Methods!
All useful solutions are included in this article, explaining each step about how to write to NTFS on Mac.
The terminal is a free solution to enable read and write on NTFS drive. You can use it on an M1 mac.
In-depth tutorial to write NTFS drive:
Step 1. Click on the Finder icon > Choose the Application > Locate and click Utilities > Find and open Terminal.
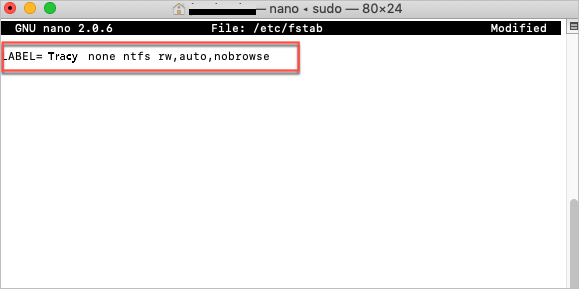
Step 2. When the Terminal window pop up, type the command: sudo nano /etc/fstab
Then teh /etc/fstab file will be listed below.

Step 3. Type command line: LABEL=NAME none ntfs rw,auto,nobrowse (Change the NAME with your drive name.)
Step 4. Press Ctrl+O and press Enter to save the file.
When it has been done, you can choose to see files or folders and editing data on them.
If third-party tools and terminals are not your first choice, you can choose to reformat the NTFS drive to FAT32 or HFS+ file system. Remember to copy or clone all data from your NTFS drive. Formatting will delete all data.
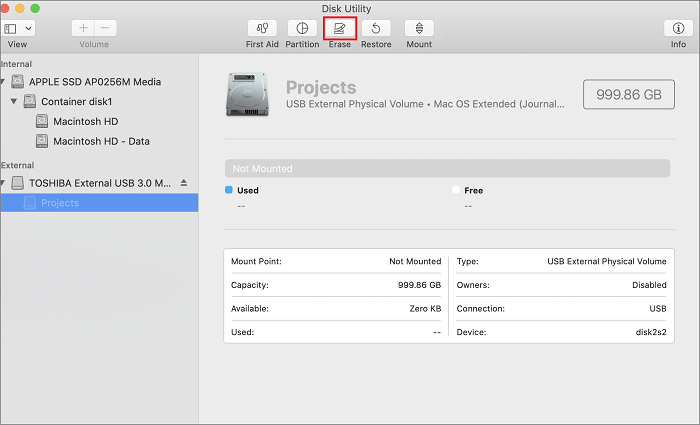
Step 1. Click on the Finder icon, find Application from the left panel, scroll down to find Utilities, and double-click on Disk Utility.
Step 2. Under the External heading, click on the NTFS external drive.
Step 3. Go to the top section of Disk Utility and click on the Erase button.
Step 4. When the Erase window shows up, rename the NTFS drive and set the new Volume Type.
After the formatting, you can try to add files to NTFS external devices and see files without worry.
Do these NTFS for Mac M1 free solutions work for you? As we tested, the Terminal does not always work as users complain about "Terminal do nothing......". So if you want to get quick access and saw files and folders. We recommend option 1 - EaseUS NTFS for Mac. For beginners, it is definitely easy to run.
Related Articles - ALSO ON EaseUS SOFTWARE
How Do I Fix USB Read Only on Mac? Your Reliable Fixes Are Here
![]() Banu/2025-06-26
Banu/2025-06-26
3 Best Mac NTFS Writers 2026 Free Download
![]() Banu/2026-01-05
Banu/2026-01-05
How to Format Disk to NTFS on Mac Using Terminal [2026 Full Guide]
![]() Banu/2026-01-05
Banu/2026-01-05
What Is NTFS for Mac, Everything You Should Know About It
![]() Daisy/2025-06-26
Daisy/2025-06-26
Copyright © 2004 - 2023 EaseUS. All rights reserved.


