- Store
-
Support CenterGuides, License, ContactDownloadDownload installerChat SupportChat with a TechnicianPre-Sales InquiryChat with a Sales Rep
How do you read and write Windows NT file system drives on a Mac computer? This page presents you with the 3 best methods to read and write NTFS on Mac flexibly for free. Follow this tutorial guide to take full control of your NTFS drives on Mac now.
Table of Contents
Can Mac read and write to NTFS drives? Due to the file system support limitation, Apple macOS can only read from NTFS formatted drives but can't write to files on the drive.
So how do I make my NTFS drive writable on a Mac? Stay here, and we'll guide you through the process, making your Windows formatted drives readable and writable on Mac without formatting the disk. Let's get started.
"I connected my external hard drive (in NTFS format) to Mac computer, nothing appears. I mounted the drive. Now, I can view its content but can't copy files from NTFS to Mac. How can I fix this? Help."
If you encountered a similar issue as listed above, relax. You can overcome the limit of the NTFS file system by trying any of the next 3 methods:
| NTFS Drive Read & Write Tools | Detailed Steps |
|---|---|
| 1. EaseUS NTFS for Mac - Easiest | Download and launch EaseUS NTFS for Mac, activate this software...Full steps |
| 2. FUSE for macOS - Complex | Download FUSE for macOS and install on Mac...Full steps |
| 3. Terminal - Complex | Go to Finder > Applications > Utilitys > Double-click to open Terminal...Full steps |
Note: For quick access to read and write to NTFS drives on your Mac, EaseUS NTFS for Mac with its Enable Writable feature stands out to help.
| Pros: Easy-to-use, 1-click solution, support all macOS and Mac OS X | Cons: 7 days free only. |
EaseUS NTFS for Mac is a third-party NTFS driver software that enables you to open, mount, write, and eject Windows file system formatted external hard drives, USB drives successfully on Mac. It requires no technical skills.
In a word, any one of you who knows how to click files or apps on Mac computers can add read and write rights to NTFS drive on Mac. Let's see how to read and write files on your Mac now:
Step 1. Launch and activate EaseUS NTFS for Mac. Click "I already have a license" to unlock this software.
Step 2. Connect an NTFS drive to Mac, EaseUS NTFS for Mac will automatically detect the device. Select your drive and you'll see it's now marked as 'Read-only". Click "Enable Writable" to add read and write rights to the drive.
Step 3. When the state of NTFS drives turns into "Writable".
Step 4. EaseUS NTFS for Mac will pops up a window to help Mac get access to the NTFS drive:
Step 5. When EaseUS NTFS for Mac restarts, you can then open to check, read, write, and even modify saved data on the NTFS device.
Besides enabling NTFS drive writable on Mac, you can also apply EaseUS NTFS for Mac to resolve these issues:
Featured Video Tutorial of EaseUS NTFS for Mac
Follow this video to enjoy full features in EaseUS NTFS for Mac and take full control of your NTFS drives on Mac now:
| Pros: Open-source free solution | Cons: Complex for beginners, support macOS only, cause a security risk. |
FUSE for macOS is an open-source free solution for new macOS computers. It requires disabling the System Integrity Protection and replace one built-in tool on Mac with a binary. As a result, you may bring a security risk to your Mac computer while enabling Mac to read and write to NTFS drives.
Note: We suggest that you think twice and be careful with this method. For security consideration, EaseUS NTFS for Mac is the best choice.
Let's see how to make your NTFS drive readable and writable on Mac now:
Step 1. Download FUSE for macOS and install on Mac: https://github.com/osxfuse/osxfuse/releases
Step 2. Install Xcode:
1. Go to Finder > Applications > Utilities > Double-click to open Terminal.
2. Type the command line in Terminal and press Return:
3. Then, click "Install" to confirm the installation of Xcod on Mac.
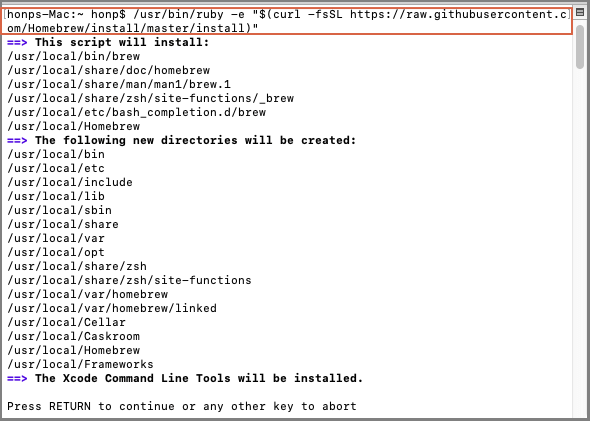
Step 3. Install Homebrew:
1. Open Terminal, type the command, and press Enter:
/usr/bin/ruby -e "$(curl -fsSL https://raw.githubusercontent.com/Homebrew/install/master/install)"
2. Terminal will automatically execute the command, download and install Homebrew.
Step 4. Install NTFS-3g:
Type the command line in Terminal and press Return:
Step 5. Type the following command lines one by one in Terminal and press Return to mount the NTFS drive on Mac:
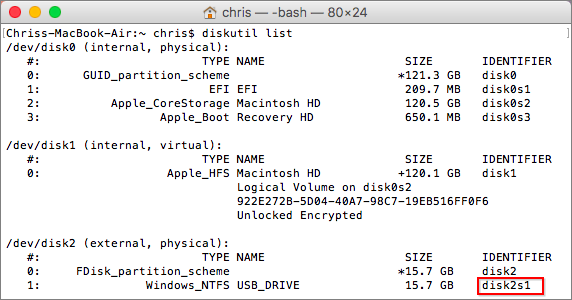
Step 6. Unmount and re-mount NTFS drive in Terminal with the below command lines:
Replace /dev/disk2s1 with the drive name of the NTFS disk.

After this, you'll see your NTFS drive shows up on the Mac desktop. You can read and write to NTFS drive files without any issues now.
| Pros: Free | Cons: Unstable on macOS 10.12 and newer versions. |
The terminal is a Mac built-in command disk utility that you can apply to manage Mac hard drives and apps. Adding read and write support to NTFS drives is also possible by using Terminal command lines for help.
Note that according to some tests, it seems that this method is unstable in some new macOS systems. For a stable solution, revert to Method 1 to take EaseUS NTFS for Mac for help.
Let's see how to access and write to your NTFS external or USB drives on Mac now:
Step 1. Go to Finder > Applications > Utilitys > Double-click to open Terminal.
Step 2. Type the command lines one by one as listed below, and hit Return each time:
Replace DRIVENAME with the name of the NTFS drive.
Step 3. Press Ctrl + O to save changes.
Step 4. Press Ctrl + X to close Terminal.
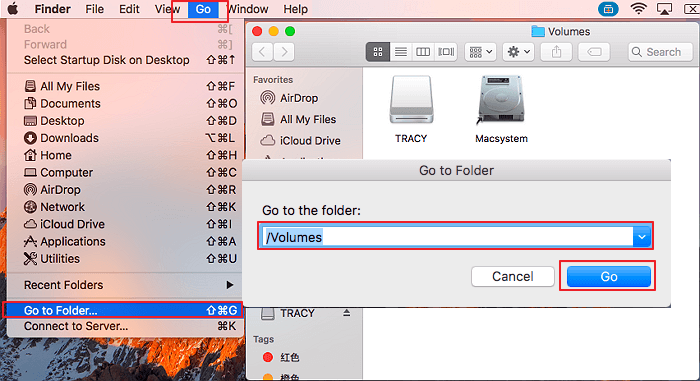
Step 5. Now you can go and follow this path to open, read, and write to NTFS drive on Mac:
"Finder/Go/Go to Folder" > Type /Volumes and click "Go".
Comparing to the above three solutions, it's easy to identify that EaseUS NTFS for Mac is the easiest and most efficient tool for making your NTFS drive writable on Mac.
With this software, you can make NTFS drives accessible, readable, and writable on Mac M1 computers. It's also fully compatible with all old and new mac OS, like Monterey, Catalina, Big Sur, Mojave, High Sierra, Sierra, etc. Apply this software to read and drive NTFS drives on your Mac now.
Related Articles - ALSO ON EaseUS SOFTWARE
How to WD Elements Not Showing up Mac [2026🔥]
![]() Cici/2026-01-05
Cici/2026-01-05
Can Mac Write to NTFS, Yes! Your 2023 Full Tutorial
![]() Sherly/2025-07-07
Sherly/2025-07-07
NTFS-3G for macOS Free Download and Install Tutorial
![]() Banu/2026-01-05
Banu/2026-01-05
NTFS for Mac M1 Free: How to Get Write Access on M1 Mac
![]() Banu/2025-06-26
Banu/2025-06-26
Copyright © 2004 - 2023 EaseUS. All rights reserved.


