- Store
-
Support CenterGuides, License, ContactDownloadDownload installerChat SupportChat with a TechnicianPre-Sales InquiryChat with a Sales Rep
When a USB drive shows 'read-only' on Mac, you can neither read nor write files on the device. The only solution is to get rid of the 'read-only' state from your USB drive. How to fix this issue? On this page, we'll present you with 5 methods that you can follow to fix USB read-only on Mac successfully on your own.
Table of Contents
This page covers 5 solutions to help you fix USB drive read-only issues on Mac. If your USB drive or USB flash drive suddenly becomes inaccessible with read-only status or you can neither open the drive or editing files in the drive on Mac, follow the complete guide here. You'll get rid of the USB drive read-only issue successfully on your own.
Fix USB Drive Read Only Windows
If you are a Windows user and USB shows as read-only, don't worry. Follow this guide, you'll also get rid of the read-only state from USB in Windows.
Read Duration: 5+ minutes.
Supports to Fix: Read-only error on a hard drive, USB, external hard drive, SD card, etc., on macOS Monterey, Big Sur, Catalina, Mojave, and older Mac OS X.
Read-only is a write protection status. When a USB drive is read-only, it means that your USB is write-protected. You can only read or view the saved data. You won't have access to modify, edit, or even delete files and data on the drive.
5 Methods to Fix USB Read Only Error on Mac:
So how to fix this error? First, please reconnect the USB drive to Mac and see if you can access and write to the USB drive. If yes, congratulations. If not, move on and follow the 5 methods below to fix the USB drive read-only immediately.
#1. Run First-Aid to Fix Read-Only USB Drive with Internal Errors
#2. Ignore Permissions to Make Read-Only USB Drive Accessible
#3. Format USB Drive If It's Blank
#4. Enable Read-Only NTFS USB Drive on Mac with EaseUS NTFS for Mac
#5. Add Write Support to Read-Only NTFS USB Drive via Terminal
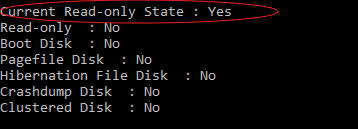
To find the right fix for a read-only USB, it's important that you check the state of the USB drive. Here are the steps that you can follow:
Step 1. Keep USB drive connected to Mac.
Step 2. Try to open the USB drive, and see the state of the USB. Also, note if Mac prompts any notifying messages.
If this error occurs to your external hard drive, follow this page to learn How to Fix External Hard Drive Read Only on Mac With/Without Formatting.
When a storage device contains internal errors, it may have an accessible error that the drive may display as "Read-Only" on Mac. To get rid of the errors, you can run First Aid on the USB drive with the following steps.
Step 1. Connect the read-only USB drive to Mac.
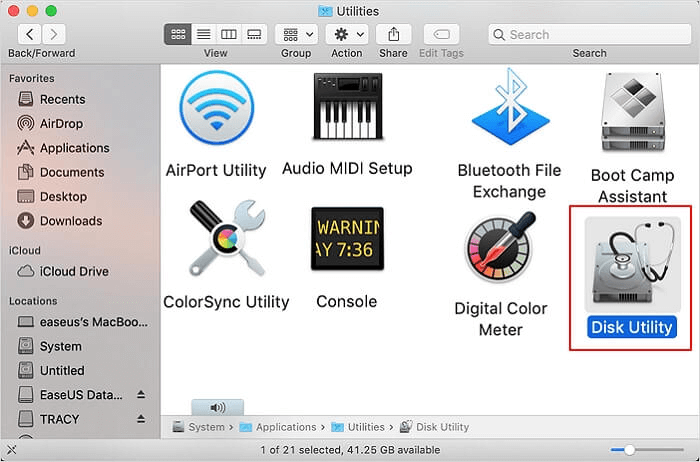
Step 2. On Finder, go to "Applications" > "Utilities" > Double-click "Disk Utility".
Step 3. Select the read-only USB drive, click "First Aid" at the top pane, and click "Run".
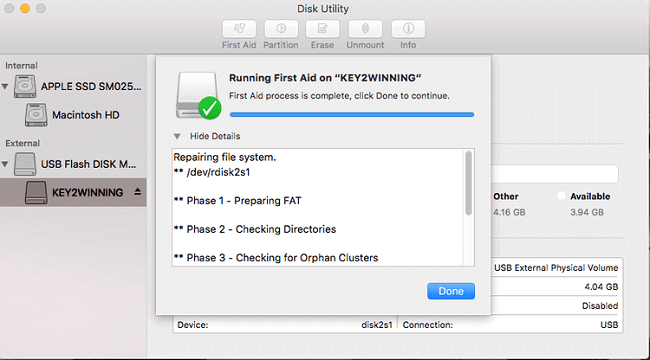
When the First Aid process completes, close Disk Utility > safely eject and reconnect USB drive on Mac > Check if it's accessible.
If yes, congratulations that you can stop here. If not, continue with the fixes below.
If you locked or set permission limits to the USB drive, Mac will add permission limits to the drive. In this case, it will show as Read Only. You can change the permission settings to make it readable and writable again.
Here are the steps:
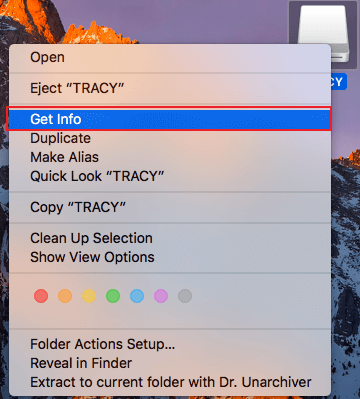
Step 1. Connect the USB drive to Mac and right-click on it, select "Get Info".
Step 2. Expand "Sharing & Permissions" and click the lock to authenticate.
Step 3. Tick "Ignore ownership on this volume".
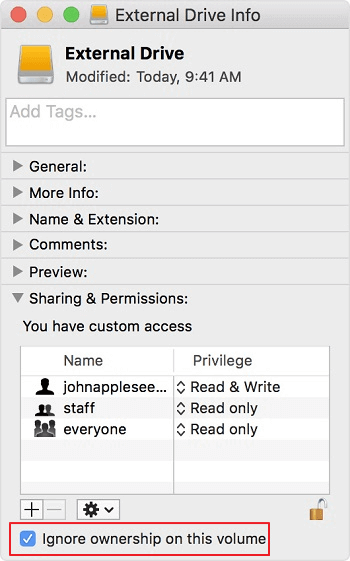
After this, see if you can access and edit files on the USB drive. If not, restart Mac to keep the changes.
Note that if the USB drive is empty, and it doesn't contain the errors in Method 1 and Method 2, you can directly format to fix this issue.
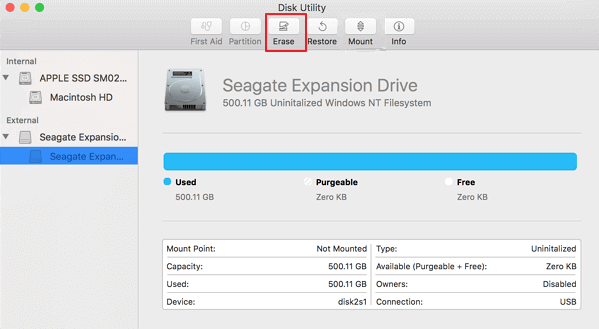
Step 1. Connect the read-only USB drive to Mac.
Step 2. Go to Finder > Applications > Utilities > Double-click to open Disk Utility.
Step 3. Select the USB drive and click "Erase".
Step 4. Set the format of the USB drive as MS-DOS (FAT) or Mac OS Extended, Master Boot Record, and click "Erase".
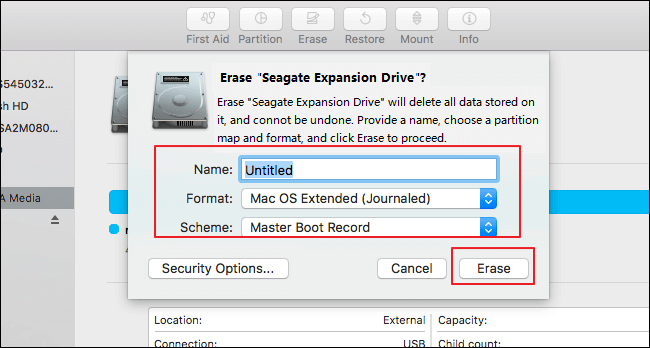
When the formatting process completes, disconnect the USB and restart Mac. Reconnect USB to Mac. You should be able to access and you can save new files on the drive now.
When your USB drive is formatted with an NTFS file system, Mac computers sometimes will detect the drive as read-only for securing the saved data. Also, when your USB drive contains essential files, you can't just format the drive.
To solve this issue, you can enable NTFS on Mac so as to allow Mac computers to access the USB drives. How to do so? Here, automated EaseUS NTFS for Mac is capable of helping.
EaseUS NTFS for Mac will remove the access block, allowing you to edit, modify, copy, and even delete files on the NTFS USB drive with only one click.
Step 1. Launch and activate EaseUS NTFS for Mac. Click "I already have a license" to unlock this software.
Step 2. Connect an NTFS drive to Mac, EaseUS NTFS for Mac will automatically detect the device. Select your drive and you'll see it's now marked as 'Read-only". Click "Enable Writable" to add read and write rights to the drive.
Step 3. When the state of NTFS drives turns into "Writable".
Step 4. EaseUS NTFS for Mac will pops up a window to help Mac get access to the NTFS drive:
Step 5. When EaseUS NTFS for Mac restarts, you can then open to check, read, write, and even modify saved data on the NTFS device.
The other manual way for unlocking NTFS read-only USB drive on Mac is turning to Terminal commands for help. Note that the process is a bit complex that you need to be very careful to follow the steps below.
Step 1. Open Terminal on Mac and type the command below and press Enter:
nano etc/fstab
Step 2. Type the command in Terminal and replace DRIVENAME with the real name of your USB drive:
LABEL=DRIVENAME none ntfs rw,auto,nobrowse
Step 3. Press Ctrl + O to save the file.
Step 4. Press Ctrl + X to quit.
Step 5. Go to Finder > Go > Go to Folder > Enter /Volumes and click "Go".
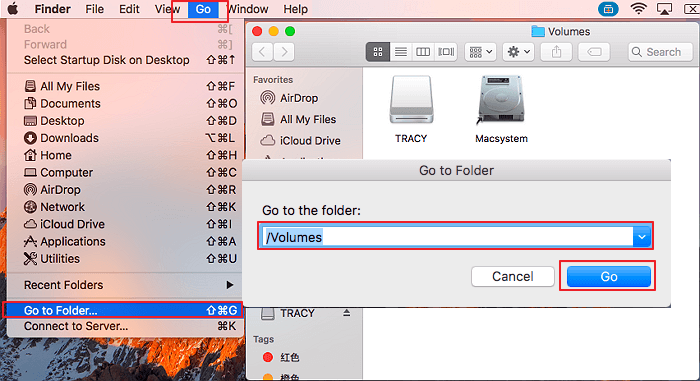
You'll be presented with your USB drive and you can make changes to the USB drive by copying files, editing data, delete or even format the drive on Mac.
By following the solutions above one by one, you can successfully get rid of the Read-Only issue from your USB drive or other types of storage devices on Mac.
Some of you may also want to know what caused the USB drive or USB flash drive to read-only? Normally, a read-only error was caused by the following reasons:
The reasons that caused storage devices on Mac could be various. With proper operations, it's avoidable and fixable:
On this page, we provided 5 practical solutions that you can the guide steps to fix USB read-only errors on Mac successfully.
To do so, we suggest that you take action to detect the state of the USB drive first. Then follow the respective solutions to make Read-Only USB accessible and writable again.
Just stay calm when the USB drive or your other types of devices are displaying as read-only on Mac, you can follow and fix the issue on your own.
Related Articles - ALSO ON EaseUS SOFTWARE
How to Fix Toshiba External Hard Drive Not Working on Mac
![]() Banu/2025-06-26
Banu/2025-06-26
How to Safely Force Eject External Hard Drive on Mac
![]() Banu/2025-06-26
Banu/2025-06-26
Sabrent External Hard Drive Not Recognized Mac | 5 Solutions
![]() Oliver/2025-09-01
Oliver/2025-09-01
How to Change Read and Write Permissions Mac [Step-by-Step]
![]() Cici/2026-01-05
Cici/2026-01-05
Copyright © 2004 - 2023 EaseUS. All rights reserved.