Table of Contents
You might have noticed a slight compatibility hiccup if you're a Mac user who's ever crossed paths with a Western Digital (WD) Element external hard drive. These handy storage devices typically come pre-formatted in a file system called FAT32, which plays well with both Mac and Windows systems but can sometimes leave Mac users yearning for the benefits of the NTFS file system. That's where our guide on how to format WD Element to NTFS on Mac comes into play.
In this passage, EaseUS will lead you to learn about transforming your WD Element's file format into NTFS, offering Mac users free access to a more robust and feature-rich file system. By the time we're done, you'll have the keys to unlock your WD Element's full potential, making it a more reliable storage companion for your Mac.
NTFS or New Technology File System stands for "New File System," and it's the file system used by most Windows operating systems. NTFS is used to organize and manage the data saved on storage devices. HFS+ or the more current APFS are typically the Mac's native file systems.
So, you might be wondering if the NTFS file system can be used with your Mac. In short, your Mac can read from disks with the NTFS file system. The drawback is that your Mac needs to be able to write natively to NTFS drives. This implies that you must apply some workarounds to modify, delete, or add new files on your Mac.
Next, we will continue to introduce more information about WD Element and NTFS format on Mac. If you think this guide is useful, you can share it with other friends and help them to solve problems.
Indeed, you can format your WD Element to NTFS on your Mac, and there exist valid reasons for pursuing this course of action. Mac can use NTFS with professional NTFS for Mac tools. NTFS boasts various advantages, including enhanced security features and support for larger file sizes. If you plan to use the drive on both Windows and Mac, formatting it to an NTFS file format can be a smart choice.
Let's look at how to format your WD Element on your Mac. We want to make this process as easy as possible so you can get the most out of your external drive.
Further reading: Can Mac Read FAT32
Here are some detailed methods to help you format WD Element to NTFS on Mac.
Method 1. Format WD Element to NTFS via Third-Party Tool
Are you looking for a hassle-free way to get read access to NTFS on your Mac and format your WD Element drive as NTFS? EaseUS NTFS for Mac is your answer. This tool offers safe, easy, quick, and full-featured solutions for managing NTFS drives on your Mac. With it, you can seamlessly access NTFS files and even format your WD Element to NTFS hassle-free.
It's not just about changing NTFS; it does a lot more. You get a bunch of valuable features that make handling your drives easy. It's like having a handy tool for your data.
So, why go for a complicated solution when you can have a safe, easy, quick, and feature-packed answer with EaseUS NTFS? Your data will be grateful!
Follow these steps:
Step 1. Launch EaseUS NTFS for Mac on Mac computer, click "I already have a license" to activate this software.
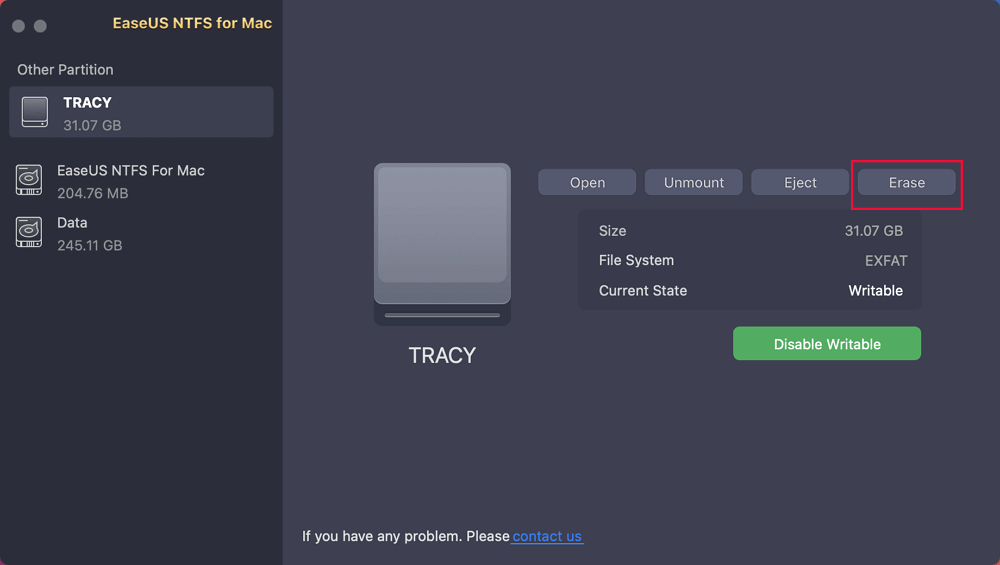
Step 2. Select target disk drive or removable device you tend to erase, and click "Erase" to continue.
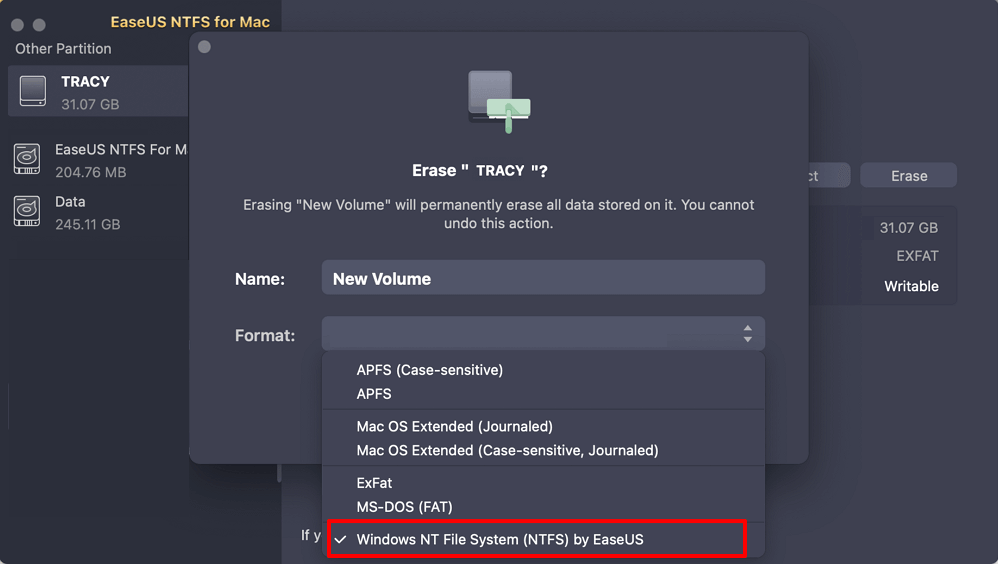
Step 3. Select "Windows NT File System (NTFS) by EaseUS" - NTFS file system as the target file system.
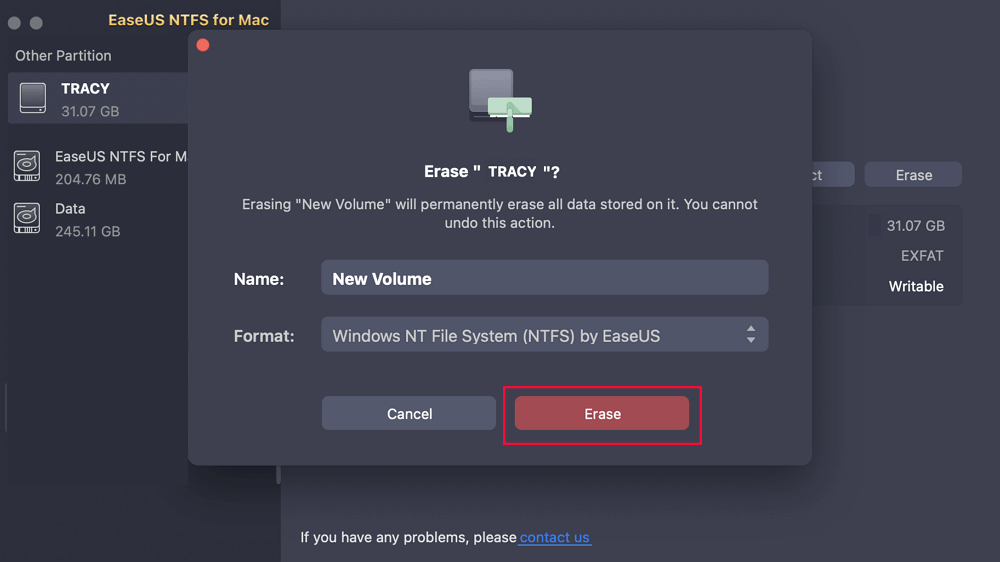
Step 4. Click "Erase" to confirm the formatting and start erasing your target device to NTFS file system.
Notable Features
Here are some amazing EaseUS NTFS for Mac:
Incorporating these features, EaseUS NTFS for Mac simplifies working with NTFS drives on your Mac, making it a versatile solution for those who regularly interact with NTFS-formatted storage devices.
Try EaseUS NTFS for Mac, and forget about the worries of NTFS compatibility on your Mac again.
Method 2. Format WD Element to NTFS via Mac Terminal
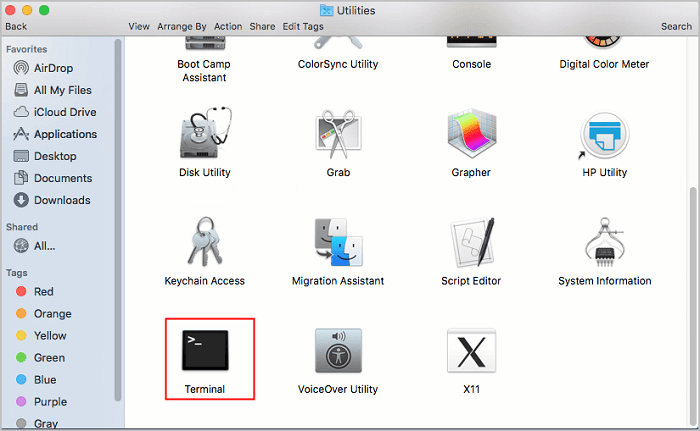
For those who prefer a manual approach, here's how to format your WD Element to NTFS using Mac Terminal. Please follow these steps carefully:
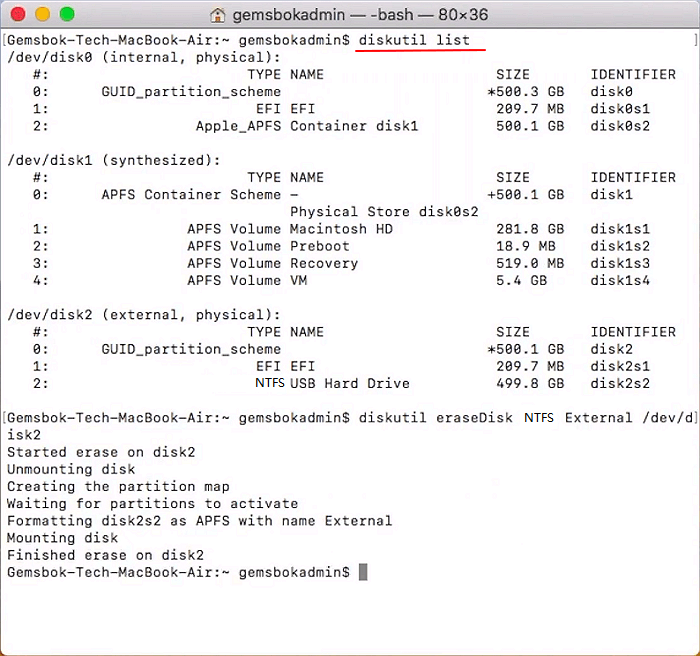
Remember to share this helpful guide with others facing the same formatting challenge on their Mac. Sharing is caring; you could be the tech hero someone needs today.
See also:
In conclusion, reformatting your WD Element to NTFS on your Mac opens up a world of possibilities for seamless data sharing between Mac and Windows systems. While both methods have merits, we highly recommend trying out EaseUS NTFS for Mac due to its advanced features and user-friendly interface. With these quick workarounds, you'll no longer be tethered to one platform but free to explore the digital universe on your terms.
By transitioning to NTFS, you'll enjoy enhanced security features and support for larger file sizes, making it a smart choice, especially if you plan to use your drive across both Windows and Mac environments. Say goodbye to compatibility issues and hello to a more versatile storage companion.
Got more questions? We've got answers!
1. What format is WD Elements for Mac and Windows?
WD Elements typically comes formatted in NTFS, which is compatible with Windows. However, for Mac users, this format may require some adjustments. When using it with Mac, it's often read-only by default.
2. How do I format my external hard drive to NTFS on a Mac?
You can format your external hard drive to NTFS on a Mac using third-party tools like EaseUS NTFS or the Mac Terminal method. These methods allow you to overcome the limitations of NTFS on macOS.
3. How to format WD Elements for Mac and PC?
To format your WD Elements for Mac and PC compatibility, Yu can use Third-Party Tools like EaseUS, or you can use MAC Terminal. These methods enable seamless data sharing between both platforms, ensuring your drive works smoothly in diverse computing environments.
Related Articles - ALSO ON EaseUS SOFTWARE
Is NTFS Compatible with Mac? Check Your Answer Here
![]() Tracy King/2024-02-26
Tracy King/2024-02-26
How to Force Erase Disk Mac Terminal [Quick Guide]
![]() Cici/2024-02-23
Cici/2024-02-23
Solved: Can't Delete Photos From SD Card on Mac - 2023 New
![]() Sherly/2024-02-26
Sherly/2024-02-26
How to Safely Eject NTFS Drives on Mac Catalina
![]() Tracy King/2023-12-19
Tracy King/2023-12-19

