- Store
-
Support CenterGuides, License, ContactDownloadDownload installerChat SupportChat with a TechnicianPre-Sales InquiryChat with a Sales Rep
Discover step-by-step instructions to force erase disk Mac terminal when Disk Utility fails. Learn effective alternatives and ensure your data is securely wiped.
Table of Contents
When you try to clean your Mac's hard disk, you run into trouble because Disk Utility won't cooperate and won't let you wipe anything or will become gray when you need it most.
It's time to keep your hands to utilize Mac's Terminal's capabilities. When you need to take matters into your own hands, this under-the-hood application can be rather strong, despite its initial scary appearance. In this guide, EaseUS will dive deep into the world of Mac Terminal to show you how to bypass these hurdles and force-erase your disk.
Sometimes, the usual methods fall short, particularly when Disk Utility is unresponsive or certain options are unavailable. In such cases, a force-erase disk Mac terminal becomes necessary. This could happen for various reasons, like file system corruption, unauthorized disk partitions, etc.
Don't worry if the Disk Utility on your Mac is stuck and won't let you format or delete your hard drive. Entering commands in the Mac Terminal can feel like you're trying to understand an archaic language. One mistake might mean saying goodbye to your files. Therefore, we have covered you with the best alternative for Mac Terminal: EaseUS NTFS for Mac.
EaseUS NTFS for Mac provides a user-friendly interface that streamlines the process and saves time in this "Disk Utility won't let you erase hard drive" situation. It's like having a helpful tech wizard who makes difficult spell-casting easy, safe, and rapid.
Advantages of using EaseUS NTFS for Mac over the Mac terminal include its ease of use, making disk management accessible to all users, regardless of their expertise level. The tool ensures safety, reducing the risk of accidental data loss due to command-line errors.
Here are some key advantages that EaseUS NTFS for Mac offers:
EaseUS NTFS for Mac positions itself as a comprehensive solution that takes the fear out of disk management, offering a user-friendly and efficient alternative to the Mac Terminal.
Download EaseUS NTFS for Mac and follow these quick steps to erase the disk with a few clicks forcefully.
Step 1. Launch EaseUS NTFS for Mac on your Mac, click "I already have a license" and enter your code to activate this software.
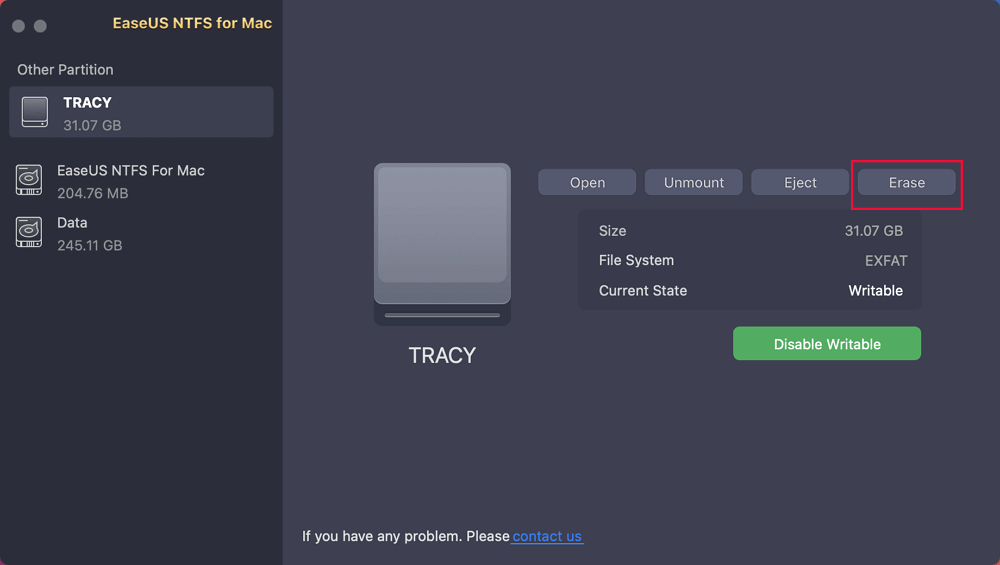
Step 2. Connect the target external hard disk to your Mac, locate it and choose "Erase" to move on.
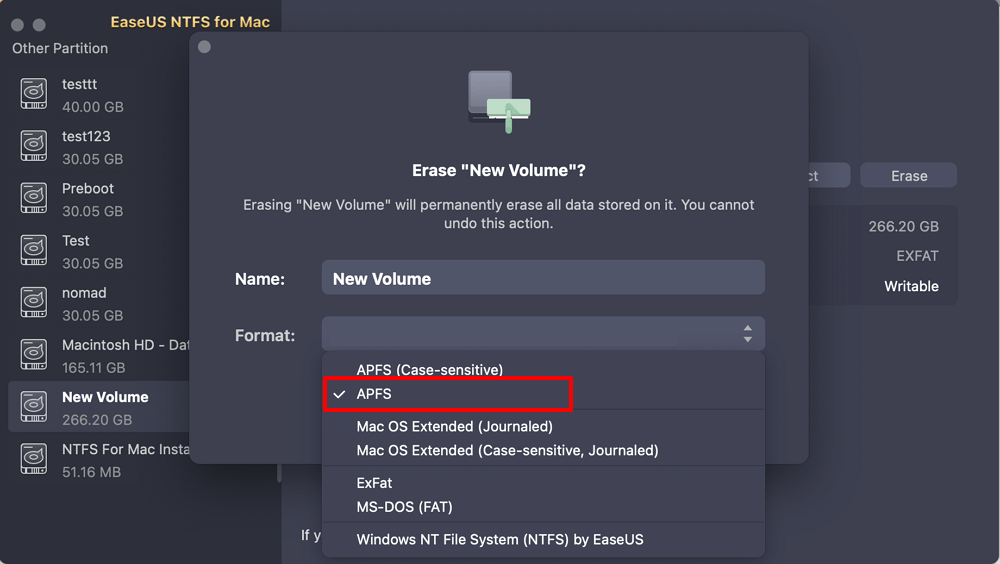
Step 3. In the Format box, select the "APFS" option in the scroll down menu as the new file system.
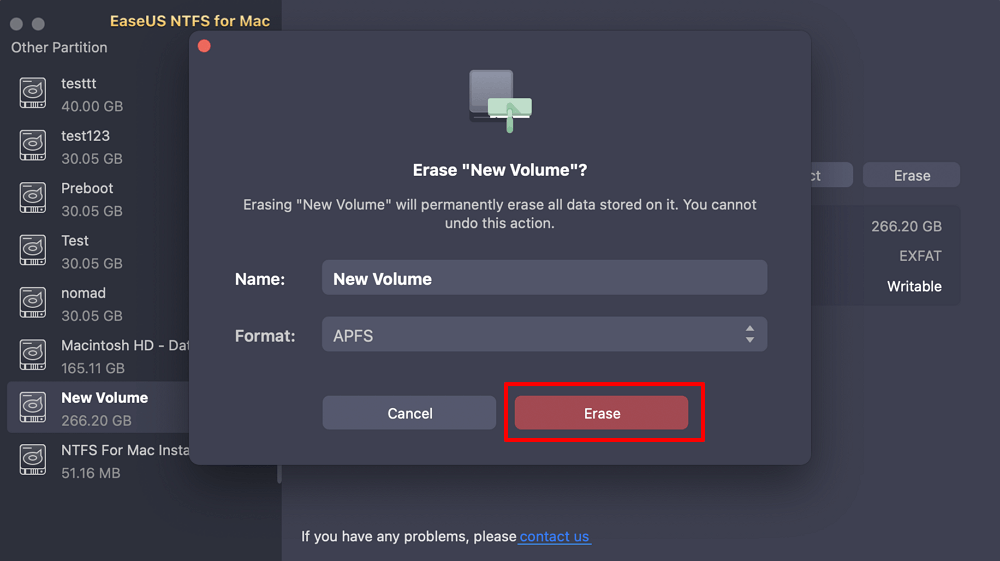
Step 4. Hit on the "Erase" button to confirm the format action and erase all data stored on this external storage device.
EaseUS NTFS for Mac can also solve other errors related to hard drives, such as WD Elements Not Showing up Mac
Using a Mac Terminal to erase a disk involves a complex process. Please note that you are required to perform each command with caution. One wrong command may lead you to potential data loss.
Note* If you are inexperienced and have limited computer skills, we advise using the alternative tool described above.
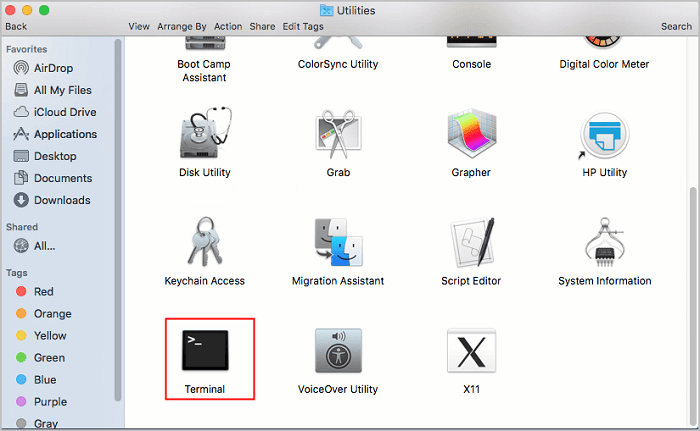
Step 1: Go to the Utilities folder, and open "Terminal," or type "Terminal" in Spotlight to use the utility.
Step 2: Once you access the Terminal interface, type or paste the diskutil list command to display all disks connected to your Mac.
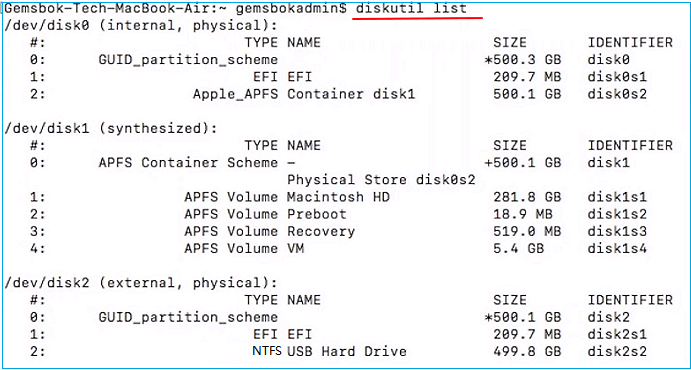
Step 3: You will see the list of connected drives to the system. Identify the targeted disk under the "IDENTIFIER" section and note its name and size.
diskutil eraseDisk FILE_SYSTEM NEW_DISK_NAME DISK_IDENTIFIER
Replace FILE_SYSTEM with the file system format you want to use. If you're unsure which one you need, there's a handy list of file system formats you could reference.
For instance, if your disk identifier is /mani/disk1, you want to format your drive to JHFS+ (Mac OS Extended), and you want to name it "CleanDrive," your command will look like this:
diskutil eraseDisk JHFS+ CleanDrive /mani/disk1
Remember to double-check your disk identifier to avoid formatting the wrong drive – a little caution goes a long way! If you think it is helpful to force erase disk with Mac terminal, click the social buttons and share it with others in need.
EaseUS NTFS for Mac stands out as a user-friendly, one-click solution for users of all skill levels looking to format drives on their Mac. This refined software streamlines the formatting process and enhances data security and privacy with its robust erase feature. While the traditional Mac Terminal offers a solid approach to disk management, it can be complex. EaseUS NTFS for Mac offers a more straightforward and intuitive alternative for anyone looking to manage their disks safely and efficiently.
If you have further questions about force erasing disks on Mac, you may find the answers here:
1. Why won't my Mac let me erase Disk Utility?
Your Mac may not allow you to erase via Disk Utility due to several issues, including a locked disk partition or file system corruption. To resolve this, try to force erase the disk Mac terminal or use software like EaseUS NTFS for Mac can be effective.
2. How do I force unmount a disk in the Mac Terminal?
To force unmount a disk in the Mac Terminal, search "Terminal" in Spotlight and open the application. Paste/Write the following command and hit the "Enter" key.
unmountDisk force /dev/(disk identifier
3. How do I force a Mac hard drive to format?
Force formatting a hard drive on a Mac can be done through Mac Terminal with the command:
sudo diskutil eraseDisk FILE_SYSTEM DISK_NAME /dev/(disk identifier)
Or you can also use a dedicated disk management tool like - EaseUS NTFS for Mac.
Related Articles - ALSO ON EaseUS SOFTWARE
How to Copy Files From Mac to External Hard Drive Without Formatting
![]() Sherly/2025-06-26
Sherly/2025-06-26
How to Safely Force Eject External Hard Drive on Mac
![]() Banu/2025-06-26
Banu/2025-06-26
How to Change Permissions on External Hard Drive Mac [Full Guide]
![]() Cici/2025-06-26
Cici/2025-06-26
How to Fix Seagate External Hard Drive Read-Only on Mac
![]() Banu/2025-06-26
Banu/2025-06-26
Copyright © 2004 - 2023 EaseUS. All rights reserved.