Table of Contents
Do Macs support mounting NTFS drives? To be able to copy, write, and even edit files on an NTFS drive from within a Mac, how do I enable NTFS to write and write support? In this article, EaseUS will define NTFS and demonstrate how to access NTFS on Mac so that you can access and edit files stored on NTFS volumes. Let's discuss it in detail.
Microsoft created NTFS, short for New Technology File System. Starting with Windows NT 3.1, NTFS has been Microsoft's preferred file system. Because of its many technological advancements, NTFS is now superior to older file systems like FAT and HPFS regarding transfer speeds, data integrity, and disk space consumption. It's perfect for sending and storing large files, up to 4 GB.
Can a Mac Read NTFS? Currently, macOS can access and display the contents of external hard drives or USB drives formatted with NTFS. However, as the NTFS format is read-only on Mac, you cannot perform any operations on NTFS-formatted drives other than mounting them.
Can Mac Write to NTFS Drive? macOS lacks functionality for writing to NTFS drives. Some tutorials suggest formatting the hard drive to exFAT, which has write support on Windows and Mac. If you already have critical data on the disk, you must back it up and then format it in a different file system, such as format NTFS drive to APFS.
Can I Access NTFS on Mac? Yes, macOS can effortlessly access Windows NTFS-formatted USB flash drives, SD cards, memory sticks, and external hard drives. The Boot Camp Assistant-created Windows NTFS partition is also readable on a Mac. Click the link below to learn more about NTFS on Mac:
There are several scenarios in which Mac users would want to access and work with NTFS drives. When you need to move large files, create a game drive, set up a one-of-a-kind testing environment, etc. So, how do you access NTFS files from a Mac? Easy. Any of the three methods below will allow you to enable NTFS to write support on a Mac. Let's take a look at their basic information as follows:
| ⏱️Duration | 10 Minutes |
| 💻Goal | Access NTFS on Mac |
| 🧰Preparation | Computer, Network, EaseUS NTFS for Mac |
| 🔒Difficulty |
✔️[Easy] Access NTFS on Mac with EaseUS NTFS for Mac ✔️[Medium] Access NTFS on Mac via Terminal ✔️[Complex] Access NTFS on Mac via Enabling Write Access |
| 🛠️Tools |
To assist users in making an NTFS storage drive accessible on a Mac, EaseUS software recently published a new program called EaseUS NTFS for Mac. Its "Enable Writable" feature will help Mac users of any skill level activate NTFS write functionality for their drive, which makes NTFS support for Mac can be downloaded and activated with a single click.
Additionally, it supports all macOS versions, from the most recent (macOS Monterey) to the oldest (OS X). Once you have used EaseUS NTFS for Mac to enable the NTFS drive, NTFS write support will be enabled automatically.
Click the above button to install EaseUS NTFS for Mac and follow the detailed steps:
Step 1. Launch and activate EaseUS NTFS for Mac. Click "I already have a license" to unlock this software.
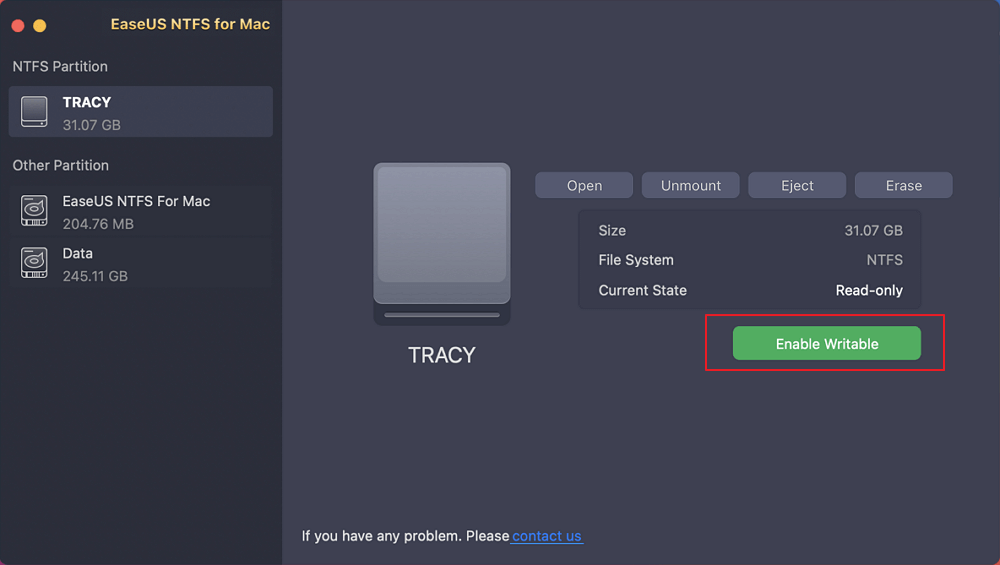
Step 2. Connect an NTFS drive to Mac, EaseUS NTFS for Mac will automatically detect the device. Select your drive and you'll see it's now marked as 'Read-only". Click "Enable Writable" to add read and write rights to the drive.
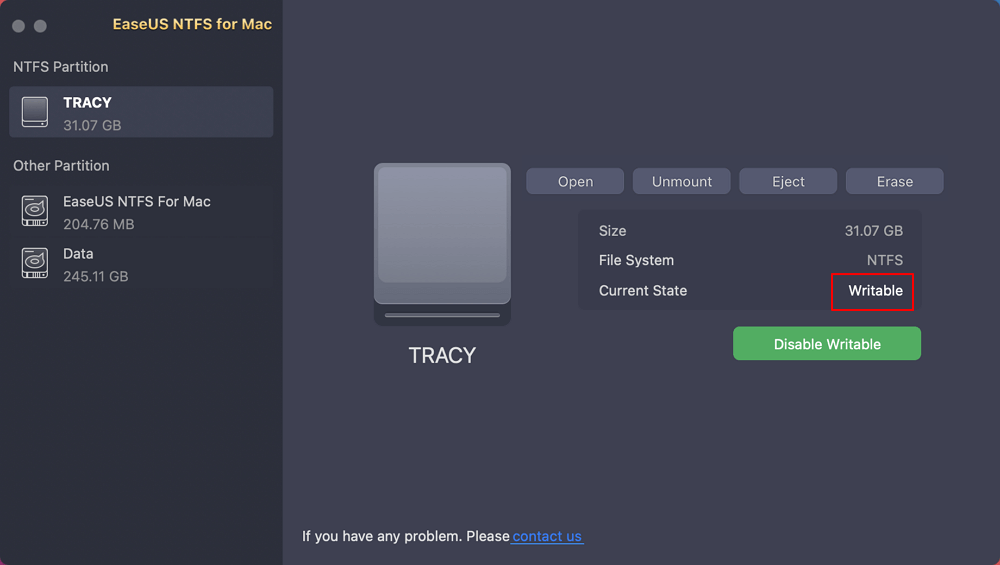
Step 3. When the state of NTFS drives turns into "Writable".
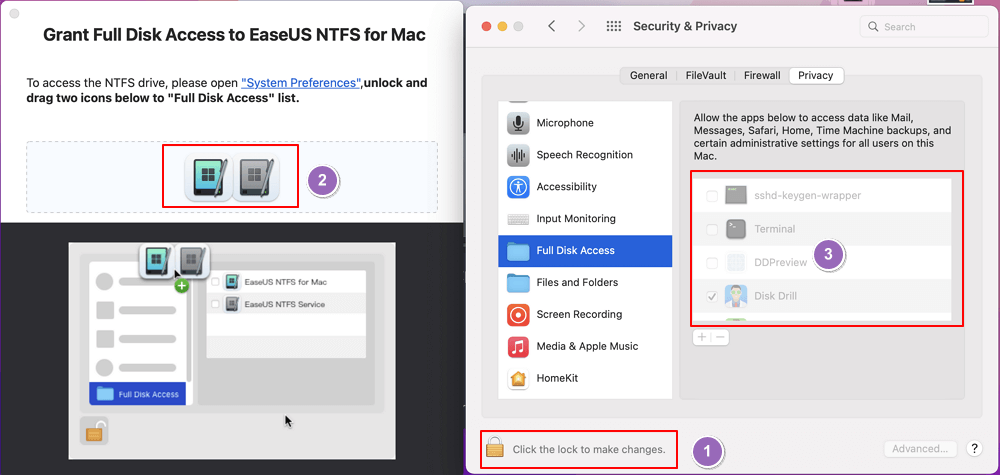
Step 4. EaseUS NTFS for Mac will pops up a window to help Mac get access to the NTFS drive:
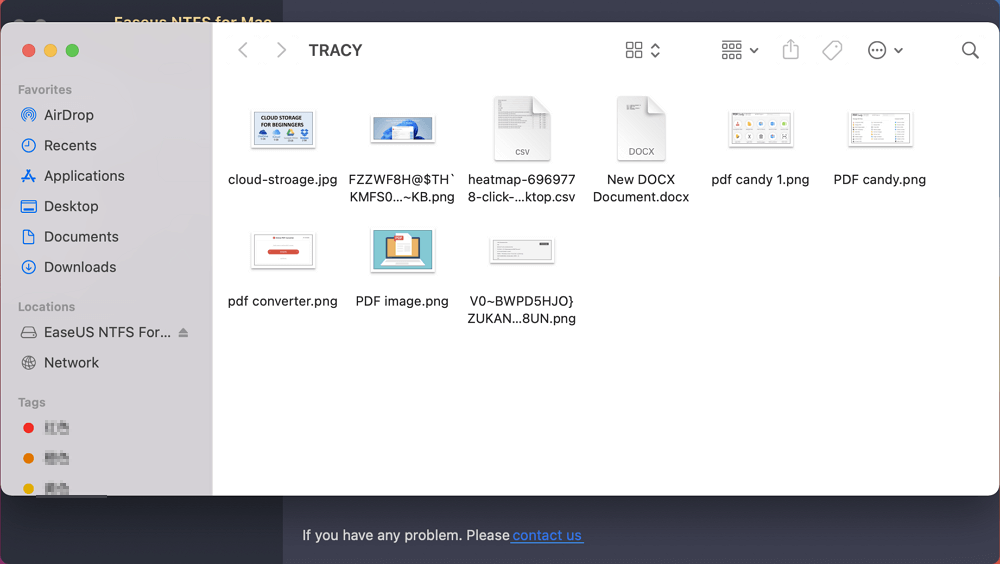
Step 5. When EaseUS NTFS for Mac restarts, you can then open to check, read, write, and even modify saved data on the NTFS device.
Key Features of EaseUS NTFS for Mac:
If the drive is read-only, select the "Mount" option to make it writable. You can use your Mac to access, modify, and create new files on the NTFS disk. Also, it enables you to delete Files from an external hard drive Mac. That way, you can avoid unnecessary procedures.
If this passage can be a helper for you, share it on the social media platforms below with one click:
A built-in method, but one that does the job of allowing Macs to write NTFS. The Terminal is a built-in program on Mac computers and storage devices frequently used for modification and customization. This program can also be used to modify the NTFS drive so that Macs can write to it.
Let's go through a few steps you can take to activate NTFS on your Mac:
Step 1. Connect the NTFS drive to the Mac and launch the Terminal.
Step 2. Enter the command and press Enter: sudo nano /etc/fstab

Step 3. Use another "NAME" with the Name of the NTFS volume on your Mac by typing LABEL=NAME none NTFS rw, auto, nobrowse, and press "Return."

Step 4. On the Mac keyboard, press "Control + O" > "Control + X."
Step 5. Select "Go" > Go to "Folder" > Type: /Volumes in Finder, then click "Go."
Replace the name with the drive's NTFS label.

This will allow you to access and write files on your NTFS-formatted drive on a Mac.
The other workaround for removing writing access to an NTFS drive on a Mac. To access an NTFS drive, BootCamp can be used by Mac users with advanced skills. Bootcamp is closely related to Macintosh computer booting issues. To gain NTFS write access on a Mac, users must launch into Windows.
Note that Time Machine backups will be deleted if you use Bootcamp to gain NTFS access. Remember to back up your files if you have a history of doing so.
Step 1. Navigate to "Finder," go to "Applications," and press utilities to Boot Camp Assistant.

Step 2. Launch Bootcamp and select "Continue" to configure Windows booting on a Mac.

Step 3. Restart the Mac computer and wait for it to launch into Windows.
Step 4. Connect the NTFS drive to the Mac, and you can read and write to the drive's files.
This post explains how to access NTFS on Mac and why Mac users cannot write directly to NTFS drives. Even though macOS has limitations for accessing NTFS-formatted devices, you can still access and alter files in NTFS drives on a Mac. We have explained three methods for effectively making your NTFS drive writable. Take the easy route with EaseUS NTFS for Mac, automatically making your drive accessible without additional steps or effort.
If you are still confused about NTFS on Mac, you can go through some of the questions to their answers and clear all confusion.
1. How to set up NTFS for Mac?
Enable write support for NTFS in Terminal is as follows:
Step 1. Launch Terminal on the Mac.
Step 2. Connect the NTFS-formatted drive.
Step 3. Type sudo nano /etc/fstab.
Step 4. Scroll to the bottom of the list and type the following command: LABEL=NAME none NTFS rw, auto, browse.
Step 5. Press "Control + O" on the Mac keyboard.
Step 6. Enter "Control + X" on the keyboard.
2. Why is NTFS not compatible with Mac?
NTFS is a proprietary file system that Apple has not licensed, so your Mac cannot natively write to it. You will need a third-party NTFS driver if you want to deal with NTFS files on a Mac. You can read them on your Mac, but it is unlikely that this will meet your requirements.
3. Can macOS copy files from NTFS?
The NTFS file system's incompatibility with macOS is why you cannot transmit files between a Mac and other devices that use the NTFS files. Apple macOS lacks permission to write to NTFS devices.
Related Articles - ALSO ON EaseUS SOFTWARE
How to Read NTFS on Mac for Free? 3 Best Solutions Available
![]() Tracy King/2023-12-19
Tracy King/2023-12-19
Is NTFS Compatible with Mac? Check Your Answer Here
![]() Tracy King/2024-02-26
Tracy King/2024-02-26
How Do I Read and Write NTFS Drives on Mac? 3 Best Solutions Available to Help
![]() Tracy King/2023-12-19
Tracy King/2023-12-19
Why Is My External Hard Drive Shows Read Only on Mac? Answered
![]() Tracy King/2023-12-19
Tracy King/2023-12-19


