- Store
-
Support CenterGuides, License, ContactDownloadDownload installerChat SupportChat with a TechnicianPre-Sales InquiryChat with a Sales Rep
Want to learn an easy way to format NTFS drive to APFS? Click open this post to find how to format NTFS to APFS in Disk Utility and why EaseUS is the best way to access NTFS on Mac.
Table of Contents
External drives are a great source to store data and keep it handy while traveling. Today, external drives are formatted into several file formats APFS, NTFS, HFS+, FAT32, and others, based on the user's convenience.
NTFS and APFS are the two leading file formats for Windows and Mac devices. Both file formats are high-tech and powerful. But still, many external drive users prefer to format NTFS drives to APFS. Why?
For that, you have to scroll down and understand why formatting NTFS drives to APFS file format is a good idea.
APFS, also known as Apple File System, is a modern file system launched with High Sierra 10.13 in 2017. This file system is designed for Apple devices as a replacement for the years-old HFS file system.
APFS has all the core features to support Apple gadgets like multiple user keys, single-key, multi-key encryption, etc. One down thing is that APFS works on macOS High Sierra or higher versions only.
NTFS stands for New Technology File System. It is a default Windows file system developed by Microsoft. This file system has several advantages like file compression, data deduplication, and more.
But unfortunately, Mac can only read NTFS formatted drives, but it can't write to them. Therefore, Mac users refrain from using NTFS file systems unless users have to work with a Windows machine.
APFS file system brings onboard numerous benefits for SSDs, USB flash drives, and other external drive users, such as:
Max users can use a built-in utility tool called Disk Utility to perform all disk-related operations like fixing minor file system errors, reformatting a drive, creating a new partition, and so on.
Using the Disk Utility, Mac users can quickly convert NTFS drives to APFS:
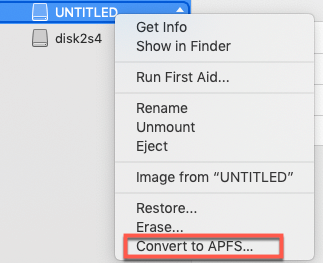
Step 1. Navigate to Finder > Applications > Utilities > Disk Utility.
Step 2. From the left pane, find the NTFS drive name and right-click on it.
Step 3. Select the "Convert to APFS" from the popup menu. Just wait for a few minutes to complete the conversion process.
Another option to convert the NTFS drive to APFS is to format NTFS to APFS. But this method will entirely erase the drive data because a new directory structure is created for the APFS file system.
Therefore, you should back up the NTFS drive data to a safe location on the Mac or iCloud storage space. Once the backup is done, follow these steps to format NTFS to APFS:
EaseUS NTFS for Mac is dedicated to supporting NTFS formatting or reading NTFS on top of Mac. It can recognize NTFS drives and format them to APFS. The tool has a simple interface, and even if you are new to computers, you can convert NTFS to APFS with its Erase feature:
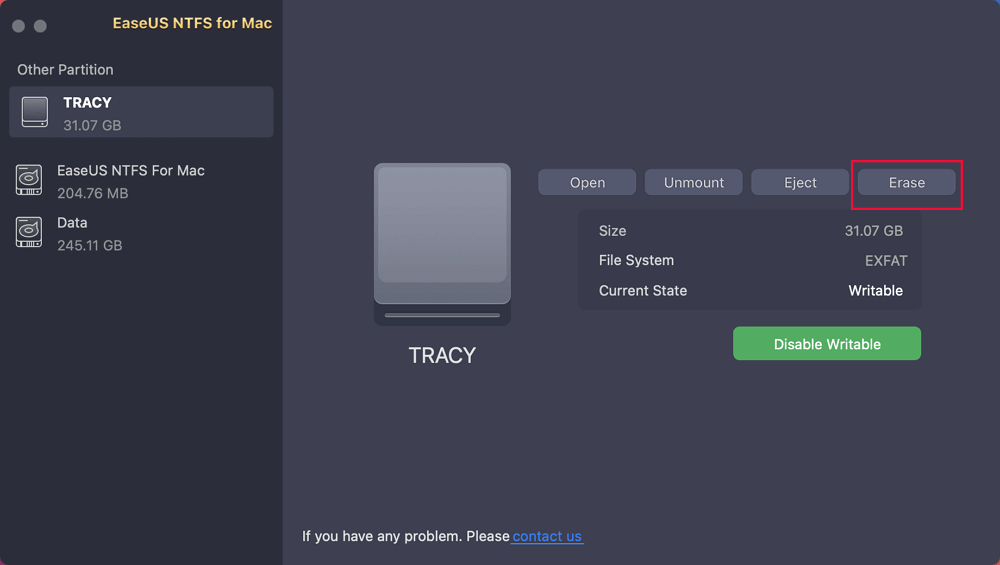
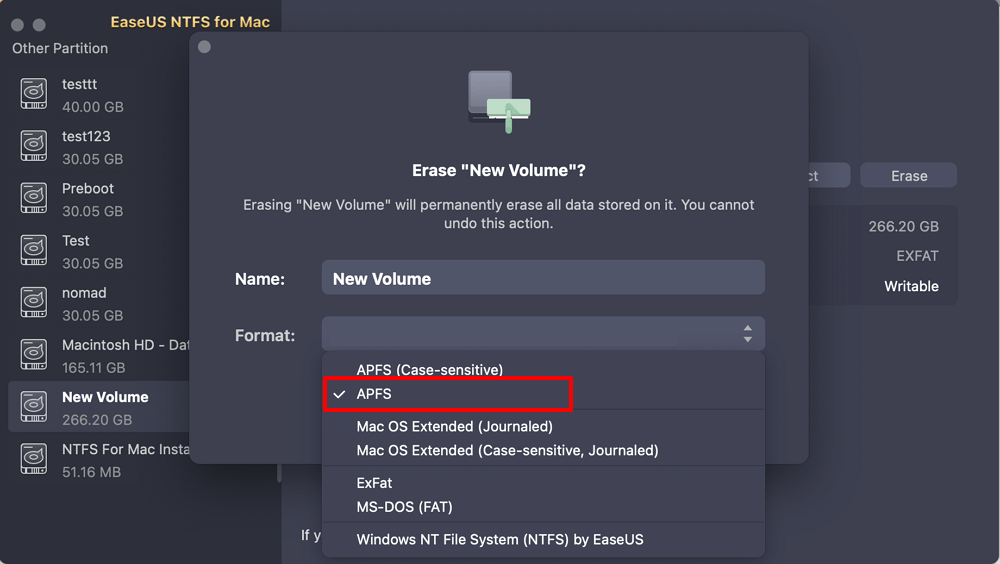
Step 1. Launch EaseUS NTFS for Mac on your Mac, click "I already have a license" and enter your code to activate this software.
Step 2. Connect the target external hard disk to your Mac, locate it and choose "Erase" to move on.
Step 3. In the Format box, select the "APFS" option in the scroll down menu as the new file system.
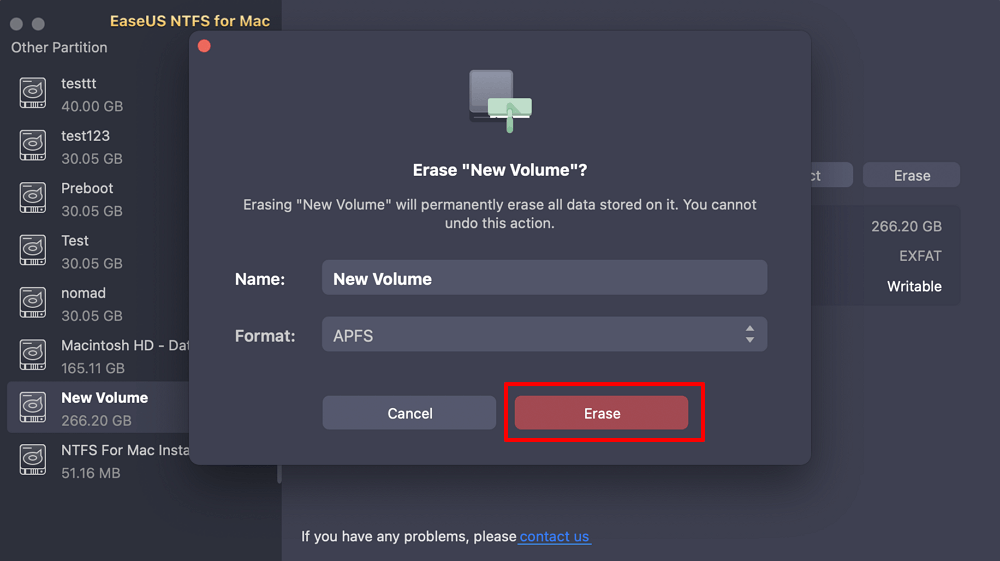
Step 4. Hit on the "Erase" button to confirm the format action and erase all data stored on this external storage device.
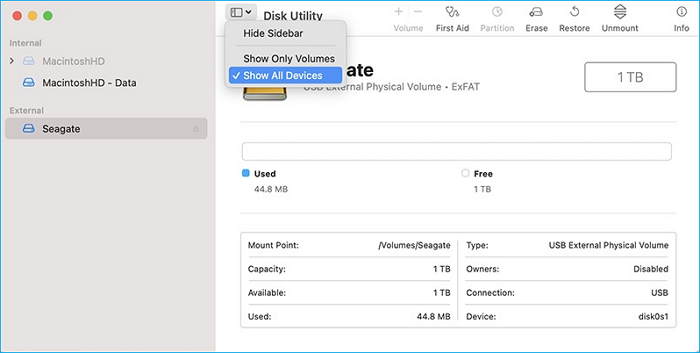
Step 1. Open Finder > Applications > Utilities > Disk Utility.
Step 2. Select Show All Devices from the upper left side located in the View dropdown menu.
Step 3. Select the NTFS disk and click on the Erase tab in the Media menu.
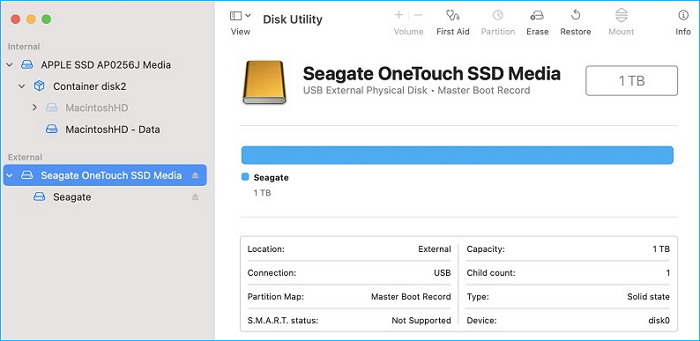
Step 4. You can provide a name to the disk (optional).
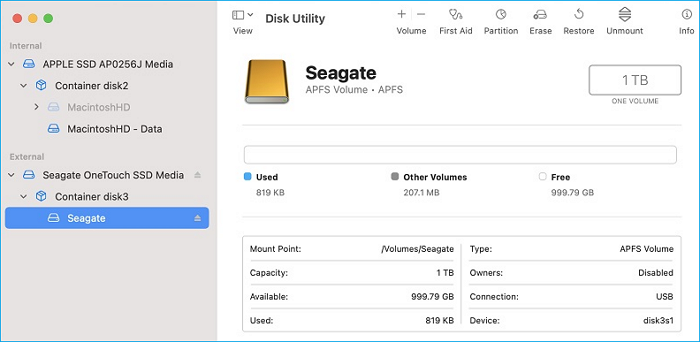
Step 5. Now, set the Scheme field to GUID Partition Map and Format to APFS.
Step 6. Click on the Erase button to format the NTFS to APFS.
Step 7. Once the process is done, the drive will show APFS volume under the name you provided earlier.
If you don't want to lose data while formatting the NTFS drive to APFS, there's another option available - EaseUS NTFS for Mac. This utility tool will allow Mac users to access NTFS drives in full read-write support, so there's no need to format.
The software will help users efficiently work with NTFS formatted external disk on Mac. It allows you to read, write, copy, transfer and delete NTFS files on Mac without data loss.
Main Features of EaseUS NTFS for Mac
Steps of how to enable Mac writing to NTFS drive without formating are listed below:
Step 1. Launch EaseUS NTFS for Mac on your Mac, click "I already have a license" and enter your code to activate this software.
Step 2. Connect the target external hard disk to your Mac, locate it and choose "Erase" to move on.
Step 3. In the Format box, select the "APFS" option in the scroll down menu as the new file system.
Step 4. Hit on the "Erase" button to confirm the format action and erase all data stored on this external storage device.
NTFS and APFS are the latest file formats for Windows and Mac, respectively. However, since Apple only allows Mac users to access NTFS formatted files in read-only mode; thus, often, they have to convert or format NTFS to APFS.
But formatting a drive can erase the entire data present on it. Therefore, formatting NTFS to APFS is not a feasible option for many users.
But thanks to EaseUS NTFS for Mac, it is now possible to get full read-write access to NTFS drives. The best thing is that EaseUS offers a free trial, so you can download the software today.
Related Articles - ALSO ON EaseUS SOFTWARE
How to Change Read-Only Files on Mac [No Data Loss]
![]() Sherly/2025-06-26
Sherly/2025-06-26
Can't Delete Files From SD Card on Mac [Reasons and Fixes]
![]() Sherly/2025-06-26
Sherly/2025-06-26
(Solved!) Samsung Portable SSD Not Detected Mac
![]() Oliver/2025-06-26
Oliver/2025-06-26
How to Use G-Drive External Hard Drive on Mac [Set Up Guide]
![]() Banu/2025-06-26
Banu/2025-06-26
Copyright © 2004 - 2023 EaseUS. All rights reserved.