- Store
-
Support CenterGuides, License, ContactDownloadDownload installerChat SupportChat with a TechnicianPre-Sales InquiryChat with a Sales Rep
Need a troubleshooting guide to fix a Samsung Portable SSD not detected on Mac. Follow these easy steps to resolve connectivity issues and regain access to your important data.
Table of Contents
I just received a Samsung SSD T7. For some reason, my iMac will not recognize the SSD. After a little research, it seems the workaround is to disable some of Apple's security on my mac. Is this the only way? - Apple Community
Is your Samsung Portable SSD not being recognized by your Mac? I understand the frustration when you urgently need to store or transfer some data, but your drive won't respond.
In this guide from EaseUS, I will share 5 quick fixes to not only repair your Samsung SSD but also provide insights into the possible causes behind it. So, make sure to follow the article, and let's get the "Samsung Portable SSD not detected by Mac" issue fixed.
This section will act as a manual for you, offering straightforward yet efficient methods to ensure that your external SSD shows up on your Mac in the proper manner.
Please make sure that you have a proper connection. Ensure that the Samsung Portable SSD is securely inserted into a USB port on your Mac using the official USB cable or an approved alternative.
Double-check that the cable is firmly attached to the SSD and the Mac at both ends. If the SSD is not recognized, try connecting it to a different USB port on your Mac. Sometimes, ports can fail or may not work with certain devices.
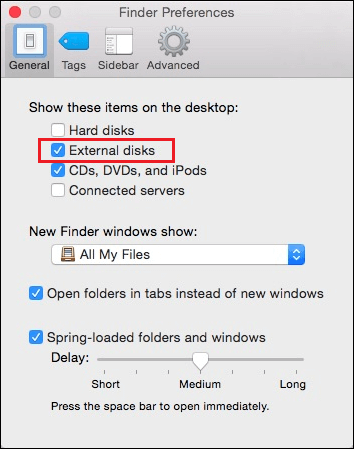
Another common reason your Mac could not be displaying your Samsung SSD is if it isn't set up to show external devices on the desktop. Follow these steps to show your SSD icon-
Step 1. Click on the desktop or open any Finder window.
Step 2. In the menu bar at the top of the screen, click on "Finder" and then select "Preferences."
Step 3. Click the "Sidebar" tab in the Preferences box that appears. Click on the "External Disks" checkbox and you can find it listed as the last item on the Sidebar list. Just scroll down to enable it and this guarantees that when connected, external drives such as the Samsung Portable SSD will show up in the Finder sidebar.
Step 4. Similarly, even in the "General" tab make sure "External disks" is selected. This setting determines whether connected external drives appear on your desktop.
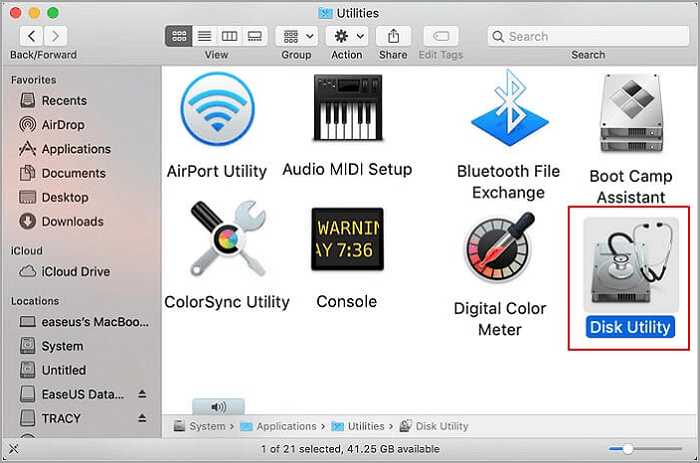
You can try looking for your Samsung SSD file using Disk Utility if the above-mentioned method does not work for you. This method makes use of macOS's disk utility feature to manually mount the SSD.
You can verify that your Mac detects your SSD without any problems by manually mounting the external disk. Just, follow the steps mentioned below:
Step 1. Choose "Application" from the "Finder" menu, then click "Utilities" to choose "Disk Utility."
Step 2. Choose "Show all devices" from the disk utility's left-hand menu.
Step 3. From the left sidebar, choose your Samsung SSD, then click "Mount" in the disk utility window.

The Samsung Portable SSD should now be accessible like any other external drive after it has been mounted. To open it and view your files, double-click on its icon in the Finder.
🚩Read also: Fix "Unable to Mount External Hard Drive on Mac" Error
Writing to or altering data on disks formatted with NTFS is not supported by macOS by default. Plus, NTFS (New Technology File System) is the primary file system format of Windows operating systems and devices.
Although macOS can read (see) data on NTFS disks, it requires additional software to write (edit or delete) files to these drives. One approach to get access is to enable writable for your NTFS disk using a third-party tool like EaseUS NTFS for Mac.
This utility program's main purpose is to make it easier for macOS users to manage and communicate with external disks formatted in NTFS. Download the tool and build the connection for your Samsung SSD and Mac with one simple click.
Step 1. Launch and activate EaseUS NTFS for Mac. Click "I already have a license" to unlock this software.
Step 2. Connect an NTFS drive to Mac, EaseUS NTFS for Mac will automatically detect the device. Select your drive and you'll see it's now marked as 'Read-only". Click "Enable Writable" to add read and write rights to the drive.
Step 3. When the state of NTFS drives turns into "Writable".
Step 4. EaseUS NTFS for Mac will pops up a window to help Mac get access to the NTFS drive:
Step 5. When EaseUS NTFS for Mac restarts, you can then open to check, read, write, and even modify saved data on the NTFS device.
The best thing is that you may import and export important documents, movies, photos, and other material on your NTFS drive with ease and without worrying about formatting or compatibility issues thanks to EaseUS NTFS for Mac's "Enable Writable" function, which is dependable, easy, and quick.
EaseUS NTFS for Mac not only changes external hard drives from Read-only on macOS, but it can also delete or reformat NTFS drives to be used with other file systems when necessary. This is great if you usually move from different operating systems.
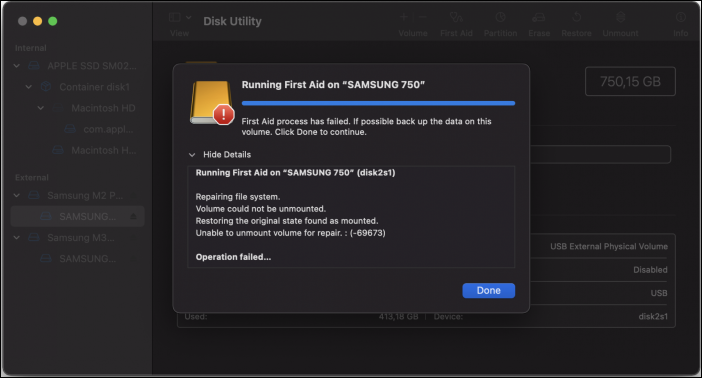
If you can't manually mount your Samsung SSD using the Disk Utility software, it may indicate problems with your file. However, there is hope! You can fix this issue by using a feature called "First Aid."
This utility tool can quickly analyze and fix any basic faults in the file system, volume bit mappings, and catalog extensions.
Step 1. Connect your Samsung SSD to your Mac
Step 2. Choose "Disk Utility" from the "Applications" and then "Utilities" menus to start it.
Step 3. On Disk Utility, locate your Samsung SSD on the left-hand panel.
Step 4. Select the "First Aid" icon located in the upper-right area after selecting the SSD.
Step 5. To initiate the repair procedure, select "Run."
Step 6. To check if your file can be accessed or mounted directly, try mounting your Samsung SSD drive now.
See also:
There are several reasons why your Samsung Portable SSD may not be detected on your Mac. Some of the most common reasons include the following:
Knowing these causes of external SSD not showing up on Mac will not only help you to understand the problem better but also help you identify the best possible solution for you. Share this with your friends who might be facing similar issues and keep reading to know the possible fixes.
To sum up, this article offers a thorough how-to for fixing problems with a Samsung Portable SSD that won't show up on a Mac. You can diagnose and resolve problems with connections, software, and system settings by providing detailed explanations of potential causes and step-by-step solutions.
I recommend using EaseUS NTFS for Mac for a more beginner-friendly approach. It offers reliable functions including read/write access, disk formatting, and file system repairs, offering you a smooth management experience and quick compatibility with NTFS devices on macOS.
Still, wondering why your Samsung SSD didn't show up on your Mac? You've come to the right place. Here are some answers to frequently asked questions to help you troubleshoot issues more effectively.
If your Mac is not detecting your Samsung SSD, it could be due to issues such as broken cables, unsuitable connectors, or outdated drivers. Make sure that the SSD is plugged in correctly using the appropriate cable and connector. To troubleshoot further, check if the SSD shows up in Disk Utility or try attaching it to another Mac.
The Samsung SSD T5 is compatible with Mac computers. It supports macOS, but to use file systems like HFS+ or APFS, you may need to format the drive. Plus, to enable specific functions and ensure optimal performance, it may be essential to install the Samsung Portable SSD program for Mac.
Make sure your Samsung SSD is correctly attached, and experiment with other USB ports or cables to get your Mac to recognize it. To see if the drive is visible and to format it if needed, open Disk Utility. Plus, install the Samsung Portable SSD program for Mac or any necessary drivers.
Related Articles - ALSO ON EaseUS SOFTWARE
Tutorial: Change Seagate From Read Only on Mac Without Formatting
![]() Sherly/2025-11-11
Sherly/2025-11-11
How to Safely Force Eject External Hard Drive on Mac
![]() Banu/2025-06-26
Banu/2025-06-26
How to Mount BOOTCAMP NTFS Partition with Read-Write Access
![]() Sherly/2025-09-01
Sherly/2025-09-01
How to Format Flash Drive to NTFS on Mac
![]() Daisy/2025-07-07
Daisy/2025-07-07
Copyright © 2004 - 2023 EaseUS. All rights reserved.


