- Store
-
Support CenterGuides, License, ContactDownloadDownload installerChat SupportChat with a TechnicianPre-Sales InquiryChat with a Sales Rep
If you are facing difficulty formatting your hard disk on MacOS and your disk wont format simply, this guide is for you!
Table of Contents
Are you facing the frustrating issue of a disk that won't format on your Mac? If yes, then you're not alone! This can be frustrating and can lead to data loss if you attempt to format the disk without resolving the underlying issue. It is crucial to identify and address the reasons behind the formatting problem in order to regain control over the disk and ensure its proper functionality on your Mac. But fear not!
This article will explore some effective solutions to help you overcome the "disk wont format on Mac" issue. Whether you're a non-technical user or simply seeking a quick fix, these methods will empower you to resolve the problem independently.
| ⏱Duration: | 3-5 minutes |
| 🎯Goal: | Fix disk won't format on Mac |
| 💻Supported Mac OS: | All Mac OS |
| 👔Who Will Need It: | Non technical Mac users |
To overcome the "disk won't format on Mac" problem, follow the step-by-step process below:
| Ensure your Mac properly mounts and recognizes the target disk and format it. | |
| #2. Show All Devices | Unhide any hidden disks in Disk Utility to ensure you can access and format them |
| #3. Run First Aid | Use Disk Utility's First Aid feature to scan and repair any disk errors or corruption before attempting to format. |
| #4. Boot Into Recovery Mode | If you cannot format the internal disk, boot your Mac into Recovery Mode and utilize the Disk Utility from there. |
| #5. Run Disk Utility to Format Disk | Use Disk Utility to format the disk, following the necessary steps and selecting the desired file system. |
| #6. Force Format Disk with Terminal | Use the Terminal application to force format the disk |
Remember to back up any essential data on the target disk before formatting, as the process will erase all existing data. Moreover, you must allow the process to complete to avoid any further complications.
One of the initial steps in troubleshooting the "disk won't format on Mac" issue is to unmount and remount the disk. For a simplified approach, we recommend using EaseUS NTFS for Mac as a reliable disk mount and unmount tool that helps Mac beginners make their disk detectable on Mac and format the drive with simple clicks.
1. Unmount And Remount Disk
By utilizing EaseUS NTFS for Mac, you can easily unmount and remount the disk, improving its detection on your Mac.
Step 1. Launch EaseUS NTFS for Mac on Mac computer, and click "I already have a license" to enter your code for unlocking the software.
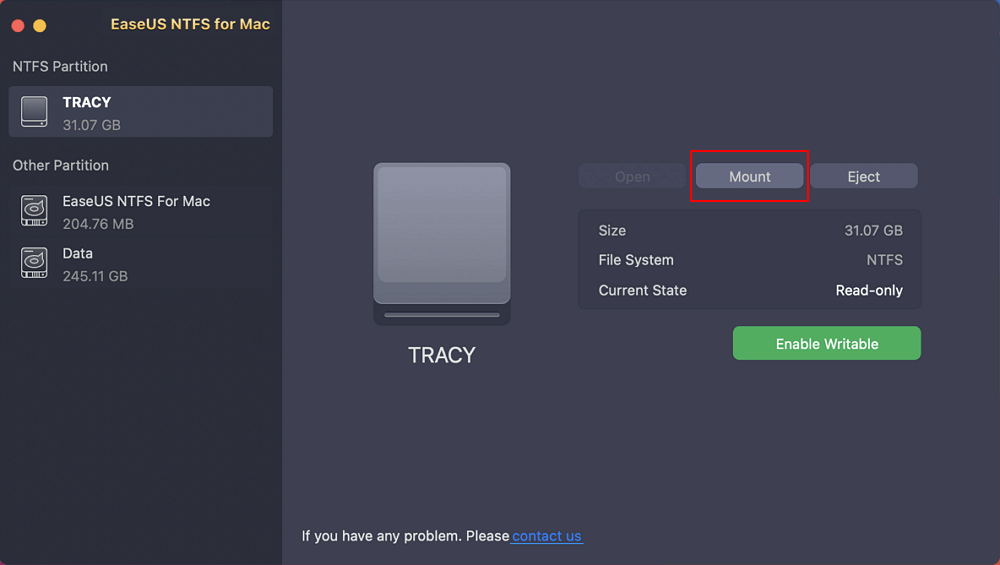
Step 2. Connect your NTFS external storage device to Mac, and let EaseUS NTFS for Mac to detect it. Once it detects your drive, select the drive and click "Mount".
After this, EaseUS NTFS for Mac will mount this drive on Mac and you shall be able to open and view its content.
This simple solution enhances the chances of successfully formatting the disk and resolving the "disk won't format on Mac" issue.
2. Force Format Disk for Mac
Then, you can refer to the step guide provided by EaseUS NTFS for Mac to further format the disk on Mac computer.
Step 1. Launch EaseUS NTFS for Mac on your Mac, click "I already have a license" and enter your code to activate this software.
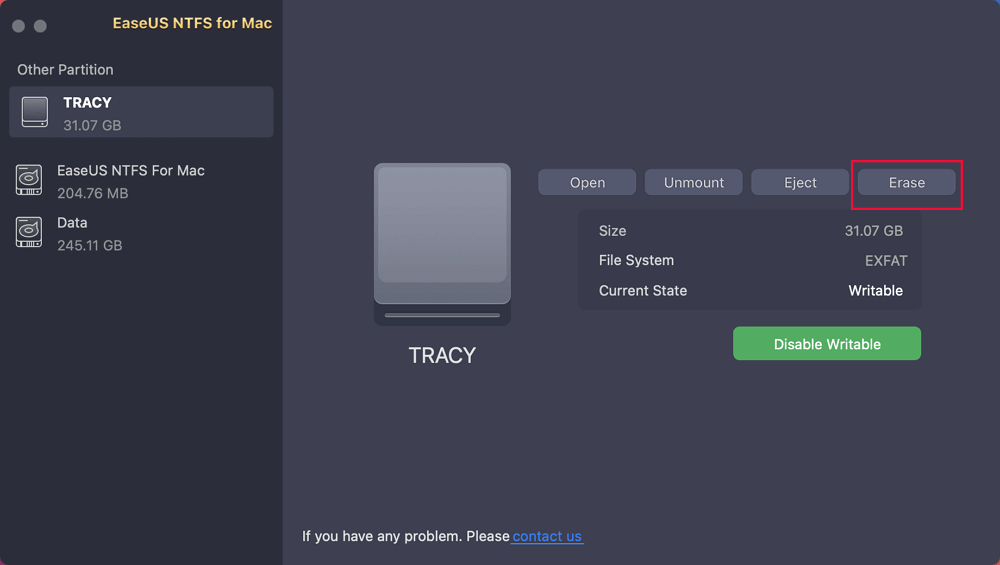
Step 2. Connect the target external hard disk to your Mac, locate it and choose "Erase" to move on.
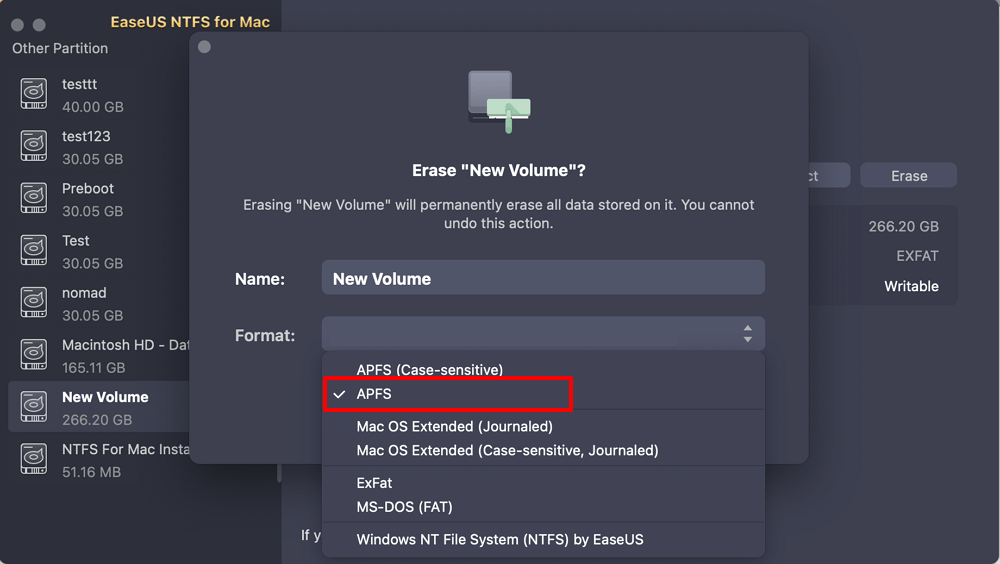
Step 3. In the Format box, select the "APFS" option in the scroll down menu as the new file system.
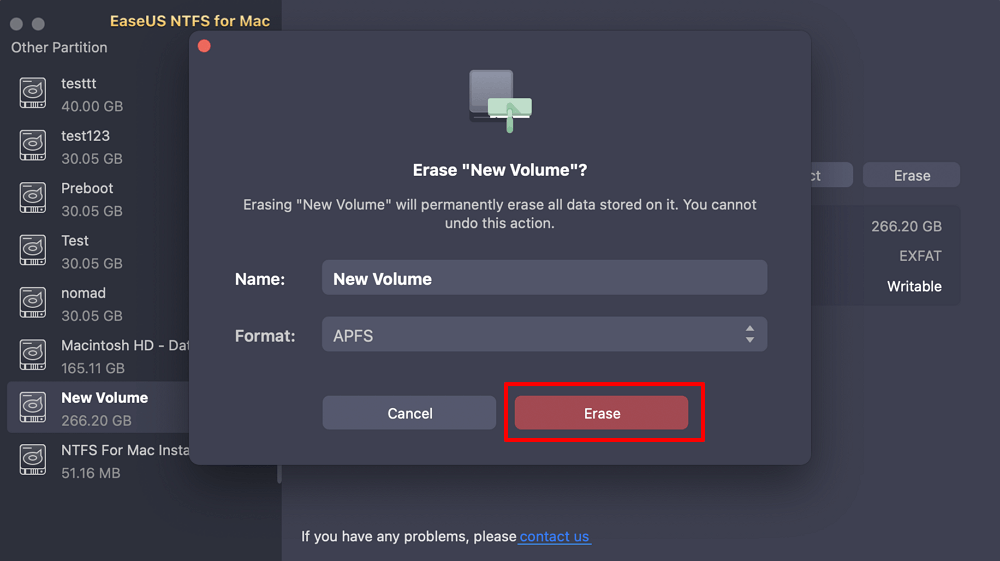
Step 4. Hit on the "Erase" button to confirm the format action and erase all data stored on this external storage device.
After following these steps, you should be able to use the target disk on Mac. If you like the solution provided by EaseUS NTFS for Mac, share it to help more people online:
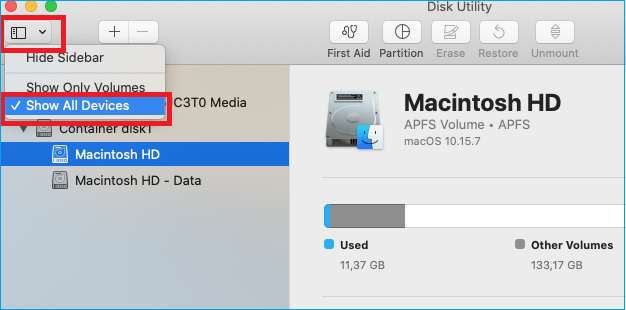
By showing all devices, you can ensure every disk is noticed during formatting. Follow the step-by-step guide below to unhide hidden disks in Disk Utility.
Steps to Show All Devices
Step 1. Open Disk Utility on your Mac.
Step 2. In the Disk Utility window, look for the "View" Click on it and select "Show All Devices."
Step 3. After selecting "Show All Devices," you should see a refreshed view in Disk Utility that includes hidden disks.
Step 4. Locate the disk you want to format and select it.
Step 5. Proceed with the formatting process using Disk Utility or any other preferred method.
Running First Aid using Disk Utility can help diagnose and repair any disk errors or corruption. Follow the steps below to run First Aid on the hard disk.
Steps to Run First Aid
Step 1. Open Disk Utility on your Mac.
Step 2. Locate the faulty disk in the Disk Utility window and pick it from the sidebar.
Step 3. Open the First aid icon from Disk Utility Window.
Step 4. Disk Utility will now perform a disk scan and attempt to repair any faults or corruption it discovers.

Step 5. Once the process finishes, check if any errors were repaired.
If so, proceed with the formatting process using Disk Utility or any other preferred method.
If you choose this procedure, remember that you will need to reinstall macOS after formatting the internal system disk. To enter Recovery Mode and format the internal disk, follow the steps below.
Steps to Boot Into Recovery Mode
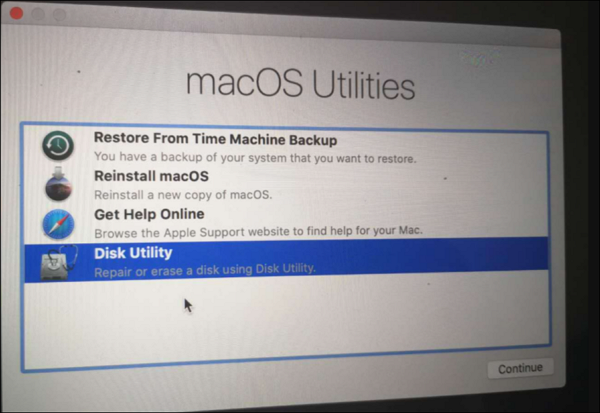
Step 1. Restart your Mac and open utility windows.
Step 2. Once the macOS Utilities window appears, select "Disk Utility" and click "Continue."
Step 3. In Disk Utility, locate the internal disk you want to format.
Step 4. Select the disk from the sidebar
Step 5. Proceed with the formatting process using Disk Utility or any other preferred method.
Step 6. After formatting the internal disk, you will need to reinstall macOS.
By using Disk Utility to format the problematic disk, you can overcome your formatting issue. Follow the steps below to format the disk using Disk Utility.
Steps to Run Disk Utility to Format Disk
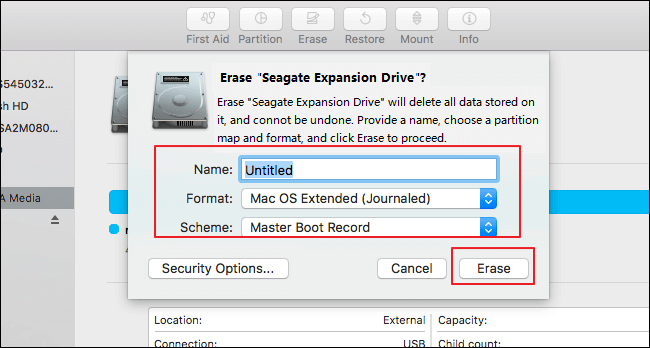
Step 1. Open Disk Utility on your Mac, and locate the disk you want to format.
Step 2. Select the disk that you want to format and choose the suitable file system such as Mac OS.
Step 3. Provide a name for the formatted disk.
Step 4. Click "Erase" to initiate the formatting process, press enter.
By the end of the process, the disk should be formatted successfully and be able to use again.
You can use Terminal, a command-line interface, to force format the disk. The terminal provides advanced control and commands to perform disk operations. Follow the steps below.
Steps to Force Format Disk with Terminal
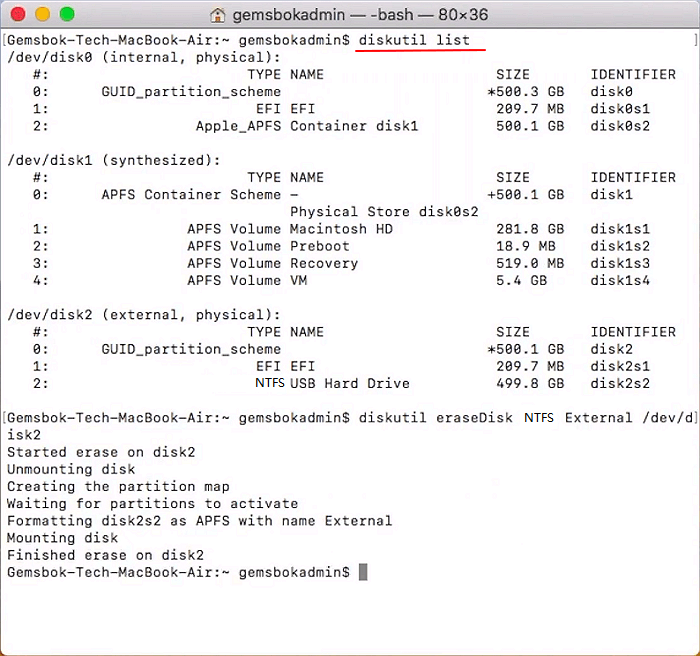
Step 1. Launch Terminal on your Mac.
Step 2. In the Terminal window, type the command: diskutil list
Step 3. Click enter, this will show you the list of disks that are connected to your Mac.
Step 4. Identify the disk you want to format from the list.
Step 5. Type the command: diskutil eraseDisk [file system] [new name] [disk identifier]
Step 6. Press the "Enter" key to execute the command and initiate the force formatting process.
Once the process finishes, the disk will be successfully force formatted and ready to use.
If the disk doesn't format on Mac, you cannot erase or reformat the disk for use. This can prevent you from utilizing the disk for storing data, installing or reinstalling macOS, or performing any disk-related operations.
It may also indicate potential disk errors or compatibility issues that must be addressed to regain functionality and access to the disk.
Furthermore, if the disk doesn't format on Mac, you may encounter error messages indicating that the operation couldn't be completed, the disk is in use, or that the format process failed.
Keep reading to learn the reasons why disk won't format on Mac.
Many reasons might cause this issue. Some of the most probable reasons are as follows:
Target disk or external disk is unmounted: If the disk you're trying to format is not properly connected or recognized by your Mac, it will be unmounted and unavailable for formatting.
The disk file system is unsupported by Mac: Mac systems have limited compatibility with certain file systems, such as Windows NTFS. Mac won't allow formatting if the disk is formatted with an unsupported file system.
Erase Option greyed out in Disk Utility: Sometimes, when you try to format a disk using Disk Utility, the Erase option may appear grayed out, preventing you from performing the formatting operation.
Can't erase Startup disk: Formatting the disk on which your Mac's operating system is installed, known as the Startup disk, can be challenging as macOS restricts such operations to protect system integrity.
Erase process has failed: Various factors, including disk errors, corruption, or conflicts with other applications, can cause the erase process to fail, resulting in the disk remaining unformatted.
Another process is using the disk: If another application or process on your Mac is actively using the disc you're attempting to format, Disk Utility may be unable to access and format the disc. Before formatting the disc, make careful to shut down any apps or processes that may be running on it.
To ensure the health and detectability of your Mac disk, here are some useful tips to follow:
✔ Update macOS Timely
Keeping your macOS up to date is essential for maintaining disk compatibility and overall system performance. Regularly check for system updates and install them promptly.
✔ Set Correct File System Format
When formatting a disk, make sure to choose the appropriate file system format supported by your Mac. Different macOS versions may have different preferred file systems, such as APFS or Mac OS Extended. Using the correct format ensures smooth disk operation.
✔ Run Antivirus
Regularly scan your Mac system and disks for any potential malware or viruses. Malicious software can cause disk-related issues and hinder proper formatting. Install a reliable antivirus program and keep it up to date.
✔ Avoid Sudden Power Loss
Power outages or sudden shutdowns during disk operations can result in data corruption and formatting problems. Ensure your Mac is connected to a stable power source or use a battery backup system to prevent unexpected power loss.
In conclusion, the reasons behind the "disk won't format" error on Mac can vary. By following the provided methods and tips on this page, you can increase your chances of successfully resolving the issue. As for beginners, take EaseUS NTFS for Mac for an efficient solution to get rid of this error on your Mac computer.
Patience and thoroughness are key while attempting the suggested solutions.
If you have more doubts about the "disk won't format" issue on Mac, refer to the following frequently asked questions for additional guidance:
1. How do I force a disk to format?
You can force format a disk using Terminal by executing specific commands:
2. Why is my WD hard drive unable to format on Mac?
The WD hard drive may be unable to format on Mac due to file system incompatibility, disk errors, write protection, or faulty USB connections. Ensure the file system format is supported, run disk repair tools, disable write protection, and try different USB cables or ports. If the issue persists, contact WD support or seek professional assistance.
3. What causes the "Mac erase process has failed, couldn't unmount disk" error?
This error can occur due to active processes or applications preventing disk unmounting. Make sure to close all open files and applications related to the disk you want to format before proceeding. Alternatively, try booting into Recovery Mode to perform the formatting process.
4. How do I fix a hard drive that won't format on Mac?
Follow the below-mentioned method carefully and persistently until the issue is resolved.
Related Articles - ALSO ON EaseUS SOFTWARE
Easy Ways to Mount NTFS on Mac | How to Mount NTFS Drive on Mac
![]() Banu/2025-06-26
Banu/2025-06-26
Best WD My Passport for Mac Driver Free Download | How-to-Use
![]() Banu/2026-01-05
Banu/2026-01-05
How to Safely Force Eject External Hard Drive on Mac
![]() Banu/2025-06-26
Banu/2025-06-26
Fix Toshiba External Hard Drive Won't Let me Add Files on Mac Error
![]() Daisy/2025-06-26
Daisy/2025-06-26
Copyright © 2004 - 2023 EaseUS. All rights reserved.