- Store
-
Support CenterGuides, License, ContactDownloadDownload installerChat SupportChat with a TechnicianPre-Sales InquiryChat with a Sales Rep
Can a mac read NTFS? Yes, when you connect an NTFS formatted external hard drive to your computer, you can only read the files on the drive instead of doing other operations, such as write data to an NTFS drive. But some users still face problems, read to fix!
Table of Contents
| Workable Solutions | Step-by-step Troubleshooting |
|---|---|
| Can Apple Mac Read NTFS? | The Answer is YES. Mac is able to read the NTFS drive but not allow to write on it...Full steps |
| Three Ways for Mac to read and write NTFS |
Use EaseUS NTFS for Mac...Full steps |
Real case from MacRumors: "Mac no longer reading NTFS formatted external drive. Hi. A couple of weeks ago I had to take my 2015 MacBook Pro into the apple store as it wouldn't turn on, the lady wiped it and reinstalled the operating system......However, I can now no longer write any files to the hard drives and when I have looked at their properties I see the format on them is NTFS which I have read is not comparable with Macs but before I have used these hard drives with no issues......"
This is an unprecedented case I've seen on the forum. In general, even though the NTFS file system is not supported by Mac, you can still access the drive in read-only mode. If "mac can't read BTFS" happens, it's better to resort to third-party software or other manual ways. Here in this article, you can get straightforward methods to enable read and write support on NTFS formatted external drive.
The Answer is YES. Mac is able to read the NTFS drive but not allow to write on it. Some users ever said their device isn't allowed to read NTFS drive, which may cause by your wipe operation on mac. If you have faced such a problem, the best advice is to use paid software to achieve read and write. Surely you can see apple native methods, but these are less reliable than the third-party software.
Three ways to enable read and write NTFS:
1. Use Third-Party Software - EaseUS NTFS for Mac
2. Use Terminal to Enable Write Support
3. Format NTFS to Fat32
If you want a direct way to edit your external device with the NTFS file system, there is a top-notch software you can use - EaseUS NTFS for Mac. To automatically read and write NTFS external drive on Mac, you can download this tool right now:
See what EaseUS NTFS Can Do for You:
Step 1. Launch and activate EaseUS NTFS for Mac. Click "I already have a license" to unlock this software.
Step 2. Connect an NTFS drive to Mac, EaseUS NTFS for Mac will automatically detect the device. Select your drive and you'll see it's now marked as 'Read-only". Click "Enable Writable" to add read and write rights to the drive.
Step 3. When the state of NTFS drives turns into "Writable".
Step 4. EaseUS NTFS for Mac will pops up a window to help Mac get access to the NTFS drive:
Step 5. When EaseUS NTFS for Mac restarts, you can then open to check, read, write, and even modify saved data on the NTFS device.
Mac Writing to NTFS: How to Enable Mac to Write NTFS
In this part, you can have one automatic third-party NTFS manager, one apple native program, and one free NTFS driver.
The terminal is the Apple native program that you can directly use to enable NTFS to write support on Mac. But it is risky if the inexperienced users enter the wrong command. That would damage your drives or lose data. If you are not familiar with this program and enable write support at the first time. We do not recommend you to use this method.
How to Use Terminal:
Step 1. Open Terminal on your Mac.
Click the Finder icon on the middle of the screen and select Applications from the left menu.
Click Utilities and choose Terminal to run.
Step 2. Connect the NTFS formatted drive to mac.
Step 3. Type the command and hit Enter: sudo nano /etc/fstab, enter the password if prompted.
This command will open a list of NTFS files.

Step 4. Scroll down to the end of the list and enter command LABEL=NAME none ntfs rw, auto, nobrowse (Replace the NAME as the name of your NTFS drive.)
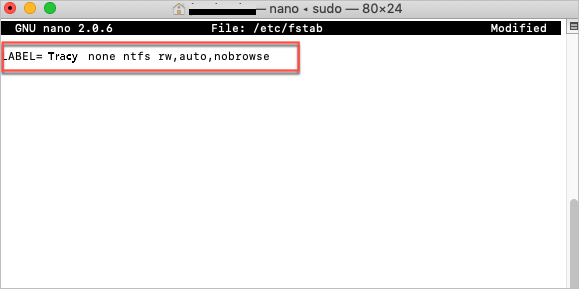
Step 5. Press Ctrl + O and then press Enter to save the change.
Step 6. Press Ctrl + X to exit.
Step 7. Open Finder icon on mac.
Step 8. Select Go from menu > Choose Go to Folder > Enter /Volumes > Click Go
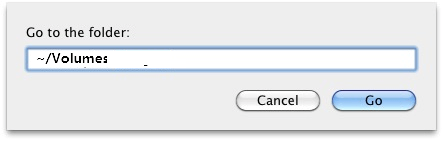
Then you can enjoy the read and write support on Mac.
To be honest, formatting is an inconvenient method when you’ve kept important data on it. Avoid erasing all data, you’d better try the above options.
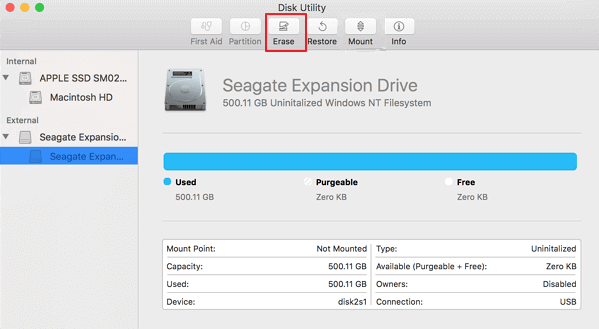
Step 1. Connect your device to mac.
Step 2. Go to Applications and click Utilities. Double-click Disk Utility.
Step 3. Select the read-only NTFS drive and click Erase.
Step 4. Rename the drive (Optional).
Step 5. Under the Format tab, choose the format as MS-DOS (FAT). Choose Scheme as Master Boot Record. Then click Erase.
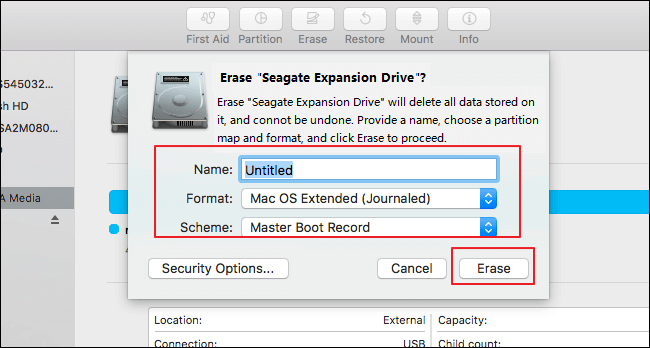
When the Erase process is finished, you can get a Fat32 formatted drive.
Mac can read NTFS but not write on it. If you encountered such an unreadable issue, download the third-party software and retry to read. Wish these methods can help you!
Related Articles - ALSO ON EaseUS SOFTWARE
(Solved!) Samsung Portable SSD Not Detected Mac
![]() Oliver/2025-06-26
Oliver/2025-06-26
Easy Ways to Mount NTFS on Mac | How to Mount NTFS Drive on Mac
![]() Banu/2025-06-26
Banu/2025-06-26
How to Fix Toshiba Read Only on Mac Error in 2026
![]() Banu/2026-01-05
Banu/2026-01-05
External Hard Drive Not Mounting on Mac? Fixes Here!
![]() Banu/2025-06-26
Banu/2025-06-26
Copyright © 2004 - 2023 EaseUS. All rights reserved.


