- Store
-
Support CenterGuides, License, ContactDownloadDownload installerChat SupportChat with a TechnicianPre-Sales InquiryChat with a Sales Rep
Do you want to get write permissions on the Toshiba NTFS driver? If you have such need on mac. Don't miss this article about Toshiba NTFS Driver for Mac. 2 useful methods are waiting for you.
Table of Contents
Does your Toshiba external hard drive turn into read-only? Do you want to get write access to the Toshiba disk? Do you need an NTFS driver on mac? If you answered "yes" to all of it, you are not alone.
See the same cases from discussions.apple.com: After updating to EI Capitan yesterday, my Toshiba external hard drive is now only giving me permission to "read-only". How do I fix this?”
1. Permission Limits
Some permission settings will not let you write to disk. If your Toshiba external hard drive only allows reading, you'd better change permissions for the first time.
2. Mac Only Read NTFS Driver
If your Toshiba is a Windows-formatted NTFS drive, surely, you can not do any changes except read files on the device. Under that situation, two choices you can choose. The one is to install a third-party NTFS driver to enable mac writing to NTFS. The other is to reformat the target machine to a new file system (APFS or FAT32) work with your Mac computer.
In this article, we will teach you how to fix permission issues. And you can get a free Toshiba NTFS driver and a reformatting method for Mac.
| Situations | Workable Solutions |
|---|---|
| 1 - Permission Limits | Change Permissions On External Hard Drive for Mac Computer...Full steps |
| 2 - Mac Only Read NTFS Driver |
Method 1. Run Toshiba NTFS Drive for Mac...Full steps Method 2. Reformat Toshiba NTFS Drive...Full steps |
Step 1. Open Finder and select your Toshiba drive.
Step 2. Right-click the drive icon and choose "Get Info". And you can check the details of the drive.
Step 3. Go to the bottom of the drive, click the lock icon if it is locked.
Step 4. Enter administrator name and password to unlock permission settings.
Step 5. Under "Sharing & Permissions", you can see a list with a user name and its corresponding Privilege.
Step 6. You can view a drop-down menu at the front of "Read & Write" or "Read-only". Click the drop-down menu to change permission to "Read & Write".
Step 7. Click the Gear icon under the list and choose "Apply to enclosed items".
Once "Enable Read-write" come out, your search page may full of tutorial to teach you how to use Terminal, Apple native tool, to enable write to NTFS drive. However, this method is not the best solution fits for all users. Not only does this approach require many steps to complete, but it can be dangerous for users unfamiliar with the operation. That's why we look up a simple method for you - EaseUS NTFS for Mac.
EaseUS NTFS for Mac is an easy tool that you don't need to check and paste command line again and again. All you can do is just click the button. After the activation, EaseUS NTFS for Mac will automatically detect your Toshiba drive and enable writable. Then you can do file editing like add, transfer, delete, format.
Toshiba NTFS mac Driver Download:
How to Run Toshiba NTFS Driver for Mac:
Step 1. Launch and activate EaseUS NTFS for Mac. Click "I already have a license" to unlock this software.
Step 2. Connect an NTFS drive to Mac, EaseUS NTFS for Mac will automatically detect the device. Select your drive and you'll see it's now marked as 'Read-only". Click "Enable Writable" to add read and write rights to the drive.
Step 3. When the state of NTFS drives turns into "Writable".
Step 4. EaseUS NTFS for Mac will pops up a window to help Mac get access to the NTFS drive:
Step 5. When EaseUS NTFS for Mac restarts, you can then open to check, read, write, and even modify saved data on the NTFS device.
Take 5 minutes to catch a wise software to enable read/write support on WD My Password driver and master a manual to format WD device that both work with Windows and Mac file systems.
Quick Note: The format operation will erase all data on your device. If your drive kept some important data, remember to transfer files on another device or take a full backup on a Windows computer. We bet you do not want to check the data recovery method anymore.
Step 1. Connect the Toshiba external hard drive to a Mac.
You can see the Toshiba drive icon on the desktop.
Step 2. Go to the dock and click the Finder icon. Once Finder opens, navigate to the left panel and click Applications.
Step 3. Scroll down to check and open Utilities.
Step 4. Locate and Open Disk Utility.
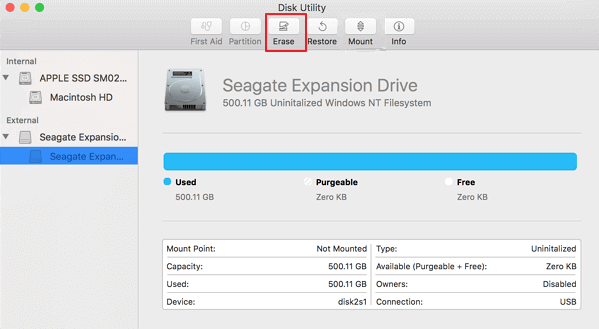
Step 5. Go to the left panel, check Toshiba external hard drive and click Erase tab.
Check Erase's location like the screenshot:
Step 6. In the Erase window, type a new name and select Volume Format.
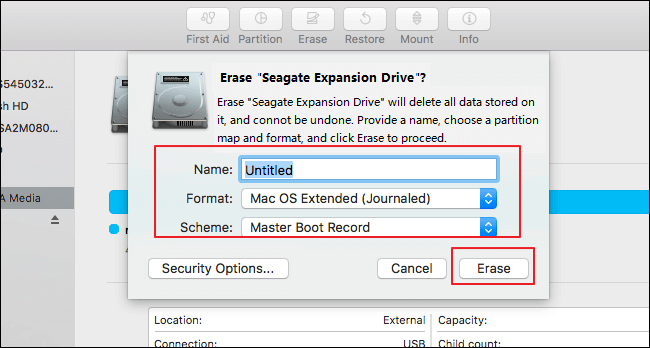
Step 7. Click the Erase button to go on.
Have you solved your problem with these three methods we mentioned in this article? For my advice, considering fewer steps and great results, you can try EaseUS NTFS for Mac. If your drive is not been formatted as NTFS, simply, you can change its permissions immediately.
Related Articles - ALSO ON EaseUS SOFTWARE
How to Easily Fix Read-Only File System on Mac [Step-by-Step Guide]
![]() Cici/2025-11-11
Cici/2025-11-11
Can Mac Read FAT32? Everything You Should Know
![]() Cici/2026-01-05
Cici/2026-01-05
How to Copy Files From Mac to External Hard Drive Without Formatting
![]() Sherly/2025-06-26
Sherly/2025-06-26
Can Mac Write to NTFS, Yes! Your 2023 Full Tutorial
![]() Sherly/2025-07-07
Sherly/2025-07-07
Copyright © 2004 - 2023 EaseUS. All rights reserved.


