- Store
-
Support CenterGuides, License, ContactDownloadDownload installerChat SupportChat with a TechnicianPre-Sales InquiryChat with a Sales Rep
MacBook doesn't support NTFS Write by default. Users need to either use professional software or use an experimental feature. In this guide, we will share how you can put files on NTFS from Mac. Both of them are easy to set up, but using software ensures better compatibility and support
Table of Contents
| Workable Solutions | Step-by-step Troubleshooting |
|---|---|
| Method 1 - Click to Enable NTFS Drive Writable on Mac | Step 1. Activate EaseUS NTFS for Mac...Full steps |
| Method 2. Use Terminal Command to Make NTFS Drive Writable on Mac | Step 1: Click Spotlight...Full steps |
NTFS is a disk format that macOS does not support if you want to copy files into it. Usually, this happens when an external hard drive used in Windows is connected to Mac, and the user gets a surprise when they cannot copy the files but can only browse the files and folders.
That said, while it is not as simple as clicking a button, there are ways to put files into the NTFS disk using a MacBook. Most Mac users are not aware of the exact process, so here in this post, you will get two effective methods that will assist you in putting files on the NTFS disk from Mac. Let's discuss more on these methods and exact steps in detail.
Want to transfer files from Mac to NTFS drivers but don't know the exact process? No need to worry! You are landed at the right place; here in this post, you will know the accurate processes of transferring data on the NTFS disk to Mac. So let's learn more about the methods and required steps.
To transfer files from Mac to NTFS, you need a Mac to support NTFS Drive, but you need to know that the Mac only half supports NTFS disk! It means that the Mac operating system can only read NTFS drive/disk content but can't write to it. So it would help if you had some software or driver that allows you to write into the NTFS drive when using the Macbook.
Below are the two methods that will help you to make Mac support NTFS drives:
Let's learn more details about these two methods.
If you want to make an NTFS drive Writable on Mac effortlessly, then you can use the top-rated third-party software EaseUS NTFS for Mac. It is a highly recommended and helpful tool that makes it possible to write into NTFS Drive on Mac with just one click. EaseUS NTFS tool comes with several unique features like:
Steps of how to use EaseUS NTFS for Mac are listed below:
Step 1. Launch and activate EaseUS NTFS for Mac. Click "I already have a license" to unlock this software.
Step 2. Connect an NTFS drive to Mac, EaseUS NTFS for Mac will automatically detect the device. Select your drive and you'll see it's now marked as 'Read-only". Click "Enable Writable" to add read and write rights to the drive.
Step 3. When the state of NTFS drives turns into "Writable".
Step 4. EaseUS NTFS for Mac will pops up a window to help Mac get access to the NTFS drive:
Step 5. When EaseUS NTFS for Mac restarts, you can then open to check, read, write, and even modify saved data on the NTFS device.
Another way to make NTFS drive writable on Mac is with the help of using a terminal command. Follow the exact step below to perform the complete process. Before that, you need to know some basic but essential things. The terminal command process could lead to data loss, so before following this process, make sure to take the full backup of both your Mac and data on the drive.
The essential advantage of using Terminal is that it's swift to do, and there is no need for any third-party software. As this is a process switch, it's better to take a backup of your Mac and Drive before following this process because there is always a risk of data corruption at any time during this process, so make sure to proceed with extra caution.
To start this process, follow the exact steps given below:
Step 1. Click the Spotlight icon at the top right side of your screen and enter Terminal. Now Connect your NTFS drive and enter the command. It will ask for the admin account password as soon as you press the Enter key.
sudo nano /etc/fstab
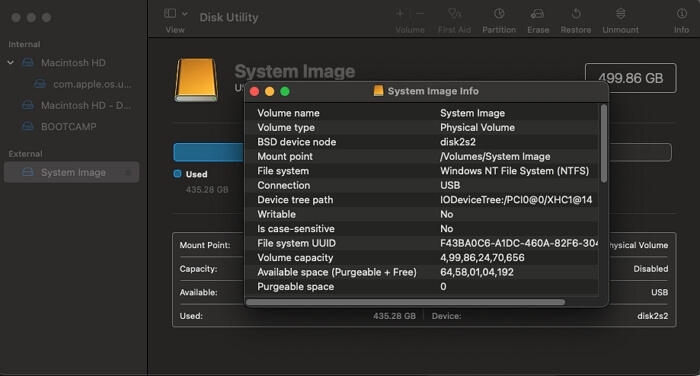
Step 2. The above command will open the fstab file which will list the drivers familiar with the Mac operating system. It can be empty too. Next use the finder to open the DISKUTIL tool in Mac, and locate the NTFS drive. Select the NTFS drive on the left, and click on info on the right-top. Note down the UUID of the drive. Switch back to the terminal, and write down this below-mentioned line.
UUID=5DE99D79-913F-4D47-9328-3907050750C6 none ntfs rw,auto,nobrowse
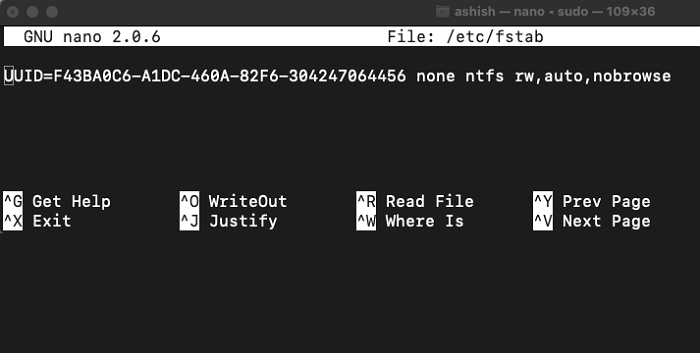
Step 3. Press Ctrl+O to save the recognized list, and press Ctrl+X to exit NANO. Restart MacBook. What you will notice here is that the drive will not show up on the Desktop. So here is how to access it.
Step 4. Open Terminal and execute the command open /volumes. It will open the finder, and you should be able to see the drive. If not, you can use the diskutil tool to mount the drive. Done that, drag and drop a file, and you can now use the NTFS drive to read and write any files into it.
After enabling the Writable disk on Mac, the question is how you can put files to NTFS drive on Mac? So here you have to follow to exact steps given below to perform this process.

Step 1. Open a terminal and then execute the open /volumes command. It will reveal the NTFS drive, which otherwise will not be available on the desktop.
Step 2. Drag and drop a file into the NTFS drive, and if it doesn't show any blocked icon and instead shows a plus icon, it means the driver can be written. You can also use the finder and copy-paste the files.
Step 3. After completing the process Click Eject to remove this NTFS drive safely from your Mac. Ejecting ensures all ready write operations are complete and there is no data loss.
Most Mac users usually face difficulties putting files on NTFS disk from Mac. If you are following this post till now, you probably know the best two methods that help you easily transfer files on the NTFS disk from your Mac. Try both ways and know which method works better for you. Follow the exact steps as motioned in this post on two different methods. Make sure to take care of the caution things never to face any kind of data corruption issue.
Related Articles - ALSO ON EaseUS SOFTWARE
Fixed: Can't Add Files to Seagate Hard Drive on Mac
![]() Cici/2025-07-07
Cici/2025-07-07
External Hard Drive Not Mounting on Mac? Fixes Here!
![]() Banu/2025-06-26
Banu/2025-06-26
How to Force Erase Disk Mac Terminal [Quick Guide]
![]() Cici/2025-11-11
Cici/2025-11-11
How to Format Disk to NTFS on Mac Using Terminal [2026 Full Guide]
![]() Banu/2026-01-05
Banu/2026-01-05
Copyright © 2004 - 2023 EaseUS. All rights reserved.


