- Products
- Store
- Partner
-
Support
Support CenterGuides, License, ContactDownloadDownload installerChat SupportChat with a TechnicianPre-Sales InquiryChat with a Sales Rep
Table of Contents
Have you encountered the trouble of WD My Passport for Mac not showing up? Are you looking for the complete instructions to make your "WD My Passport for Mac" detected and readable on Mac?
There are various things that can cause such a problem. This article will list the possible reasons and tell you how to solve this problem step by step so that users can enjoy their experience with WD external hard drives without any problems.
If you find your WD My Passport external hard drive is not showing up on your Mac, it may prove to be quite a hassle to use your WD device. There may be various reasons; some of them are mentioned below:
Connection Issues
If you have tried to connect your WD My Passport for Mac but failed to connect it successfully, you may be having problems with the connection cables or USB ports.
Most users will find out that the USB cable they use is not working properly. It can be solved by changing the old USB cable with a new one or using another available port on their computer.
Make sure you've connected your WD external drive to a secondary female USB port and check if it's working. Check your WD My Passport NTFS driver installation on Mac if it still doesn't work.
Virus Infection
It may be because the virus infection has caused your computer to malfunction, and the system failed to read the data on your WD Passport external hard drive. To resolve this problem, run antivirus software.
WD Passport is NTFS
Another possible reason WD My Passport's external hard drive does not show up in Finder could be that its partition is formatted as NTFS, which cannot be accessed directly from OS X operating system (Mac). To fix this issue, we need to convert WD Passport NTFS for Mac. It can be done by installing WD My Passport for the Mac driver.
As a powerful tool to help you make your WD My Passport for Mac readable and writable on Mac computers, EaseUS NTFS for Mac is an advanced yet easy-to-use utility that will enable you to solve the problem quickly.
It lets you enable read and write access for your NTFS drives on a Mac computer. Moreover, it offers a free trial for seven days, so you can try it out and see if you like it before committing. After that, you may want to upgrade to the professional version.
Here are some main features of this driver tool:
1. Mounting and Unmounting NTFS drives from the status bar
The software allows you to mount the NTFS partition as reading/writing so that you can access all files stored on the external drive without any problem
2. Read/Write NTFS Partition On Mac
This software enables you to read and write files from a WD My Passport external hard drive on Mac.
3. The best NTFS driver for external hard drive
EaseUS NTFS for Mac can recover data from the NTFS partition without formatting your hard drive. This can help you recover lost data from the NTFS drive if you don't want to lose the existing data or format the drive during the process.
4. Amazing Fast Speed
EaseUS NTFS for Mac provides a super fast speed and can help you transfer data quickly, even if you have a large amount of data.
5. Supported Operating Systems
macOS Big Sur 11 ~ macOS Sierra 10.12 running on Mac mini, MacBook, MacBook Air, iMac Pro, and more models.
To get started, download and install EaseUS NTFS for Mac. Once it's finished installing, open the app and follow the instructions below to make your drive readable and writable on your Mac.
For those who have just got EaseUS NTFS for Mac and don't know how to run this tool on Mac, follow this guide for more information.
Step 1. Launch and activate EaseUS NTFS for Mac. Click "I already have a license" to unlock this software.
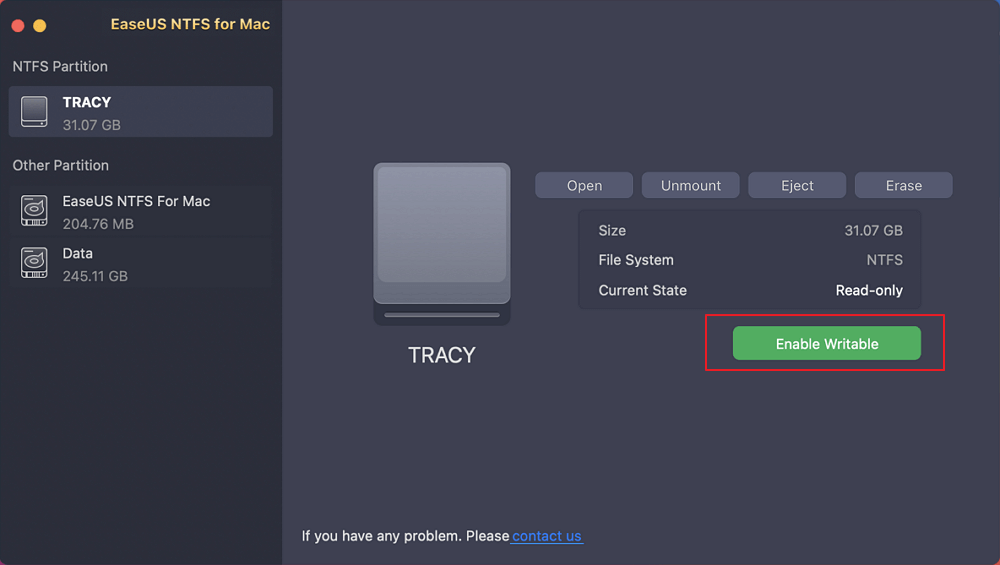
Step 2. Connect an NTFS drive to Mac, EaseUS NTFS for Mac will automatically detect the device. Select your drive and you'll see it's now marked as 'Read-only". Click "Enable Writable" to add read and write rights to the drive.
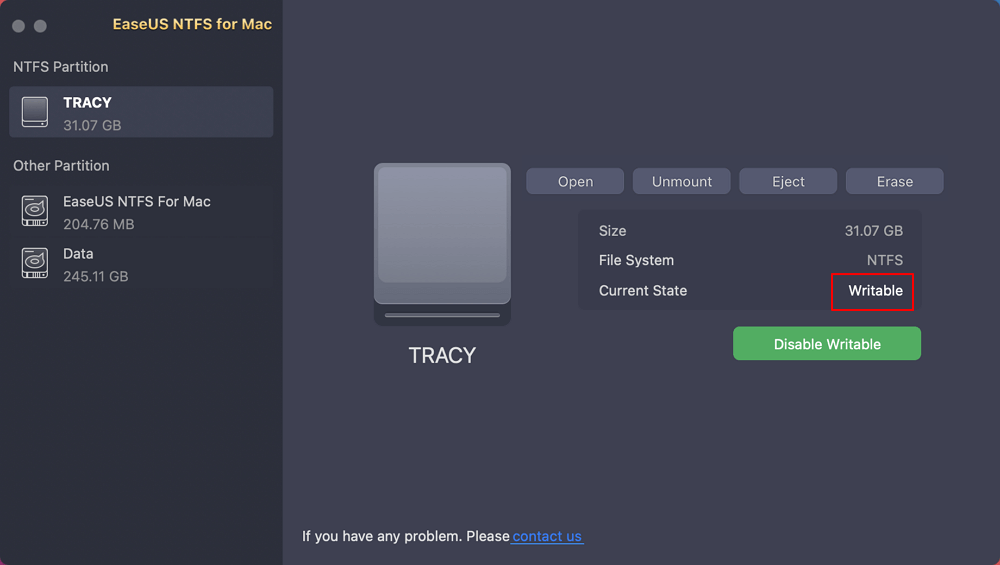
Step 3. When the state of NTFS drives turns into "Writable".
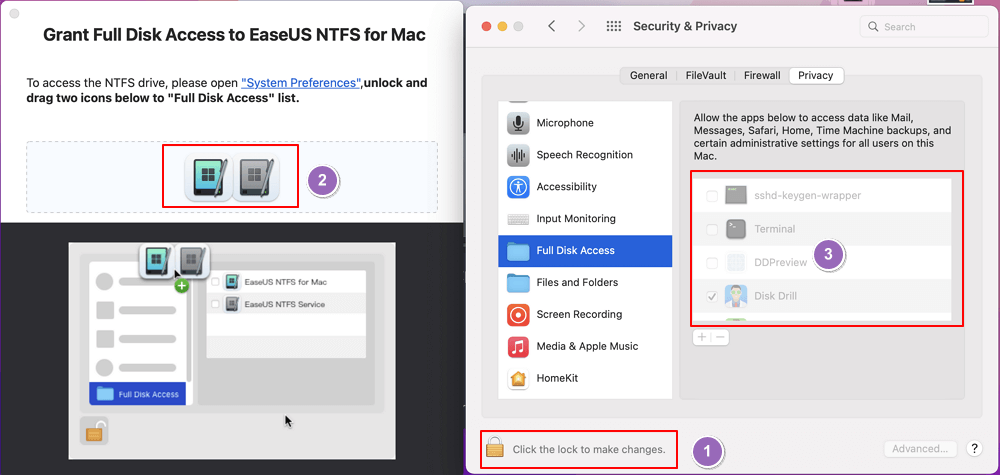
Step 4. EaseUS NTFS for Mac will pops up a window to help Mac get access to the NTFS drive:
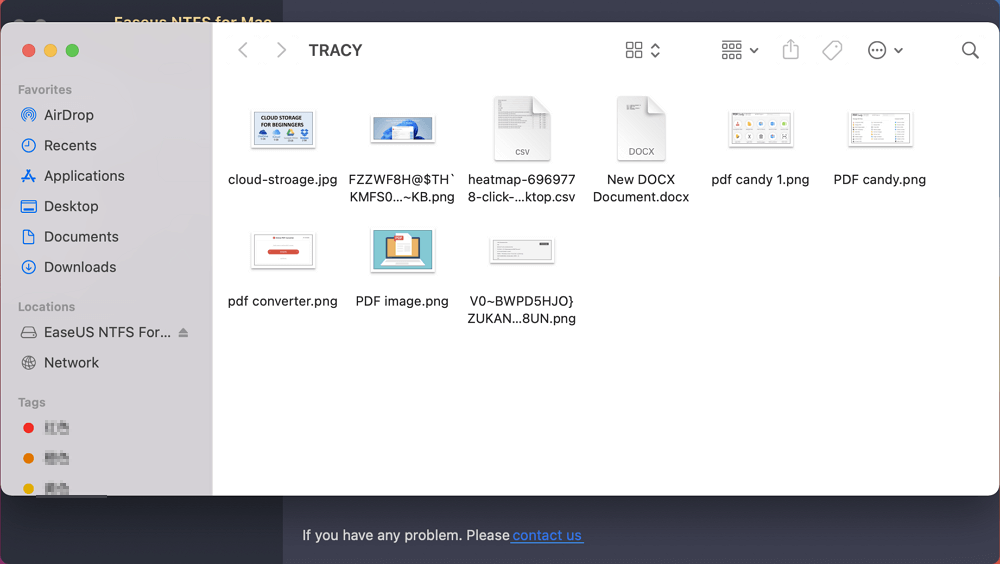
Step 5. When EaseUS NTFS for Mac restarts, you can then open to check, read, write, and even modify saved data on the NTFS device.
With EaseUS NTFS for Mac app, you can access NTFS files without worry. You can read, write, copy, delete and transfer them with full access.
The best part about EaseUS NTFS for Mac is that it offers a free trial for 7-days. So download and try right away. We think you'll see how easy it is to use and how much time you'll save by getting your work done faster.
It works with M1-based computers, macOS Big Sur, and older macOS versions. Moreover, it automatically mounts NTFS formatted hard drives after restarting your computer, so you don't have to worry about data loss or manually mounting the drive each time.
It also has a Mac-like interface that makes using the software as easy as using an app on your iPhone.
Your WD drive is a great way to store your important files, and it's always a good idea to make sure that you've got the right driver for it. As long as the driver is up to date, compatibility with many devices and programs will be improved, which helps minimize errors and keep things running smoothly.
Hopefully, this guide has helped you fix any issues regarding WD My Passport for Mac drivers. If you fail to find a proper driver for your WD My Passport on Mac, you can try using EaseUS NTFS for Mac to make the drive readable and writable immediately on Mac.
Related Articles - ALSO ON EaseUS SOFTWARE
How to Put Files on NTFS Disk from Mac
![]() Daisy/2025-06-26
Daisy/2025-06-26
5 Quick Fixes - New SSD Not Showing Up in Disk Utility
![]() Sherly/2025-07-07
Sherly/2025-07-07
How to Delete Files from Seagate Exteranl Hard Drive Mac & Windows [2026 Guide]
![]() Banu/2026-01-05
Banu/2026-01-05
Can Mac Read FAT32? Everything You Should Know
![]() Cici/2026-01-05
Cici/2026-01-05

