- Products
- Store
- Partner
-
Support
Support CenterGuides, License, ContactDownloadDownload installerChat SupportChat with a TechnicianPre-Sales InquiryChat with a Sales Rep
Table of Contents
When you can't access NTFS drives on a Mac computer, you can turn to reliable NTFS for Mac software for help. Aside from using NTFS driver software, you can also turn to an open-source NTFS driver for help. NTFS-3G is one of the drivers that we are about to introduce to you.
You can follow this guide to learn what is NTFS-3G, its pros and cons, and how to download and install it on macOS so to make your NTFS drives usable on Mac. Let's start.
| Workable Solutions | Step-by-step Troubleshooting |
|---|---|
| 1. What Is NTFS-3G for macOS | NTFS-3G is an open-source cross-platform driver...Full steps |
| 2. NTFS-3G Download | Here we provided two accesses that you can download NTFS-3G...Full steps |
| 3. Install and Use NTFS-3G | Install NTFS-3G for macOS > Use NTFS-3G for Reading-Writing NTFS...Full steps |
| 4. NTFS-3G Alternative | EaseUS NTFS for Mac read and write support to Mac in 1-click...Full steps |
NTFS-3G is an open-source cross-platform driver introduced by Szabolcs Szakacsits that implies NTFS read/write support on many platforms, including Linux, macOS, Android, NetBSD, etc., and supports all operations for writing files in any size for creating, modifying, moving, or deleting on NTFS partitions.
NTFS partitions are mounted using the FUSE (Filesystem in Userspace) interface and NTFS-3G supports links, symbolic links, and junctions that can be made to read chunk-deduplicated files, system-compressed files, and OneDrive files. It provides complete support and translation of the NTFS access control list that Mac users can directly mount and access their NTFS drives on macOS without formatting the drive.
If you search NTFS-3G for Mac online, you'll get a full page of searching results that request you to spend time and energy to define which is the exact driver that you are looking for.
Here we provided two accesses that you try either one to download NTFS-3G Safe Read/Write NTFS Driver online:
So how can I use NTFS-3G on Mac? Following the next part, you'll get a complete guide on installing the NTFS-3G driver on Mac.
Note that NTFS-3G is an open-source free driver that you are free to download and use it. However, it’s basically a source code and you need to know how to compile the code to your Mac computer to allow it to read and write your NTFS drives on mac.
Here below are the steps that you can follow to use it. Be careful while you are complying with these steps:
#1. Install NTFS-3G for macOS
Step 1. Search terminal in Spotlight search, and hit Return to open it.
Step 2. Type the command line below and press return to download Homebrew on Mac:
/usr/bin/ruby -e "$(curl -fsSL https://raw.githubusercontent.com/Homebrew/install/master/install)"
Step 3. Type the command below in Terminal and hit Return to install NTFS-3G on Mac:
brew install ntfs-3g
After this, you'll complete installing NTFS-3G on your Mac computer successfully. Now, you can follow the next guidelines to use NTFS-3G to read and write NTFS drives on Mac.
#2. Use NTFS-3G for Reading-Writing NTFS Volumes on Mac
Step 1. Connect the NTFS drives to the Mac computer.
Step 2. Open Terminal and type the two command lines to mount the NTFS drive:
Press Return each time.
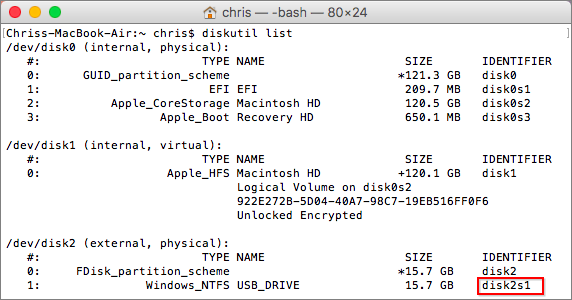
Step 3. Type the next two command lines in Terminal to unmount and remount the NTFS drive to make it readable and writable on Mac:
Replace disk2s1 with the drive number of your NTFS drive.

After this, you should be able to open and access NTFS drives on a Mac computer by then.
According to some Mac users, it seems that the NTFS-3G driver is far too complex for them to install and use on Mac. To simplify the NTFS drive installation procedure, making it easy for any level of Mac users to read and write NTFS drive content on their own, reliable NTFS for Mac software is here to help.
Here we'd like to recommend you try EaseUS NTFS for Mac that enables you to take full control of NTFS drives on Mac computers with the following feature comparison table between NTFS-3G:
| Features | EaseUS NTFS for Mac | NTFS-3G |
|---|---|---|
| Enable Writable | Yes | Yes |
| Mount/Unmount NTFS | Yes | Yes |
| Open NTFS | Yes | No |
| Eject NTFS | Yes | No |
According to this page, it's easy to learn that EaseUS NTFS for Mac works equivalent and even better than NTFS-3G. What's more, it's also free in 7 days. Go and get this software to read, write, modify, and even delete files on your NTFS drives now:
Step 1. Launch and activate EaseUS NTFS for Mac. Click "I already have a license" to unlock this software.
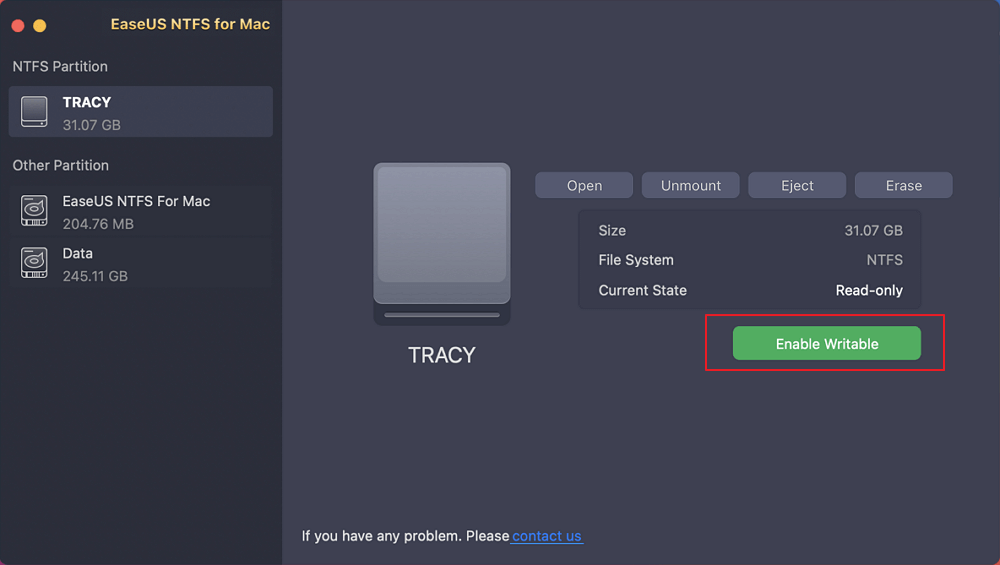
Step 2. Connect an NTFS drive to Mac, EaseUS NTFS for Mac will automatically detect the device. Select your drive and you'll see it's now marked as 'Read-only". Click "Enable Writable" to add read and write rights to the drive.
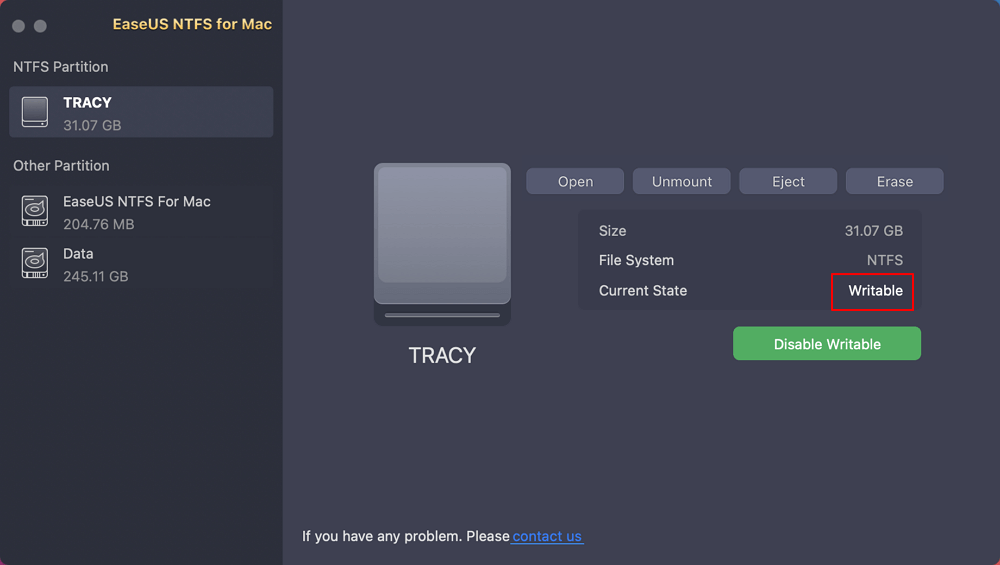
Step 3. When the state of NTFS drives turns into "Writable".
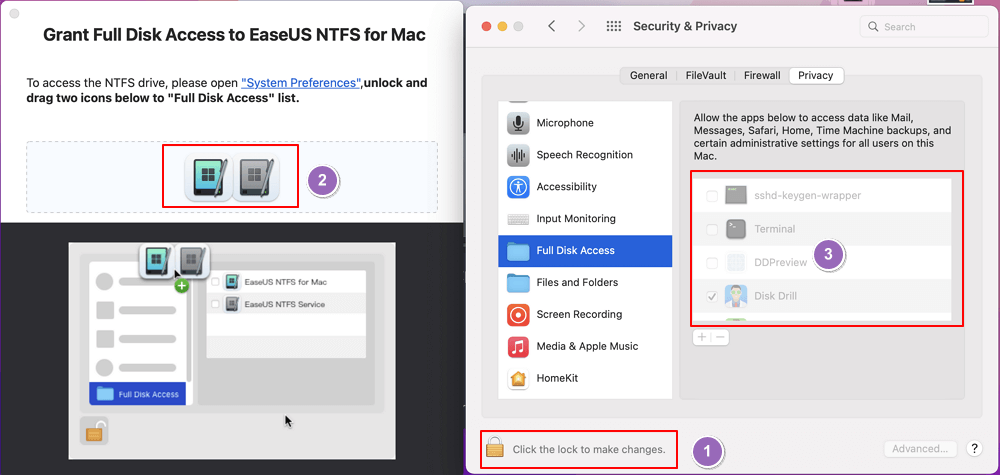
Step 4. EaseUS NTFS for Mac will pops up a window to help Mac get access to the NTFS drive:
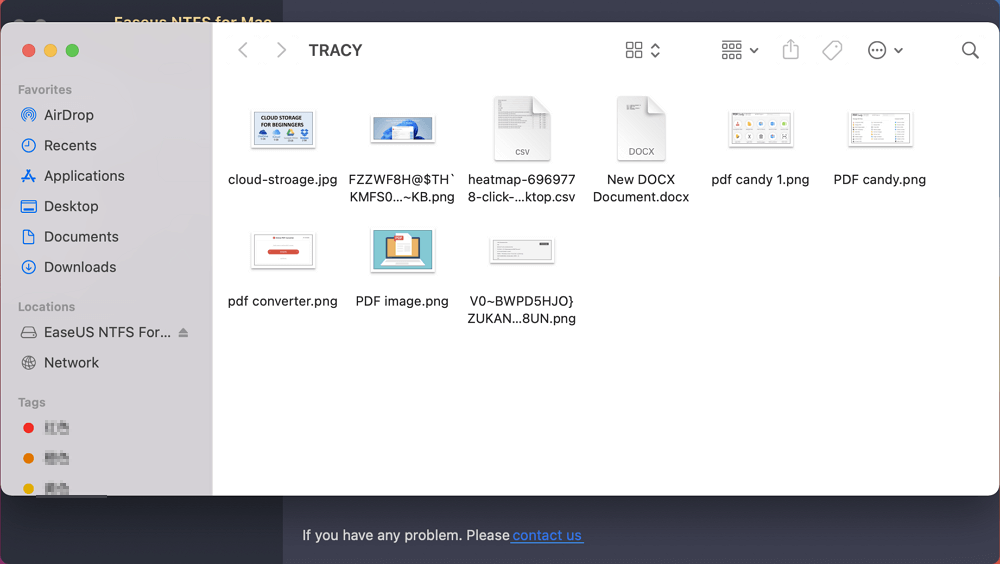
Step 5. When EaseUS NTFS for Mac restarts, you can then open to check, read, write, and even modify saved data on the NTFS device.
On this page, we explained what is NTFS-3G, had access to download the driver, and provided a complete guide for you to install this driver on Mac.
Note that though this driver makes NTFS drives readable and writable, the procedure seems a bit complex for some Mac users. For an easier alternative, EaseUS NTFS for Mac is fully featured here to help.
Aside from adding read and write support to NTFS drives, EaseUS NTFS for Mac also works to:
Featured Video Tutorial of EaseUS NTFS for Mac
Both two solutions are working to enable write support to Mac computers, you can apply either method above to make NTFS drives work for you in macOS now.
Related Articles - ALSO ON EaseUS SOFTWARE
3 Best Disk Mounter Software for Mac 2026 | Mount Disk on Mac
![]() Banu/2026-01-05
Banu/2026-01-05
Get NTFS for Mac on Seagate and Fix Seagate External Hard Drive Read-only Mac
![]() Banu/2025-06-26
Banu/2025-06-26
Can't I Format My USB to FAT32 Mac
![]() Banu/2025-06-26
Banu/2025-06-26
How to Format Disk to NTFS on Mac Using Terminal [2026 Full Guide]
![]() Banu/2026-01-05
Banu/2026-01-05

