Want to view an NTFS file on Mac? Yes, this post will disclose the two freeways to view and edit Windows NT file systems on macOS devices.
Table of Contents
For people who often move back and forth between Windows and macOS, cross-platform incompatibility is a huge concern, especially if you want to use NTFS files on Mac.
But no need to worry; this post will show Mac users two free ways to view and edit NTFS files. So, let's get started.
The answer is Yes. Mac users can view NTFS formatted files, but they can only read them. It means users can not edit, copy, paste, remove or create an NTFS file on Mac machines.
That's because NTFS, also known as New Technology File System, is the default file system for Windows operating systems. Therefore, Apple has only allowed Mac users to read in NTFS format.
Thus, if you only want to view NTFS files on Mac, simply connect the NTFS USB drive to a device and view files. But to edit or transfer USB files, third-party program or technical command knowledge is required.
The NTFS file format isn't Mac compatible, but still, many users prefer to use NTFS files instead of other file formats. Besides the latest technology, NTFS offers various other benefits, such as:
If you want to open the same NTFS files on Mac and Windows, it is possible. Here are the two free methods to view NTFS files on Mac:
The best and free tool to access NTFS files on Mac is EaseUS NTFS for Mac. It is a highly safe and fast program that can provide read-write access to NTFS on Mac.
The EaseUS offers full read-write support to copy, delete, edit, rename, move or rename NTFS files on Mac. The software can also help to mount and unmount Windows NTFS drives from Mac's status bar. It works with all the leading MacOS versions and external drives to seamlessly access NTFS on Mac.
Main Highlights
Pros
Cons
Here's how to view NTFS files on Mac using EaseUS NTFS for Mac:
Step 1. Launch and activate EaseUS NTFS for Mac. Click "I already have a license" to unlock this software.
Step 2. Connect an NTFS drive to Mac, EaseUS NTFS for Mac will automatically detect the device. Select your drive and you'll see it's now marked as 'Read-only". Click "Enable Writable" to add read and write rights to the drive.
Step 3. When the state of NTFS drives turns into "Writable".
Step 4. EaseUS NTFS for Mac will pops up a window to help Mac get access to the NTFS drive:
Step 5. When EaseUS NTFS for Mac restarts, you can then open to check, read, write, and even modify saved data on the NTFS device.
Not many people know that Apple has added the experimental NTFS write support. This feature is disabled by default, but you can run some command lines in Terminal to activate the NTFS write support for Mac.
But keep one thing in mind, it is an experimental and unstable feature. It may cause disk corruption or permanent data loss. Therefore, the Terminal to view NTFS files isn't a recommended method.
If you are curious about enabling Apple NTFS to write support, follow these steps:
Step 1. Go to the Applications > Utilities > Terminal > Terminal program.
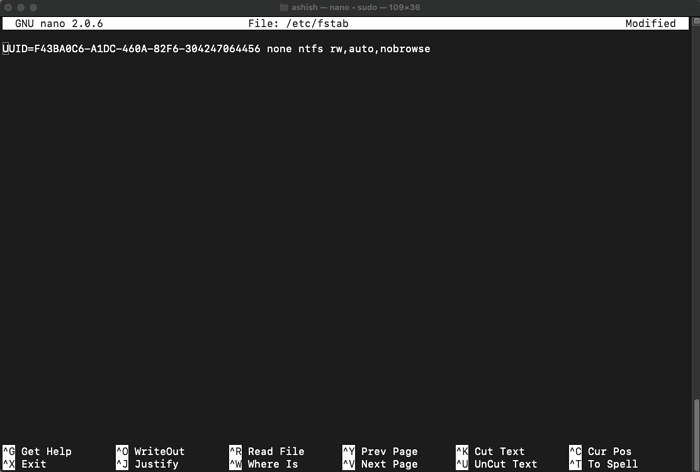
Step 2. On the Terminal app, type "sudo nano /etc/fstab" to edit the fstab file.
Step 3. Next, type "LABEL=VOLUME_NAME none ntfs rw,auto,nobrowse" and press "Control + O" to write.
Step 4. Press Enter and then "Control + X" to exit the window.
Step 5. Safely eject the NTFS drive and reconnect to the Mac.
Step 6. Go to "Go to Folder" from the top left menu and type in "/Volumes."
Step 7. Open the NTFS files and start editing them.
It is possible to view NTFS files on Mac for free. We have already discussed two options to access NTFS drives on macOS. But, we would recommend readers to go for the first option.
The reason?
EaseUS NTFS for Mac is a simple and easy solution to mount NTFS drives via Mac's status bar. On the contrary, enabling Apple's NTFS to write support using the Terminal is highly technical and risky. It can even corrupt your drive.
Therefore, we suggest using the free EaseUS NTFS for Mac to view NTFS files on Mac. But rest is your choice.
Related Articles - ALSO ON EaseUS SOFTWARE
How to Format FAT32 to NTFS on Mac
![]() Tracy King/2024-09-30
Tracy King/2024-09-30
5 Quick Fixes - New SSD Not Showing Up in Disk Utility
![]() Sherly/2024-04-19
Sherly/2024-04-19
How to Read and Format NTFS Drives on Mac
![]() Tracy King/2024-09-30
Tracy King/2024-09-30
How to Fix Can't Delete Files from USB on Mac | 2024 New
![]() Cici/2024-09-30
Cici/2024-09-30
Copyright © 2004 - 2023 EaseUS. All rights reserved.


