- Products
- Store
- Partner
-
Support
Support CenterGuides, License, ContactDownloadDownload installerChat SupportChat with a TechnicianPre-Sales InquiryChat with a Sales Rep
Table of Contents
Are you looking to use NTFS drives on your Mac? In this guide, we will show you how to read and format NTFS drives in macOS.
The Mac vs. PC debate isn’t going to end anytime soon, and there is no denying the fact that Windows computers offer more versatility. This is why many manufacturers of USB sticks and external hard drives pre-format their devices with NTFS.
NTFS was created for Microsoft, and it allows users to plug in their drives quickly into Windows machines and work with files. NTFS is exclusive, and Apple requires a special license for using it entirely on the Macs they offer.
Instead of doing this, macOS has been designed for reading drives formatted with NTFS, but they cannot write them. Mac users can only open and view files on Windows drives, but you can’t change them in any way. Moreover, you can't copy new files to NTFS format disks using Mac.
| Workable Solutions | Step-by-step Troubleshooting |
|---|---|
| Run a Third-party Software to Read and Write to NTFS Drive | Step 1. Launch and activate EaseUS NTFS for Mac. Click "I already have a license"...Full steps |
| Format or Convert to APFS or Other File System | Step 1: Back up the important files available in your NTFS drive...Full steps |
Yes, it is possible to read Windows NTFS-formatted drives, USB drives, SD cards, external hard drives, and memory sticks without any problem.
It doesn’t matter what Mac version you are using, either you are using a laptop or desktop, and no matter which Mac operating system is currently running on your Mac, Mac OS X, or macOS, you can easily read NTFS drives on Mac.
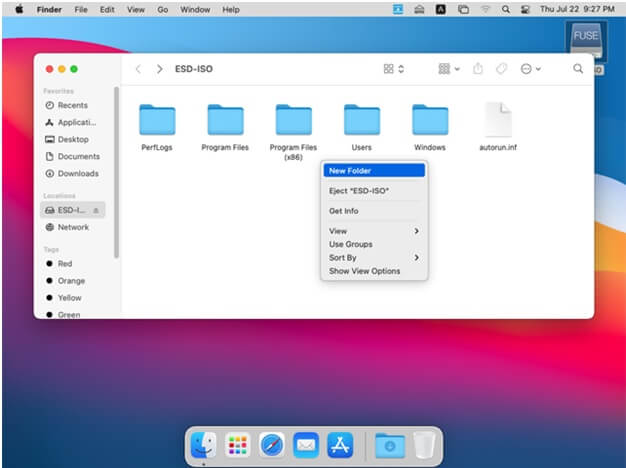
You can view the files and open them. Files will appear the same quality as they do on a PC. The files will look locked or read-only apart from the file name. However, you can’t make any changes to the files nor save/create/move any files from the NTFS drives on Mac. It looks impossible to share files between NTFS drives and Mac.
The coolest solution to bridge the gap between formats is just by reformatting the drive into FAT. However, FAT is an older file system created by Windows, and Mac has the compatibility to read and write the FAT file system.
Apparently, NTFS offers several advantages as a format; it is a new file system and has been tested to work faster than the FAT file system. However, if your drive is comparatively new and you don't have any files in the drives to keep them, reformatting and converting the drive to FAT, APFS, or other file system is an easy solution.
You can use third-party applications available online that have been developed to handle the OS X limitation. Some of these applications are free, but they can be more challenging to set up and are less reliable. EaseUS NTFS for Mac is one of the best tools that you can use to read and format NTFS drives on Mac.
#2. Format or Convert to APFS or Other File System
MacOS can format the drive to APFS and other formats including, FAT 32, exFAT, or HFS+ file system.
EaseUS NTFS for Mac is a popular Mac utility that allows users to mount NTFS external drives as writable volumes. It stays on the Mac menu bar and offers easy access for mounting & unmounting NTFS drives as read/write.
EaseUS NTFS for Mac lets you easily and quickly work with drives formatted to the NTFS format, as well as external drives. It is easy to mount and unmount drives from the menu bar app. This application allows full access to NTFS files so users can read, copy, write, delete, and transfer files without any problem. There is no need to fiddle with terminal commands to mount partitions manually.
EaseUS NTFS is a powerful and easy-to-use tool. It helps to solve the problem that Mac can't write NTFS drives. It helps to do everything with Windows drives on your Mac machines. It offers support for reading and writing external hard drives that were previously formatted for Windows OS from other known hard drive manufacturers is also an NTFS driver. EaseUS offers a free trial for 7 days. It supports MacOS11 – MacOS10.13.
Step 1. Launch and activate EaseUS NTFS for Mac. Click "I already have a license" to unlock this software.
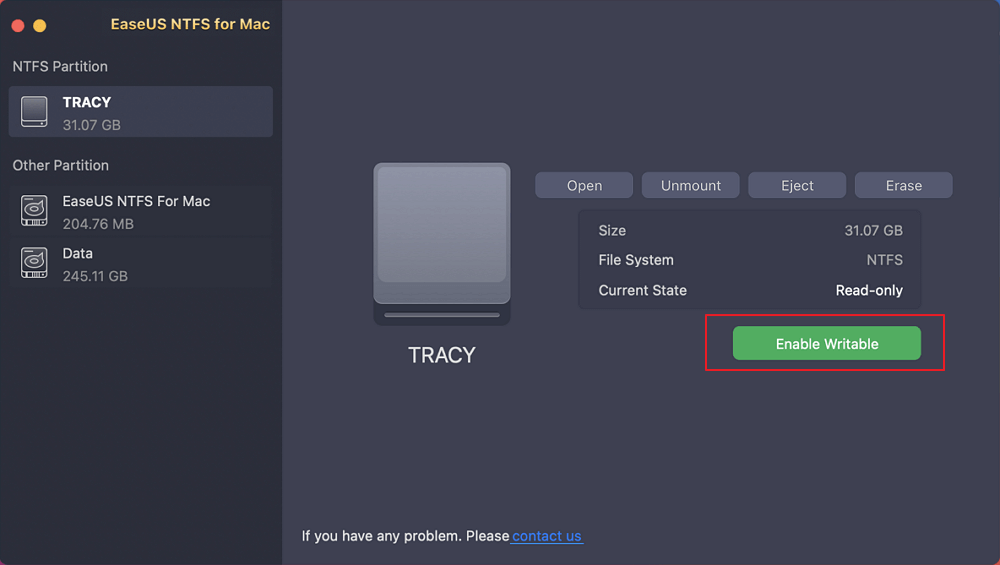
Step 2. Connect an NTFS drive to Mac, EaseUS NTFS for Mac will automatically detect the device. Select your drive and you'll see it's now marked as 'Read-only". Click "Enable Writable" to add read and write rights to the drive.
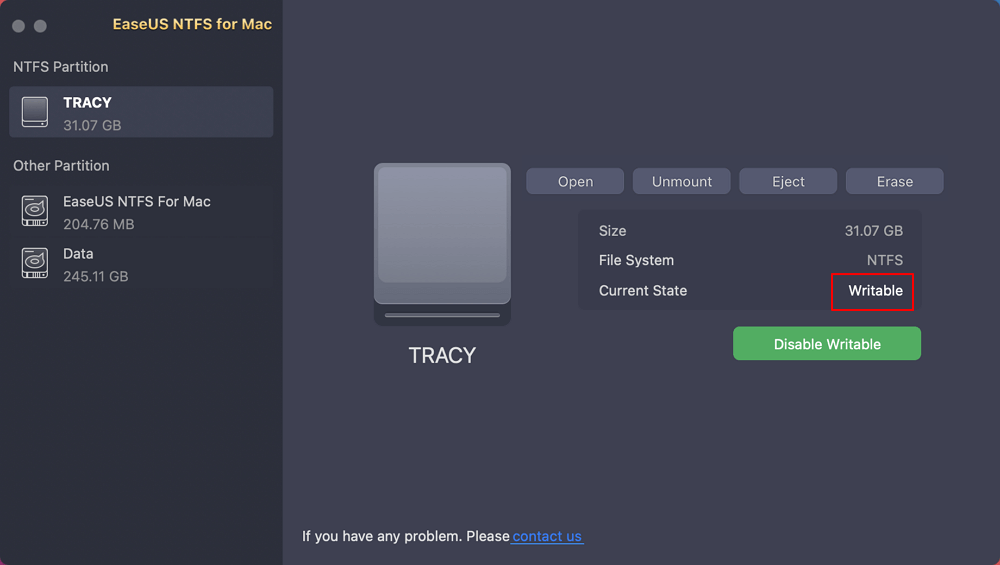
Step 3. When the state of NTFS drives turns into "Writable".
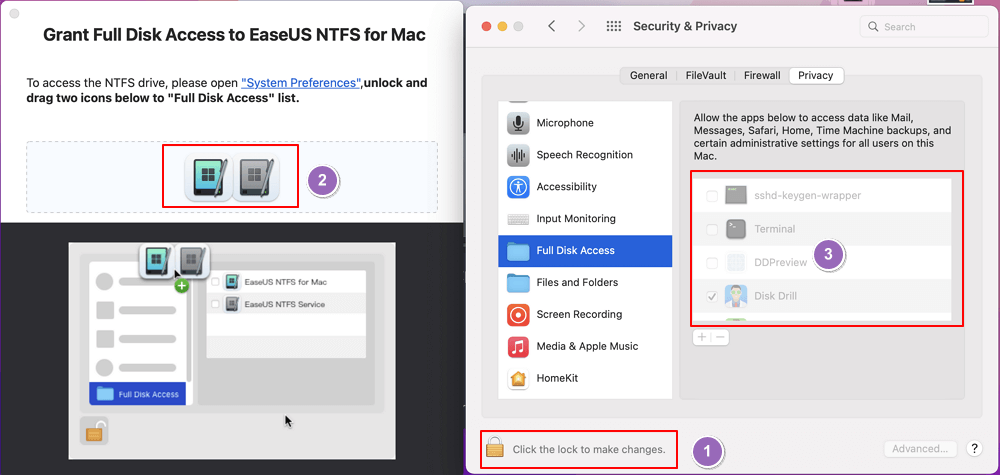
Step 4. EaseUS NTFS for Mac will pops up a window to help Mac get access to the NTFS drive:
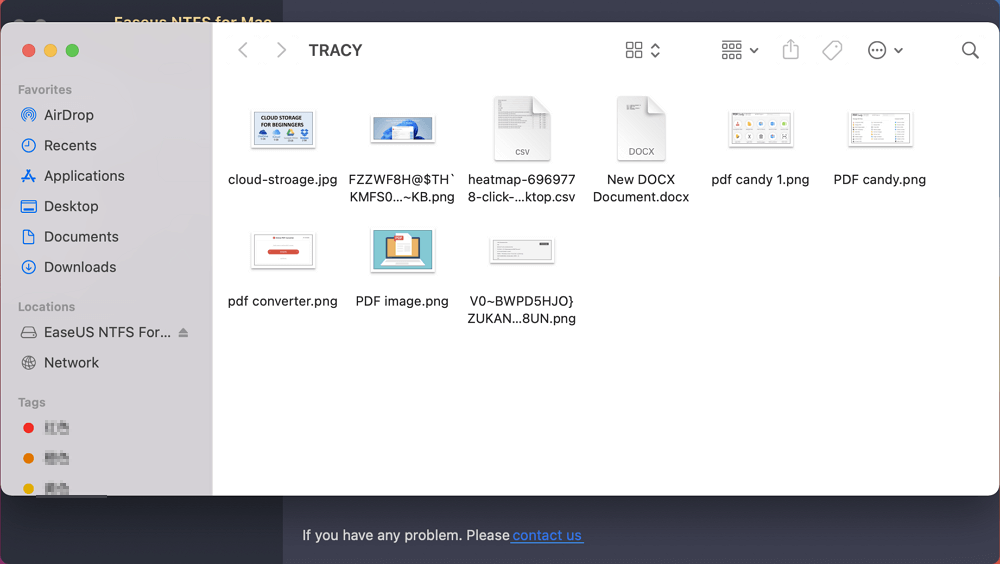
Step 5. When EaseUS NTFS for Mac restarts, you can then open to check, read, write, and even modify saved data on the NTFS device.
It has several advantages:
In this part, you can learn two ways to format NTFS drive to other file systems you want. First, you will learn the easier way - Format NTFS Drive on Mac using EaseUS NTFS for Mac.
You can still choose EaseUS NTFS for Mac. It can make your NTFS readable and writable. In addition to this, it allows users to format NTFS to APFS or other Mac-compatible file systems. Compared with the built-in formatting tool, EaseUS NTFS for Mac is simpler, more stable, and more suitable for beginners.
Step 1. Launch EaseUS NTFS for Mac on your Mac, click "I already have a license" and enter your code to activate this software.
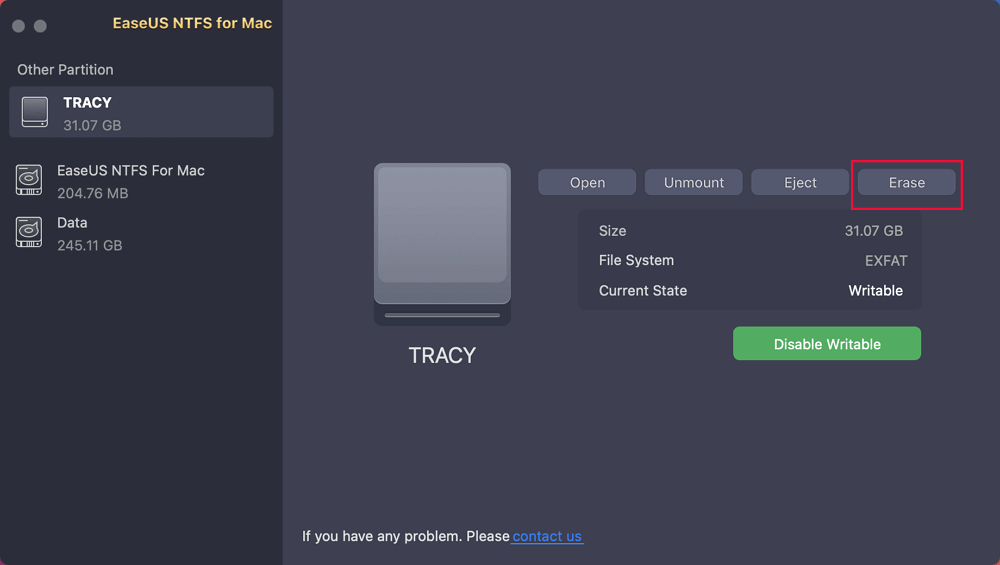
Step 2. Connect the target external hard disk to your Mac, locate it and choose "Erase" to move on.
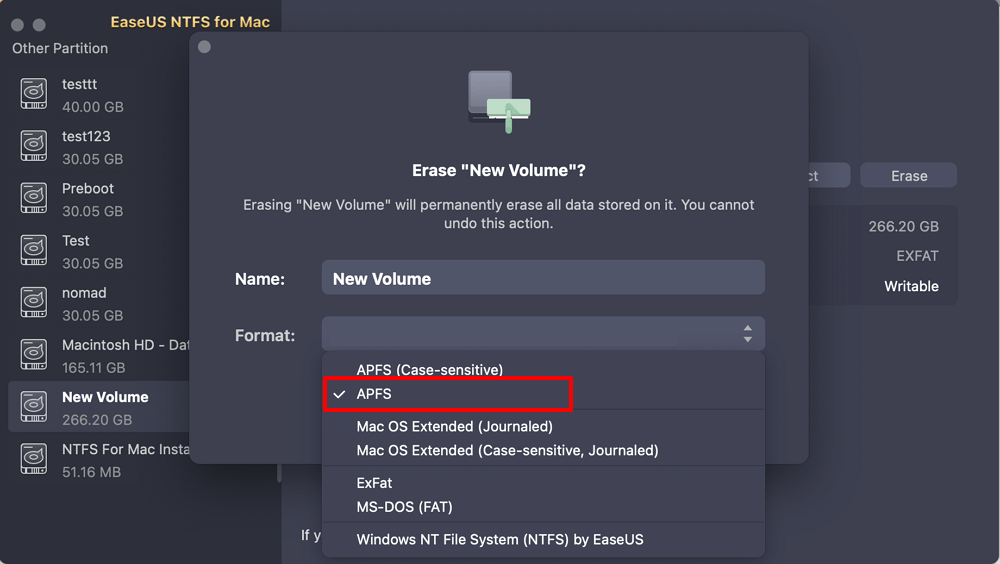
Step 3. In the Format box, select the "APFS" option in the scroll down menu as the new file system.
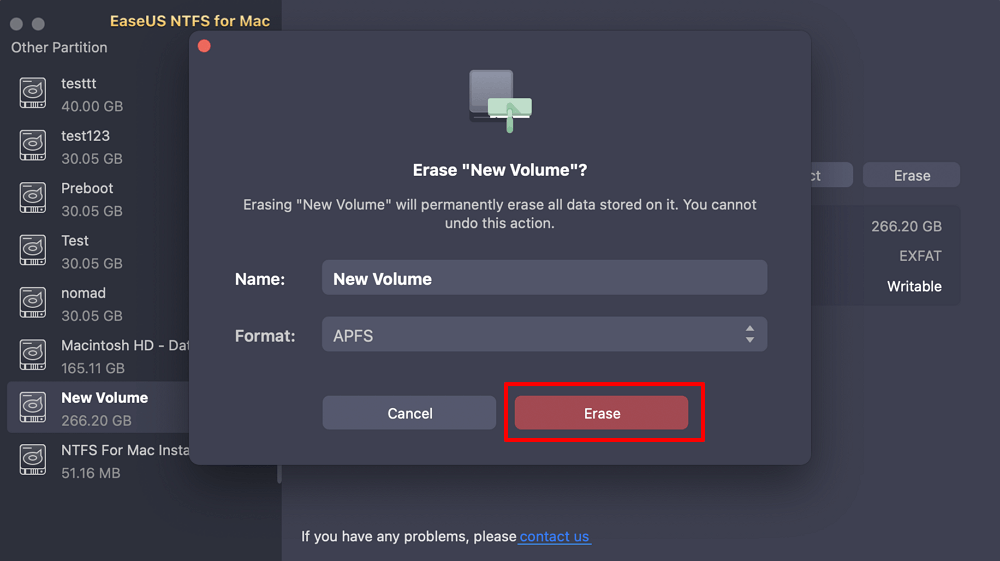
Step 4. Hit on the "Erase" button to confirm the format action and erase all data stored on this external storage device.
MacOS can format the drive to other formats including, FAT 32, exFAT, APFS, or HFS+ file system. However, it can’t format the drive to the NTFS file system. Because of it, you will need to use a third-party tool, such as EaseUS NTFS for Mac.
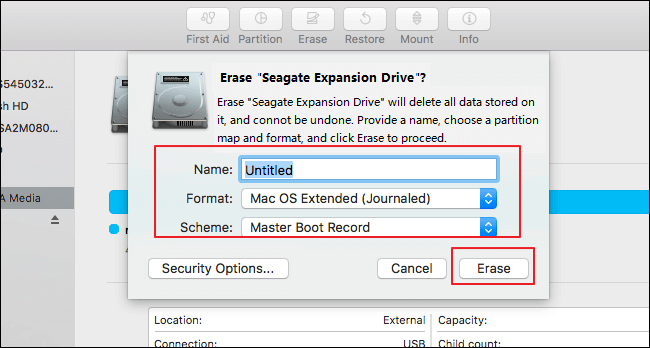
macOS allows formatting the drive to FAT 32, exFAT, APFS, or HFS+. To do so, you need to follow the below steps:
Step 1: Back up the important files available in your NTFS drive.
Step 2: Open Finder, go to the Applications folder, go to Utilities, and choose Disk Utility.
Step 3: Choose the NTFS drive from the left panel available in Disk Utility.
Step 4: Click on "Erase" on the top menu of Disk Utility.
Step 5: Choose "FAT 32" or "exFAT" file system from the drop-down box and choose Erase.
Writing to NTFS drives using Mac is entirely possible. You have different options to read and format NTFS drives on Mac, including free NTFS drivers, Apple's native NTFS support, and third-party NTFS applications.
Free NTFS drivers for Apple and Mac NTFS support are free, but they require an extra amount of work for mounting NTFS drives on Mac in read-write mode, and they are risky to use and very unstable. Even though EaseUS NTFS for Mac isn't completely free, it comes with a 7 day free trial period, and it will be helpful to save a lot of time and effort. It is an excellent, reliable, and easy-to-use third-party software.
If you are looking to use external drives to transfer files between Windows and Mac regularly. It is a great idea to format NTFS to FAT 32 or exFAT. Moreover, if you need to use this Microsoft NTFS drive on Mac later, you will be able to convert NTFS to APFS.
Related Articles - ALSO ON EaseUS SOFTWARE
How to Mount BOOTCAMP NTFS Partition with Read-Write Access
![]() Sherly/2025-06-26
Sherly/2025-06-26
How to Delete Files from Seagate Exteranl Hard Drive Mac & Windows [2025 Guide]
![]() Banu/2025-06-26
Banu/2025-06-26
How to Format NTFS on Mac [2025 New Guide]
![]() Banu/2025-06-26
Banu/2025-06-26
How Do I Fix USB Read Only on Mac? Your Reliable Fixes Are Here
![]() Banu/2025-06-26
Banu/2025-06-26

