Mac can not allow writing support for NTFS external hard drive. Your drive, therefore, needs to turn to another format or get third-party software. In this article, we will offer methods to format 1TB/2TB NTFS drive on Mac.
Table of Contents
If you search "Can macOS write to NTFS", surely, the negative answer pops up - macOS only gives read support for NTFS. One useful solution to tackle such a situation is to format NTFS external hard drive to another format, choosing a format suitable for Windows and Mac or can only be compatible with Apple devices.
"......I have a few external hard drives which I use to store photos on and before I tool my Mac in to the Apple store I had no issues with coping photos from my laptop to the hard drives. However, I can now no longer write any files to the hard drives and when I have looked at their properties I see the format on them is NTFS......"
EaswUS will write about two common ways to change drive format in this article. Moreover, you can check the recommended NTFS for Mac software if you want to get write access without formatting.
If you haven't checked what format you should change before, you will see a long list when it comes to choosing the new file system.
Stay on this part to see how to select the best format for your external hard drive.
ExFAT: Windows & Mac compatible; choose this format if your disk is over 32GB.
MS-DOS (FAT): precursor version of FAT32; Compatible with Windows version Windows XP SP2 (2004); Choose this format if your disk is under 32GB.
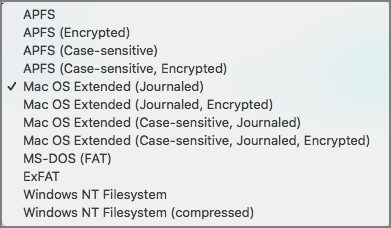
Mac OS Extended (HFS+): Mac format.
Mac OS Extended (Journaled, Encrypted): Mac format; requires a password and encrypts a partition
Mac OS Extended (Case-sensitive, Journaled): Apple-compatible; case sensitive to the folder name, like "Photo" and "PHOTO"(No friendly for some apps that like a case-insensitive file system.)
Mac OS Extended (Case-sensitive, Journaled, Encrypted): Mac format; case sensitive to folder names; protected by a password; encrypted partition.
APFS (Apple File System): Mac format (New features for macOS High Sierra); best format for SSDs and flash drives; Not working with Time machine.
Windows NT Filesystem: Windows format
Is that clear about these file systems? Now running Disk Utility and Terminal to format external hard drive on Mac. In this passage, you will learn a lot about Mac-compatible file systems and how to format NTFS drives on Mac, which you can share with your workmates and friends on social media:
This section will introduce three applicable methods to help you format a 1 TB/2 TB NTFS drive on the Mac. Now, let's quickly go through the comprehensive information table below:
| Workable Solutions | Efficiency | Difficulty |
|---|---|---|
| 🏅EaseUS NTFS For Mac | High - It enables users to format their hard drives to exFAT, FAT32, HFS+, and APFS. | ⭐ |
| 🥈Disk Utility | Medium - It requires extra steps and complicated operations. | ⭐⭐ |
| 🥉Terminal | Low - It requires basic knowledge of Mac's Terminal and command lines. | ⭐⭐⭐ |
EaseUS NTFS For Mac has built-in advanced NTFS driver technology that enables users to read and write on NTFS drive with one click. In addition, it also provides an "Erase" tool that can assist you in formatting the hard drive to NTFS, exFAT, FAT32, HFS+, and APFS file systems. Refer to the how-to-do tutorial below to format the 1 TB/2 TB NTFS drive to APFS:
Note: The format will erase all files. It's better to back up all your data first.
Step 1. Launch EaseUS NTFS for Mac on your Mac, click "I already have a license" and enter your code to activate this software.
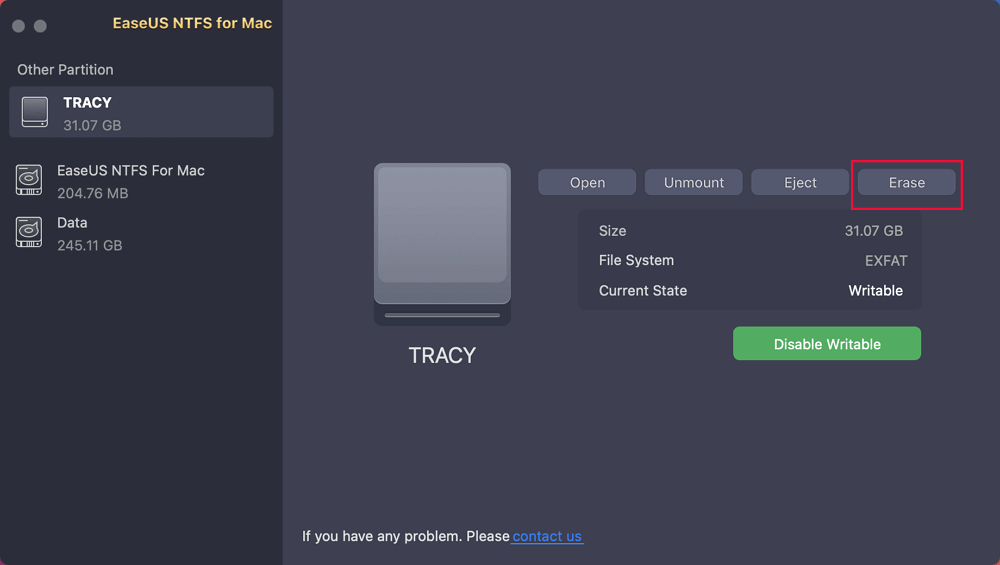
Step 2. Connect the target external hard disk to your Mac, locate it and choose "Erase" to move on.
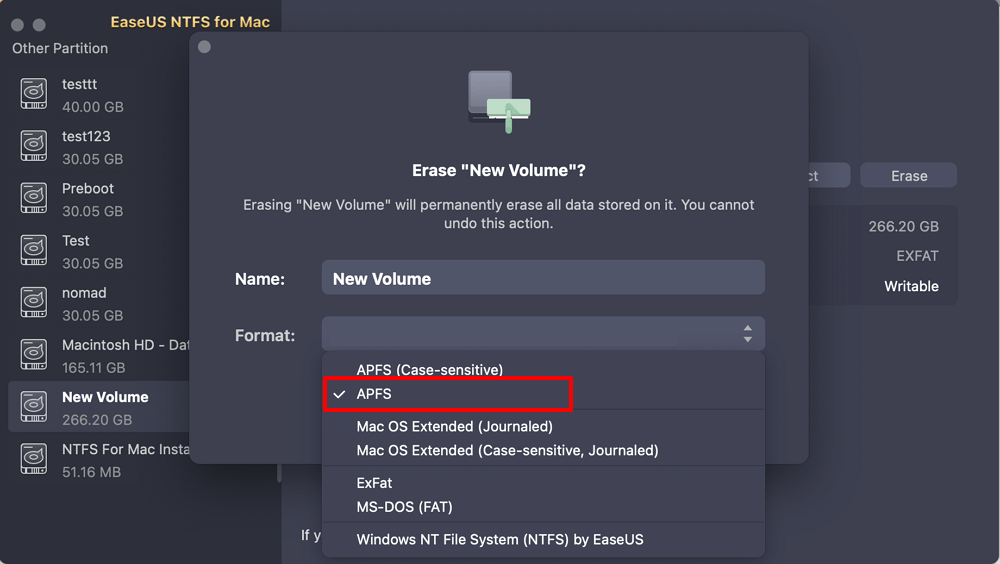
Step 3. In the Format box, select the "APFS" option in the scroll down menu as the new file system.
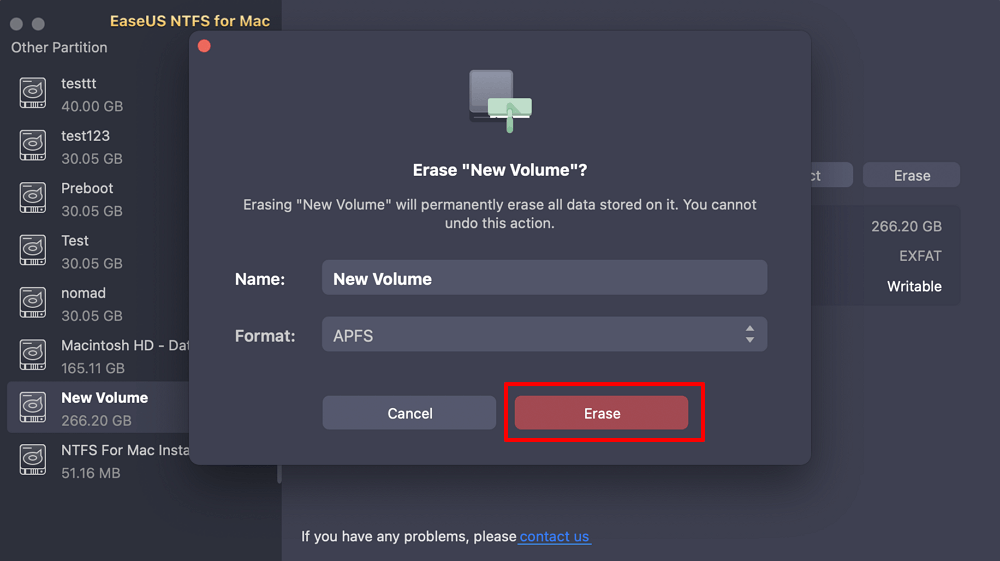
Step 4. Hit on the "Erase" button to confirm the format action and erase all data stored on this external storage device.
Time to change your way of formatting NTFS drive on Mac! Download this powerful software and have a try.
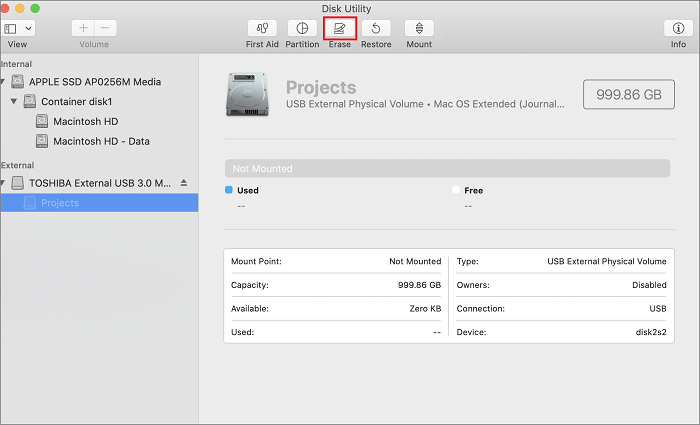
Step 1. Click the Spot icon, type Disk Utility on it, and click to open.
Step 2. Click your NTFS external drive under the External Hard Drive tab.
Step 3. Go to the right panel and choose the Erase button.
Step 4. Type drive name. Choose the right file system and Scheme.
Note for "Scheme":
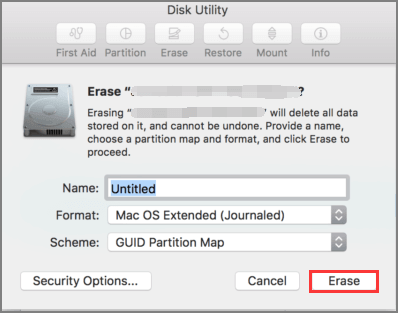
Step 5. Click the Erase button.
Step 1. Open Finder from the dock. Select Applications on the left panel. Go to Utilities and choose Terminal.
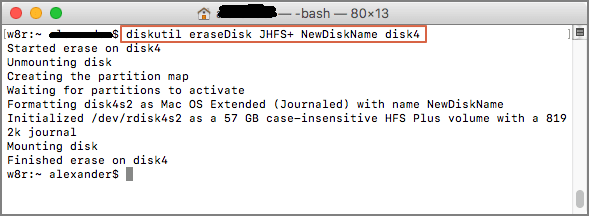
Step 2. Type command line: diskutil list. Then press Enter.
Step 3. Type the command line and press Enter.
Disktil eraseDisk (file system) (Disk Name) (Disk ID)
Such as: Disktil eraseDisk JHFS+ Seagate /dev/disk1
Getting write access is not difficult by a third-party NTFS writer. EaseUS NTFS for Mac is such a great tool to enable read and writing to NTFS external hard drive. After the click the "Writable" button, your NTFS disk is free to edit, add, delete, transfer files or folders.
Download this NTFS mounter:
How to Enable Writable by EaseUS NTFS for Mac:
Step 1. Launch and activate EaseUS NTFS for Mac. Click "I already have a license" to unlock this software.
Step 2. Connect an NTFS drive to Mac, EaseUS NTFS for Mac will automatically detect the device. Select your drive and you'll see it's now marked as 'Read-only". Click "Enable Writable" to add read and write rights to the drive.
Step 3. When the state of NTFS drives turns into "Writable".
Step 4. EaseUS NTFS for Mac will pops up a window to help Mac get access to the NTFS drive:
Step 5. When EaseUS NTFS for Mac restarts, you can then open to check, read, write, and even modify saved data on the NTFS device.
Read also:
To format a 1TB or 2TB NTFS hard drive on Mac, you can use the Disk Utility and Terminal. Make sure you've backed up important files before formatting. If you want to keep your data on an NTFS drive without deleting files, try the free NTFS for Mac software right now.
Step 1. Open Disk Utility and then click your targeted drive.
Step 2. Click the Erase button at the top right panel.
Step 3. Input your name and choose the file system as "Windows NT Filesystem".
Step 4. Click the Erase button.
Your drive needs to be formatted as a Mac-compatible file system. If not, the Partition button will turn grey.
Step 1. Open Disk Utility > Click drive > Select the Partition button.
Step 2. Start to allocate partitions.
Click the "+" button to add the number of partitions. Then move to allocate space to it.
Step 3. Click "Partition" to confirm your operation.
Related Articles - ALSO ON EaseUS SOFTWARE
Can Disk Utility Format NTFS on Mac? Check Mac Disk Utility on Mac
![]() Tracy King/2023-11-07
Tracy King/2023-11-07
How to Copy Files to NTFS on Mac
![]() Tracy King/2023-11-07
Tracy King/2023-11-07
How to Easily Fix Read-Only File System on Mac [Step-by-Step Guide]
![]() Cici/2023-11-07
Cici/2023-11-07
Is NTFS Compatible with Mac? Check Your Answer Here
![]() Tracy King/2023-11-07
Tracy King/2023-11-07
Copyright © 2004 - 2023 EaseUS. All rights reserved.