Are you stuck with read-only errors on Mac? Don't panic, as it is possible to explore external hard drive read-only without formatting on Mac. Just follow three quick fixes.
Table of Contents
Do you want to connect an external hard drive to a Mac machine? But you end up getting an external hard drive read-only error.
Then, no need to worry about formatting external drives or losing your data. That's because it is possible to explore external hard drives read-only without formatting on Mac.
Below we have disclosed the three simple options to access an external drive on Mac without losing any data. So, let's scroll down and fix read-only errors on Mac.
First of all, you aren't the only one whose external hard drive is read-only on Mac. Often people face read-only errors on Mac due to incompatible file systems, internal errors, and other reasons.
However, mainly external hard drives read-only on Mac in two situations:
Some people prefer to set up different access permissions for their sensitive files and folders to protect them from unauthorized access. While transferring those files and folders to an external hard drive, people often tend not to change the access permission settings. This, in return, will make it impossible to copy or edit those files to a Mac or any other computer.
The simplest solution here is to check your files and folders permission settings and change to remove read-only errors. To do so, go to Finder > Get Info window > Expand Sharing & Permission display menu to know the information about the file or folder.
External hard drives formatted to an NTFS file system have read-only support for Mac by default. That's because NTFS is a Windows file system, so Mac can't write NTFS files.
There you can use the same steps to Get Info about the hard drive format as the situation one. Once it is established, you have an NTFS formatted hard drive, either format it to a Mac compatible file system or use a third-party tool to access the drive. Both the options are discussed in detail ahead, so let's get moving.
Without losing data or formatting hassle, Mac users can explore external hard drive read-only using these fixes:
If permission settings are the culprit behind the external drive read-only error, that can be fixed pretty easily by changing the permission settings as follows:
Step 1. Connect the said external hard drive to a Mac.
Step 2. Right-click on the drive icon on the desktop and then click on the Get Info.
Step 3. If a golden padlock sign is visible on the bottom of the info window, the drive is read-only locked.
Step 4. Click on the golden padlock sign and enter an administrator password to unlock the hard drive permission settings.
Step 5. Expand the Sharing & Permissions dropdown menu. Here the name of an account along with the access privilege will popup.
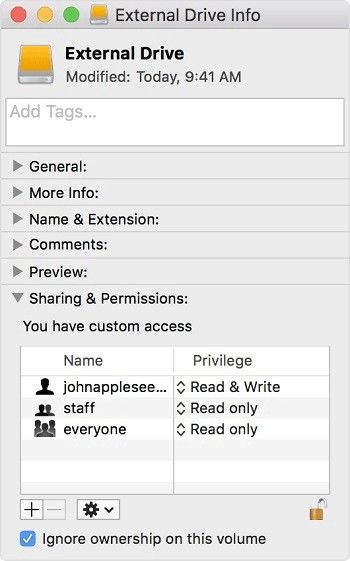
Step 6. Simply click beside the account name whose permission you wish to change and select the Read & Write permission.
Step 7. After changing the settings, click on the gear icon and select the Apply to enclosed items to prevent any future permission conflicts.
When you have an NTFS formatted external hard drive, it is common to face a read-only error. Here you can format an external hard drive to Mac compatible file formats like HFS+, APFS, or exFAT to access the drive's content.
But this will erase the external drive's data. However, there's no need to worry yet. Using the EaseUS NTFS for Mac, you can easily gain read-write access to NTFS drives in macOS.
The software works with NTFS formatted files and folders to allow Mac users to read, write, delete, move or copy them. It can even mount or unmount the NTFS drives from the Mac status bar.
Here are some other benefits of using EaseUS NTFS for Mac to explore external hard drives in the read-write format:
To access NTFS external hard drive in a read-write format using EaseUS, follow these simple steps:
Step 1. Launch and activate EaseUS NTFS for Mac. Click "I already have a license" to unlock this software.
Step 2. Connect an NTFS drive to Mac, EaseUS NTFS for Mac will automatically detect the device. Select your drive and you'll see it's now marked as 'Read-only". Click "Enable Writable" to add read and write rights to the drive.
Step 3. When the state of NTFS drives turns into "Writable".
Step 4. EaseUS NTFS for Mac will pops up a window to help Mac get access to the NTFS drive:
Step 5. When EaseUS NTFS for Mac restarts, you can then open to check, read, write, and even modify saved data on the NTFS device.
This fix isn't something that we recommend because it is risky and complicated. However, for tech-savvy users, this method might work.
By default, Apple has suspended NTFS writable for Mac users. But it can be enabled from the Terminal. Before diving into Terminal, we advise you to properly backup your data as anything could go wrong during the process. With this in mind, let's begin:
Step 1. Connect an NTFS formatted drive to a Mac and remember the volume name.
Step 2. Open Terminal and enter the following command along with the admin password when prompted - sudo nano /etc/fstab.

Step 3. On the blank fstab file, type this command using the volume name - LABEL=VOLUME_NAME none ntfs rw,auto,nobrowse.

Step 4. Press Ctrl + O keys to write the information to file and then press Enter to save the changes.

Step 5. Once you are done, press Ctrl + X to close the file.

Step 6. Now, safely eject the external hard drive and mount again to see if this fix has worked.
As you can see, it is possible to explore external hard drive read-only on Mac without formatting hassle. If the issue is with permission settings, it is pretty easy to change the settings.
However, if an external hard drive is formatted to NTFS file format, it is very hard to use the Terminal command to make it writable to Mac. Additionally, one wrong move and all the external hard drive data will be removed.
So, after full consideration, it is clear that EaseUS NTFS for Mac is the best solution to get NTFS read-write access on Mac. Plus, it is a safe and simple tool to mount and unmount NTFS drives on Mac.
That's our conclusion, but you can explore the external hard drive read-only on Mac as you wish.
Related Articles - ALSO ON EaseUS SOFTWARE
How to Fix LaCie Hard Drive Not Showing Up on Mac (5 Practical Methods)
![]() Tracy King/2023-11-07
Tracy King/2023-11-07
How to Fix Lacie Read-Only Mac (Two Easy Ways)
![]() Tracy King/2023-11-07
Tracy King/2023-11-07
Is NTFS Compatible with Mac? Check Your Answer Here
![]() Tracy King/2023-11-07
Tracy King/2023-11-07
3 Reliable Ways to Format SD Card to FAT32 on Mac
![]() Tracy King/2023-11-07
Tracy King/2023-11-07
Copyright © 2004 - 2023 EaseUS. All rights reserved.


