Table of Contents
| Workable Solutions | Step-by-step Troubleshooting |
|---|---|
| Can MacOS Detect NTFS? | The answer is simple, MacOS can detect and read NTFS files, but it will not give you complete access...Full steps |
| Why Can't MacOS Access NTFS Drive | Microsoft introduced the NTFS Drive system in the early 90s in Windows NT 3.1, and due to its fast speed...Full steps |
| Get MacOS Detect NTFS | Step 1: Firstly, plug in your NTFS Drive to your macOS and then on your computer. Go to Applications there...Full steps |
| Access NTFS Drives on a Mac | Step 1. Launch and activate EaseUS NTFS for Mac. Click "I already have a license" to unlock this software...Full steps |
Most Windows users use NTFS Drives. However, they are not entirely supported in macOS. If you connect an NTFS drive with your computer, you can read files in it. But, you will not be able to edit, remove, or delete them. Turn of phrase, you cannot use NTFS Drives on Mac for writing purposes.
These days, more and more people are shifting from Windows computers to macOS. For most users, it is a great upgrade. However, on the other hand, a vast majority also face several issues. Among them, a common issue is transferring Files from Windows to Mac.
So, the question here is: can macOS detect NTFS? Since millions of people are suffering from this problem, here we're going to answer it and explore how you can use NTFS drive on your computer with and without software. We also recommend that users use EaseUS NTFS for Mac as the tool to help Mac users get access to read and write support to the NTFS drives on a Mac.
So, if you are also wondering, can Apple Mac read NTFS? The answer is simple, MacOS can detect and read NTFS files, but it will not give you complete access to the file. On your macOS, you can only open a Read-only file of your NTFS files. This way, you will not be able to rename, edit, or even save files into your Drive.
Moreover, it will not allow you to add or remove a file in the NTFS Drive or Format. Thus, if you want to transfer your files from Windows to macOS, NTFS will not be the best option. Instead, it would help if you went with the FAT, FAT32, or exFAT format. But, still, if you want to transfer files between two Windows computers, the NTFS file system can give you better performance.
Microsoft introduced the NTFS Drive system in the early 90s in Windows NT 3.1, and due to its fast speed, millions of people still use it daily. Since Microsoft created and launched NTFS, it also has its proprietary rights.
So, if Mac wants to add NTFS complete support to their OS, they would have to pay a heavy licensing fee. But still, why would Mac buy a license from their biggest competitor in the market. Thus, it can only detect and read the NTFS Drives, but to date, you can use macOS to write on them.
Sometimes, Mac does not even read the NTFS. It usually happens when you are trying it for the first time. Moreover, this problem occurs due to the drive not being connected properly or not having permissions on Mac.
So, if you are also facing a similar issue, follow these steps to gain permission for the NTFS Drive on a Mac computer.
Step 1: Firstly, plug in your NTFS Drive to your macOS and then on your computer. Go to Applications there, and click on Disk Utility.
Step 2: Now a small window will appear on the screen. On the left side of the screen, go to External, click on your NTFS Drive's name, and tap on Erase at the top right.
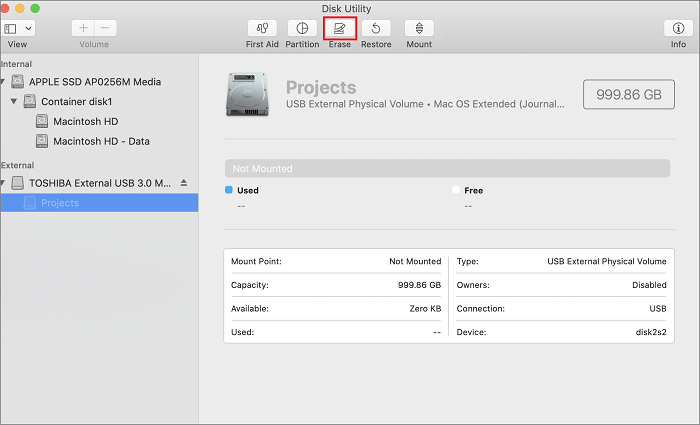
Step 3: It will ask you to change the Drive's name and format. Since macOS does not support NTFS, tap on Format and change it to FAT32. After that, click on Erase. This way, your entire drive will be formatted, and now you can use this drive for both reading and writing purposes.

If you also want to read and write NTFS drives on your Mac without getting through all the technicalities, you should use EaseUS NTFS for Mac. It will help you read and write NTFS drives with a user-Friendly interface. Plus, you will not need to delete your drive's data or lose your data to convert their drive format again.
Step 1. Launch and activate EaseUS NTFS for Mac. Click "I already have a license" to unlock this software.
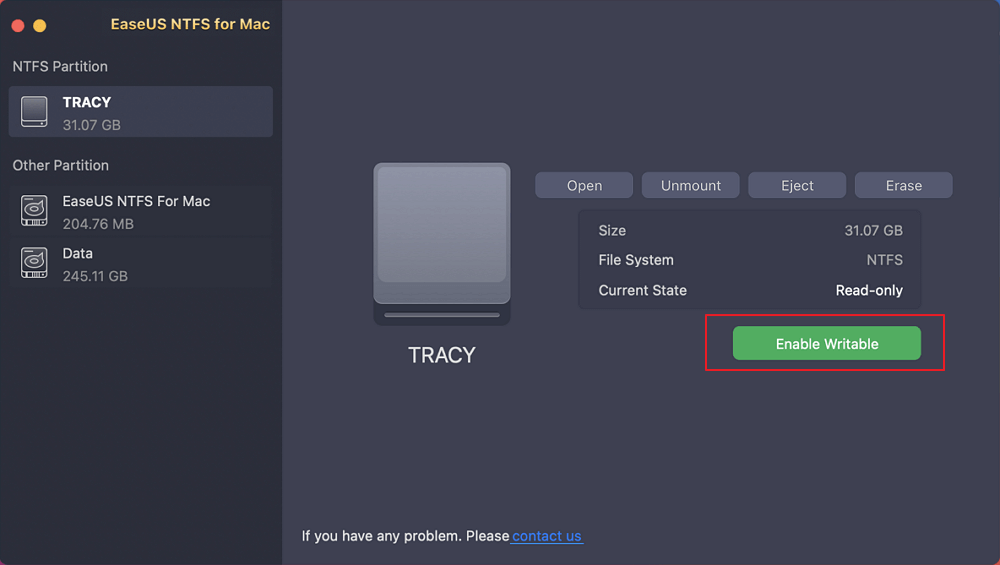
Step 2. Connect an NTFS drive to Mac, EaseUS NTFS for Mac will automatically detect the device. Select your drive and you'll see it's now marked as 'Read-only". Click "Enable Writable" to add read and write rights to the drive.
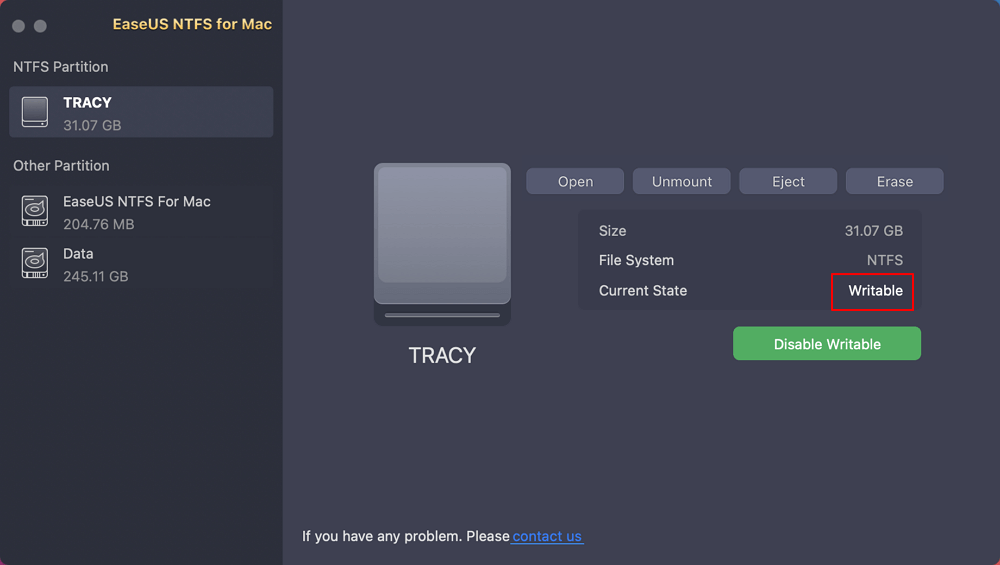
Step 3. When the state of NTFS drives turns into "Writable".
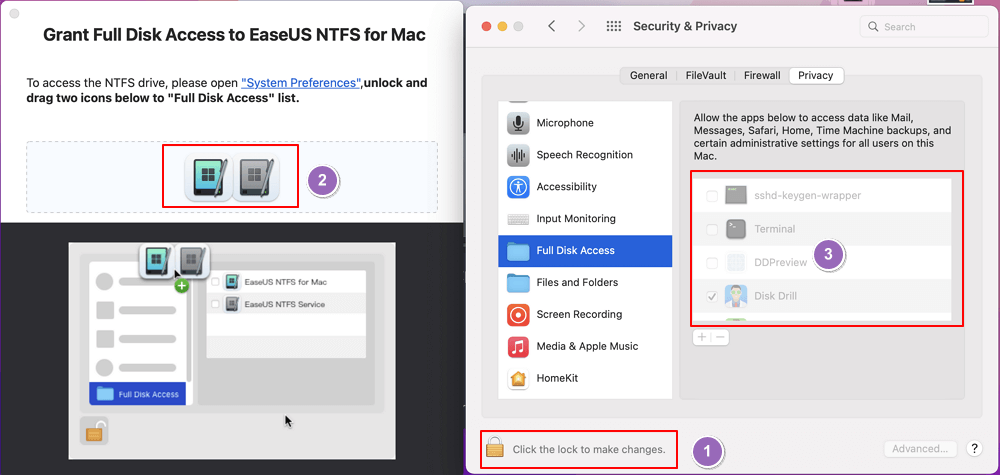
Step 4. EaseUS NTFS for Mac will pops up a window to help Mac get access to the NTFS drive:
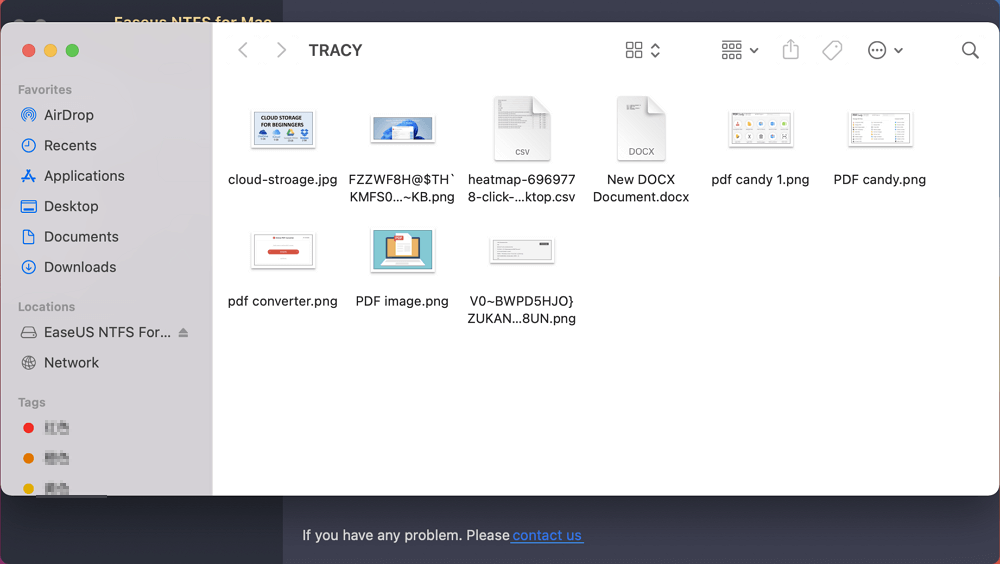
Step 5. When EaseUS NTFS for Mac restarts, you can then open to check, read, write, and even modify saved data on the NTFS device.
Here are some features of EaseUS NTFS for Mac that will likely grab your interest.
Upgrading to Mac is a great idea. Your first question would be can macOS detect NTFS? Yes, it can and we've explained to you methods to read and write NTFS drives on Mac. The first one is to format your entire drive and set it up as a FAT32. After that, the drive will allow you to do both Read and Write on it. However, it contains the risk of losing your files. Therefore, you should either have a backup of your files or make sure it does not have any important data.
Other than that, you can also switch to the easier method. It would be to download and use EaseUS NTFS for Mac as a tool that will help you read or write NTFS drives without formatting them. In contrast, if your Mac is not even reading NTFS drives, it is likely to be the permission problem. Giving it access will solve it.
Related Articles - ALSO ON EaseUS SOFTWARE
Disk Won't Format on Mac? Fixes Available Here
![]() Tracy King/2024-02-26
Tracy King/2024-02-26
How to Fix SD Card Read-Only Mac | 2024 Step-by-Step
![]() Cici/2024-01-17
Cici/2024-01-17
Explore External Hard Drive Read Only without Formatting
![]() Daisy/2023-12-19
Daisy/2023-12-19
External Hard Drive Not Mounting on Mac? Fixes Here!
![]() Tracy King/2023-12-19
Tracy King/2023-12-19

