- Store
-
Support CenterGuides, License, ContactDownloadDownload installerChat SupportChat with a TechnicianPre-Sales InquiryChat with a Sales Rep
Do you want to use an NTFS drive on your macOS Sonoma and don't know how? Read this straightforward guide to learn how to use NTFS drive on macOS Sonoma with read and write capabilities.
Table of Contents
NTFS is a file system for storage drives developed by Microsoft that is widely used in Windows operating systems. It's famous for its enhanced security encryptions and administrative control, which makes it a powerful storage format. However, macOS users can't use a storage drive running on this file system as it's incompatible with their Mac.
Relax! We are here for you to provide the solution to use NTFS Drive on macOS Sonoma without any hurdle. The guide from EaseUS will bring in 100% working solutions and a comprehensive tool to fully enable your Mac for NTFS handling. Just follow the guide all the way and share it with others if you find it cool and beneficial.
You can use NTFS Drive on macOS Sonoma through multiple effective ways. macOS itself has some built-in techniques to deal with this scenario. Give your regard to this section to learn them all:
No doubt, you can utilize the built-in solutions of macOS to handle the NTFS file system. However, they don't let you experience the maximum functionality with this format. There's a more potent solution that can deal with almost any drive-related technicality. Here, you can use the EaseUS NTFS for Mac product that enables you to read and write NTFS drive with all customization controls.
This tool is one of the best NTFS for Mac software that you can find over the internet. Not only does it enable the NTFS feature on your Mac, but you can also freely erase, copy, or even write files with maximum authorization.
If you are wondering about the complications of using this tool, you don't need to stress yourself. It's amazingly simple to use; just follow these step-by-step instructions:
Step 1. Launch and activate EaseUS NTFS for Mac. Click "I already have a license" to unlock this software.
Step 2. Connect an NTFS drive to Mac, EaseUS NTFS for Mac will automatically detect the device. Select your drive and you'll see it's now marked as 'Read-only". Click "Enable Writable" to add read and write rights to the drive.
Step 3. When the state of NTFS drives turns into "Writable".
Step 4. EaseUS NTFS for Mac will pops up a window to help Mac get access to the NTFS drive:
Step 5. When EaseUS NTFS for Mac restarts, you can then open to check, read, write, and even modify saved data on the NTFS device.
If you think you should try this tool to use NTFS Drive on macOS Sonoma, just download it for free right now.
Other than using third-party tools, there are also some ways to use NTFS Drive on macOS Sonoma. Disk Utility is a built-in feature on Mac systems that users can use to mount NTFS drives. It helps to overcome the conflict between two different file systems and allows the macOS to read and write data on NTFS-formatted external drives. You can walk through these step-by-step guidelines for using this built-in Mac facility:
Step 1. First of all, ensure that your NTFS drive is successfully connected to your Mac computer. Then, open the "Launchpad" of your Mac and tap on "Others." From there, locate and click the "Disk Utility" app.
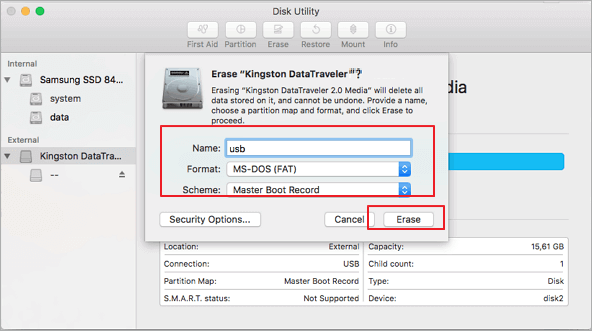
Step 2. Once the Disk Utility is launched, spot your NTFS drive from the left sidebar and select it. Hit the "Erase" button at the above bar, and it will open a new configuration window. (Click the link to fix if the Erase button grayed out on Mac.
Step 3. Now, from the "Format" section, you can select either "MS-DOS (FAT)" or "ExFAT" to mount your NTFS drive. Select any of these formats and wait for the process to finish.
If you have applied this method to your macOS Sonoma, you must have known how effective it is. Just don't forget to share it with others to let them benefit from it, too.
Terminal is another built-in tool in Mac systems that allows users to interact with their computer through text-based commands. By using this tool, users can access greater control in managing NTFS drives on their macOS Sonoma.
It means it allows users to mount, read, and even write to NTFS drives directly from their Mac computers. It is a little bit technical, but believe us, it's pretty easy when you learn it. Consider this guide to learn how to use Terminal to learn how to use NTFS Drive on macOS Sonoma:
Step 1. Start by opening the Mac Terminal app from Launchpad. Once the Terminal window opens, enter the text command "sudo nano/etc/fstab" and then hit "Enter."

Step 2. After that, type the "LABEL=NAME none ntfs rw, auto, nobrowse" command and press the "Enter" key again. In the "NAME" area, type the exact name of the NTFS drive that you want to mount.
When you are done, your NTFS drive will successfully be in read-and-write mode. However, it isn't a recommended method, as it may accidentally cause some unwanted corruption. That's why we have discussed above the safest and most reliable way through EaseUS NTFS for Mac.
Until now, we have shared enough solutions to solve this problem with you. But if you still want alternative ways, we have another one for you. Apple has facilitated Mac users with Boot Camp Assistant, which is a multi-boot utility to run a Windows OS environment on an Intel-based Mac. So, if you're using an Intel-based machine, you can use this method to use NTFS Drive on macOS Sonoma. Following are the step-by-step instructions to learn this technique:
Step 1. After opening the Launchpad of your Mac, go to "Others" and look for "Boot Camp Assistant." Tap on it and insert an external drive in your computer with an ISO file for the Windows partition.
Step 2. Afterward, choose that drive in the Boot Camp Assistant window, ISO file, and follow the general instructions to install Windows in the Boot Camp partition. Now, restart your device, and you will be able to switch between either macOS or Windows.
In a nutshell, macOS Sonoma is a powerful and efficient operating system with many advanced capabilities. Yet, it faces a limitation in the case of using NTFS drives with full authorization due to incompatibility. Therefore, we have highlighted all the possible solutions to let you use NTFS Drive on macOS Sonoma.
Among all the discussed solutions, the one you can most confidently rely on is the EaseUS NTFS for Mac tool. Using this, you don't have to worry about any accompanying disk corruption risk as it's totally safe. To build your trust in it, try it out and get entertained with its handy features.
In this section, we have included some generally asked questions and their appropriate answers for your better comprehension. Go through it for a quick review of these queries.
1. How do you open the NTFS drive on Mac?
To open it on macOS, you can use built-in techniques or third-party tools like EaseUS NTFS for Mac. With this tool, your macOS can get full read and write access to NTFS-formatted drives.
2. How do you use Terminal to mount NTFS read and write permission on Mac?
To use Terminal for mounting NTFS Drive on Mac, follow this method:
Step 1. Access the Mac Terminal, enter the "sudo nano/etc/fstab" text command, and press "Enter."
Step 2. Now, input "LABEL=NAME none ntfs rw, auto, nobrowse" and use the "Enter" key. NTFS Drive will be mounted successfully.
3. Can Sonoma read NTFS?
Yes, macOS Sonoma can read the NTFS file system. However, you can't write or make any changes to it using a Mac computer. For this, you can make use of an efficient tool, as we mentioned above.
Related Articles - ALSO ON EaseUS SOFTWARE
Toshiba NTFS Driver for Mac! Enable Read and Write Toshiba External Hard Drive
![]() Banu/2025-06-26
Banu/2025-06-26
Can macOS Read NTFS Drives? Sure! Take Full Control of NTFS Drives on Mac
![]() Banu/2025-06-26
Banu/2025-06-26
Full Guide to Convert NTFS to FAT32 on Mac without Losing Data
![]() Daisy/2025-06-26
Daisy/2025-06-26
Can't Delete Folders/Files from External Hard Drive on Mac [Fixed]
![]() Banu/2025-06-26
Banu/2025-06-26
Copyright © 2004 - 2023 EaseUS. All rights reserved.


