- Store
-
Support CenterGuides, License, ContactDownloadDownload installerChat SupportChat with a TechnicianPre-Sales InquiryChat with a Sales Rep
Do you need a full guide to permanently delete files from NTFS drive on Mac to follow this page for help? We'll show the complete process on how to permanently delete files from the NTFS drive on Mac successfully.
Table of Contents
The Mac system erases files rather than deleting them. When you delete a file on a Mac, it is not completely deleted from the system log. It merely removes the Mac's pointer location. The actual data and files, on the other hand, exist until they are overwritten.
So, to permanently delete the data from the Mac hard drive you will need to overwrite it. Using a few simple steps on Mac, you may permanently erase files from an NTFS drive.
Mac users can not directly access or modify files in an NTFS formatted drive. Fortunately, with the solution provided here, Mac users can get full control of the NTFS drive.
| Workable Solutions | Step-by-step Troubleshooting |
|---|---|
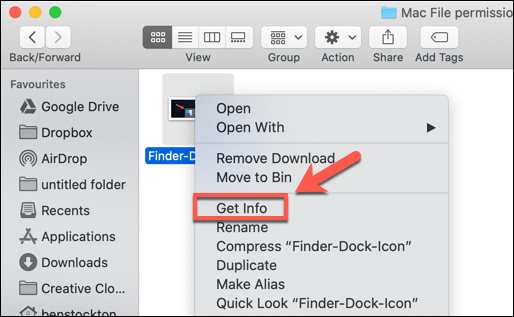
| Fix 1. Format to Delete or Permanently Delete Files from NTFS Drive | Open your system's finder and right-click on the file. Click on Get info...Full steps |
| Fix 2. Full Guide to Delete or Permanently Delete Files From NTFS Disk | 1. Enable Read and Write Support to NTFS Drive on Mac; 2. Delete or Permanently Delete Files from NTFS Drive on Mac...Full steps |
In this article, we'll look at how to delete files and data permanently on a Mac. We'll also recommend a tool that will make the task even easy and faster. Let's take a closer look at the details.
If you want to delete or permanently delete files from an NTFS drive on a Mac, you must first check whether the permission of setting has been enabled. You must overwrite the files to delete them. The steps for checking or activating ignore permission settings on a Mac are outlined below.

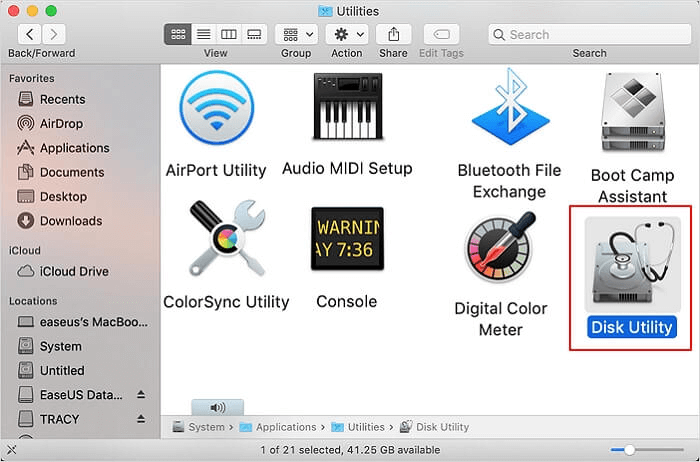
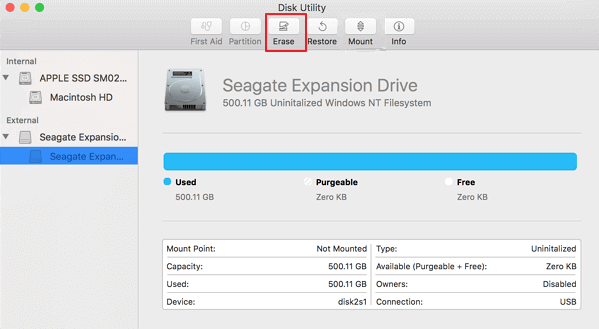
By formatting the NTFS, you can permanently erase files. To access and permanently remove files, follow the procedures below.
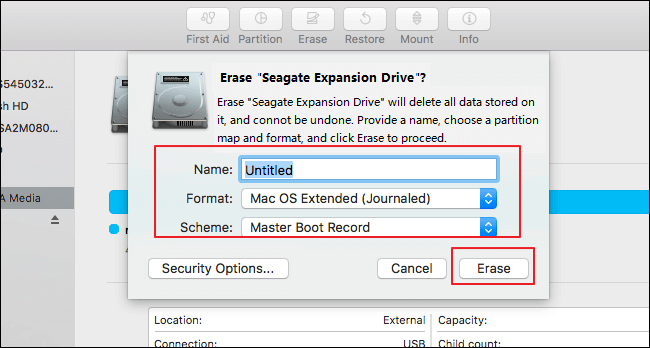
After you click to erase your files will be permanently wiped from NTFS.
Now we'll look at how to permanently erase files from an NTFS disc on a Mac.
Use EaseUS NTFS Drive on your Mac to enable read and write capability for NTFS drives. With only one click, you may have complete control over NTFS-formatted devices. External storage devices, such as hard drives, solid-state drives, USB drives, and so on, can have read and write functionality enabled. EaseUS NTFS for Mac makes it simple to work with NTFS-formatted devices. Its simple interface enables writing, copying, deleting, and moving.
The following are some of EaseUS NTFS for Mac's most useful features.
Download EaseUS NTFS for Mac to get your work done quickly.
Step 1. Launch and activate EaseUS NTFS for Mac. Click "I already have a license" to unlock this software.
Step 2. Connect an NTFS drive to Mac, EaseUS NTFS for Mac will automatically detect the device. Select your drive and you'll see it's now marked as 'Read-only". Click "Enable Writable" to add read and write rights to the drive.
Step 3. When the state of NTFS drives turns into "Writable".
Step 4. EaseUS NTFS for Mac will pops up a window to help Mac get access to the NTFS drive:
Step 5. When EaseUS NTFS for Mac restarts, you can then open to check, read, write, and even modify saved data on the NTFS device.
When you're going to delete data permanently from an NTFS drive on a Mac, be sure you choose the relevant files first. It is impossible to restore files or data that have been irreversibly erased. Select the file with care and begin the deletion process.
The two methods for deleting files from an NTFS drive on a Mac are listed below. We'll take a look at each one separately and step by step.
The steps to permanently remove files and empty your trash on your Mac are as follows:
Step 1: Go to the files folder on your hard disc.
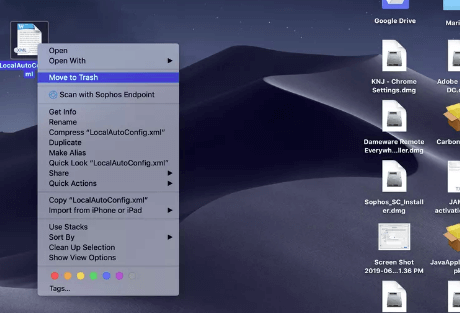
Step 2: Right-click the file you want to delete and select Delete. Choose the option to move to the trash.
The file will now be moved to the trash. You can restore from the trash.
Step 3: On a Mac, click and open the trash. Select the Empty option from the upper right corner.
Step 4: When you click on empty, it will ask you to permanently remove the file. Select Empty Trash from the drop-down menu.

You have now permanently erased the files. It's important to note that once you delete files, they can't be recovered. When choosing the files, you must be cautious.
The procedure for deleting files using the command and delete keys is explained below.
Step 1: Choose a file (or several files) to work with. Press the command and delete buttons at the same time. The file will be moved to the trash.
Step 2: Next, right-click the trash. Select the option to empty the trash.
The data and files you have chosen will be permanently deleted.
To summarise what has already been presented, choose the proper solution from the list above. Once you've chosen the best option, you'll be able to permanently delete the files. We recommend using EaseUS NTFS for Mac to make the process go smoothly and quickly. This tool is safe to use and provides an immediate solution to your situation. Why don't you try it out?
Related Articles - ALSO ON EaseUS SOFTWARE
How Do I Fix USB Read Only on Mac? Your Reliable Fixes Are Here
![]() Banu/2025-06-26
Banu/2025-06-26
How to Easily Fix Read-Only File System on Mac [Step-by-Step Guide]
![]() Cici/2025-11-11
Cici/2025-11-11
How to Format FAT32 to NTFS on Mac
![]() Banu/2025-06-26
Banu/2025-06-26
Best WD My Passport for Mac Driver Free Download | How-to-Use
![]() Banu/2026-01-05
Banu/2026-01-05
Copyright © 2004 - 2023 EaseUS. All rights reserved.


