A comprehensive step-by-step guide on how to fix your internal hard drive on MAC all by yourself.
Table of Contents
| Workable Solutions | Step-by-step Troubleshooting |
|---|---|
| Fix 1. Open Disk Utility to Mount Fantom Drive | Step 1. Go to "Disk Utility" from the search bar; Step 2. Click on "View"; Step 3. Go to "Show All Devices"...Full steps |
| Fix 2. Check Finder Preferences | Step 1. Open Finder and select the Finder option from the navigation bar at the top of the page...Full steps |
| Fix 3. Fix External Hard Drive Not Showing Up Terminal | Step 1. Using the Applications menu, select Terminal under Utilities; Step 2. Search for a line...Full steps |
| Fix 4. Run First Aid in Disk Utility | Click Run, then Continue to start First Aid. It will notify you of any problems found on the disc...Full steps |
| Fix 5. Check If Fantom Drive Is NTFS Formatted | Step 1. Launch and activate EaseUS NTFS for Mac. Click "I already have a license" to unlock this software...Full steps |
When you connect an external hard disc or Fantom drive to your Mac's USB port, it generally mounts straight away on the workspace. Apple tries to make Fantom drives simple to locate, and this is why you can also find a USB drive in the left column of the Finder under Locations.
A Fantom USB Drive, on the other hand, does not always appear. It's inconvenient, especially if you need to move anything immediately. Furthermore, there's a chance that data on the external Fantom USB Drive or hard drive is corrupted, meaning you won't be able to send data across devices in any way.
One reason your Mac won't detect a USB drive is because of corrupt data, but there are other causes as well. Let us look at what's causing this and how to repair the USB Fantom drive not showing up.
Assume you've encountered a problem with your USB Fantom drive not showing up. There might be several reasons why a USB Fantom drive, SSD, or hard disc isn't visible. The following are the most popular reasons for this:
Your USB Fantom drive may not be accessible on Mac because it is configured in NTFS, HFS+, or another format that macOS does not allow. Another reason why your Mac doesn't detect the external disc might be a loose or damaged USB cord. To resolve the problem, replace the cord.
If your Mac can't read your external hard drive, try plugging it in gently. A design fault in USB 2.0 connections, which is found on older external drives, necessitates the sluggish connection.
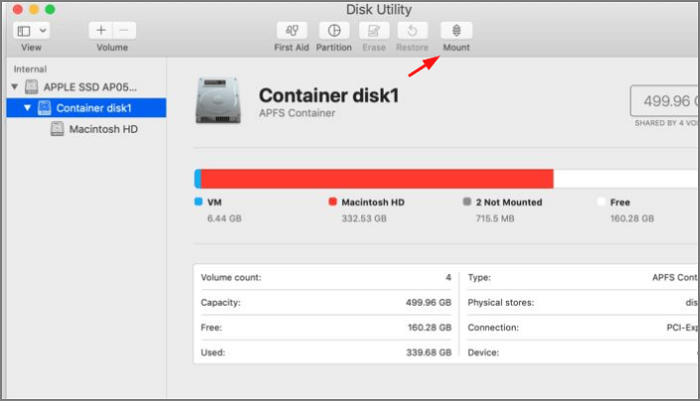
Disk Utility is frequently the go-to solution for various Mac issues, including those involving external discs. By verifying partition Macs and doing other checks across the system, it can assist in accessing and repairing various disc issues.
To utilize Disk Utility, go through the following steps:
Step 1. Go to "Disk Utility" from the search bar.
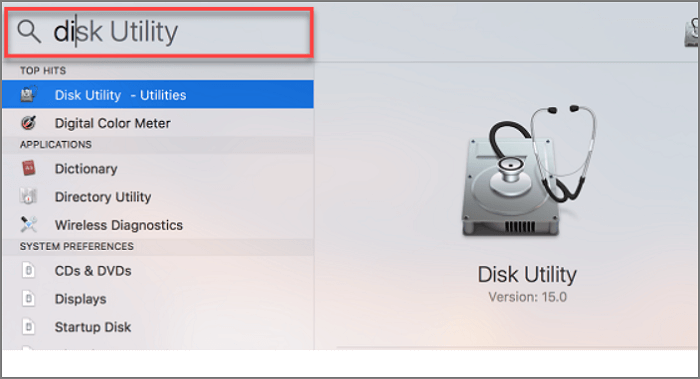
Step 2. Click on "View".
Step 3. Go to "Show All Devices".
(Any external drives will be displayed in the left-hand Sidebar; you should be able to see your hard disc there.)
Step 4. A menu will display when you click on the volume.
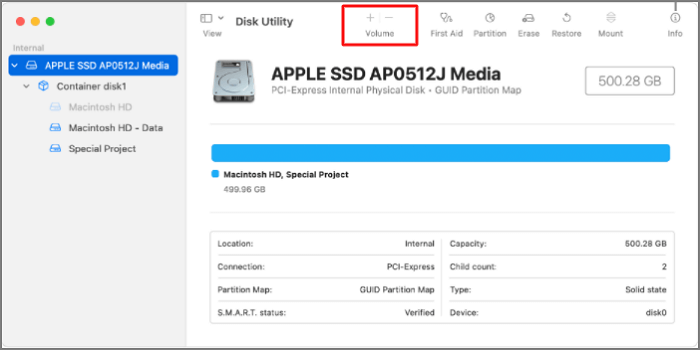
Step 5. There will be an option to unmount the drive if it has been mounted.
(If you don't see a volume list, your Mac won't mount the disc since it can't be accessed.)
If this isn't the first time you've used a Fantom drive and have a problem like this, it's rarely a problem for you. You might, however, double-check your choices just in case.
Or maybe your desktop settings don't allow you to see an external Fantom drive. To correct this,
Step 1. Open Finder and select the Finder option from the navigation bar at the top of the page.
Step 2. From "Preferences" go to "General" and then display these files on your desktop.
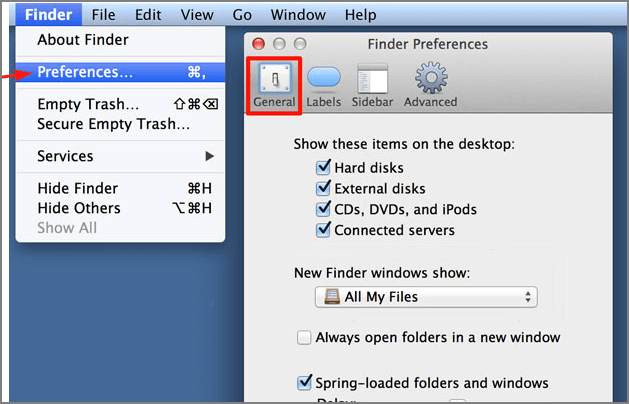
*Ensure that the items next to External hard drives and Hard discs are checked.
Then go to the Sidebar and check both Hard drives and External discs These steps will allow you to show your external disks on desktop.

The Terminal app is a last-resort choice for most users since they find it difficult. However, if you correctly follow the instructions, it is nearly always practical and isn't truly that bad, just follow these steps:
Step 1. Using the Applications menu, select Terminal under Utilities.
A diskutil list is a tool that pulls information from your Mac's system to analyze any volumes and drives connected.
Step 2. Search for a line containing /dev/disk_ (external, physical) — the underscore denotes a digit given to your disk's identification.
This operation should disclose information about your drive if your system recognizes it.

STEP 3. Then type Diskutil eject disc_ using your drive's allocated digit in place of the underscore to eject it.
You may now rerun the diskutil list to see if the drive is still listed; if it is, disconnect it from the USB port and reattach it. It should now be able to mount correctly.

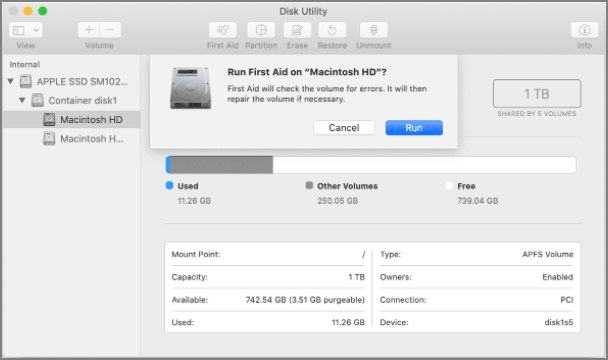
Regardless, the First Aid program is always available. It looks for faults on the disc that might prevent the external hard drive from mounting on your Mac. After that, it will try to fix them.
The First Aid bar will appear in a drop-down menu if you right-click on the device's icon. You'll also notice Restore and Erase's choices, which deletes all the data from your hard disc, so you shouldn't use them if you keep critical papers there.
Click Run, then Continue to start First Aid. It will notify you of any problems found on the disc as a consequence of the screening. Some of your files are probably corrupted if the software detects an "Overlapped extent allocation" problem. The list of impacted files will appear in your drive's Damaged Files folder; you should remove them. If they happen to contain critical information, make sure they aren't tampered with.
If the First Aid procedure fails, you have two choices: rerun the software and repair the disc, back up all of your data, change the disc format, and reinstall your current operating system. The information you backed up can then be recovered.
Windows devices recognize FAT32 and exFAT.
Some Mac users complain about not having any mount option available on their disk utility, but don't worry. You can sort this issue by using the third-party software EaseUS NTFS for Mac.
The EaseUS NTFS for Mac is an easy-to-use software that lets you to:
EaseUS NTFS for Mac is free software that lets you have complete control of your external drive. This professional software allows its users to enjoy a seamless experience.
Step 1. Launch and activate EaseUS NTFS for Mac. Click "I already have a license" to unlock this software.
Step 2. Connect an NTFS drive to Mac, EaseUS NTFS for Mac will automatically detect the device. Select your drive and you'll see it's now marked as 'Read-only". Click "Enable Writable" to add read and write rights to the drive.
Step 3. When the state of NTFS drives turns into "Writable".
Step 4. EaseUS NTFS for Mac will pops up a window to help Mac get access to the NTFS drive:
Step 5. When EaseUS NTFS for Mac restarts, you can then open to check, read, write, and even modify saved data on the NTFS device.
Hopefully, we've covered everything so you won't have to search for "external hard drive disappear from computer" again. If you need to connect an NTFS drive to your Mac and want to alter the format, you can use EaseUS NTFS for Mac.
Related Articles - ALSO ON EaseUS SOFTWARE
Top 6 Free NTFS for Mac Users in 2023
![]() Tracy King/2023-11-07
Tracy King/2023-11-07
5 Quick Fixes - New SSD Not Showing Up in Disk Utility
![]() Sherly/2023-12-12
Sherly/2023-12-12
Solved: the Disk Couldn't Be Ejected Because the Finder Is Using It
![]() Roxanne/2023-11-23
Roxanne/2023-11-23
How to Use G-Drive External Hard Drive on Mac [Set Up Guide]
![]() Tracy King/2023-11-07
Tracy King/2023-11-07
Copyright © 2004 - 2023 EaseUS. All rights reserved.


