Using an external drive can be halted if you encounter a read-only problem. This article explores three ways of solving this persistent issue.
Table of Contents
| Workable Solutions | Step-by-step Troubleshooting |
|---|---|
| Method 1. Change External Hard Drive "Read-only" Permission | Step 1: Right-click the external drive and pick Get Info; Step 2: Click on Sharing & Permissions once again...Full steps |
| Method 2. Reformat NTFS-Formatted Disk | Step 1: Launch Disk Utility on your Mac by tapping Command+Space and then typing Disk Utility...Full steps |
| Method 3. Get Read-Write Access With EaseUS NTFS for Mac | Step 1. Launch and activate EaseUS NTFS for Mac. Click "I already have a license" to unlock this software...Full steps |
Are you facing the "Read-only" problem for external drives on Mac? Follow along as we figure out this problem.
A lot of Mac computers have limited storage. Considering most of them are used for productivity, the in-built storage can sometimes run out, and it's not easy to increase internal storage on a Mac. That's why many people use external hard drives on their Mac devices.
However, the most common problem Mac users face is the read-only problem for an external drive. So, you might wonder how I change my external drive from read-only on Mac. This problem isn't only annoying but persistent as well.
So, let's dive in and find out how you can change hard drive read-only permission on a Mac device.
As mentioned before, external storages are standard among Mac users. Mainly because once you run out of the primary storage, you cannot easily replace or increase the internal storage. Since productivity is also higher on Mac devices, their storages run out quickly too.
That's when people employ various other storages such as:
While these are all common among Mac users, another common thing among Mac users is the read-only problem. This happens when you connect external storage to your Mac, and it reads that the drive is read-only. You can also find solutions when you don't have permission to write to external hard drive on Mac in thin related article.
The two most common reasons behind this trouble include:
The easiest way to figure out what's causing this problem is by doing this:
Step 1: Go to Finder.
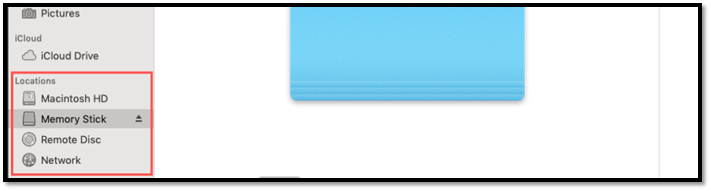
Step 2: Click on Memory Stick or whatever your external drive is named.
Step 3: Press Command I.
Step 4: Or, right-click the device, then right-click Get Info.
Once you're into the dialogue box, check if your external drive's format is one of the following:
If it's one of these three, then the format of your external drive is not the problem. Then, on the bottom side of the Get Info section, click on Sharing & Permissions: to reveal the drop-down menu of permissions.
If under the Everyone section it says "read-only", then the problem is related to permissions, not with the formatting. However, if the format isn't as mentioned before and if it's NTFS, then the problem is with the formatting of your external drive.
Now that you've figured out the problem, how do you go about fixing it? If you're a Windows user, then you may not be akin to the ways of a Mac. However, suppose you've been an avid Mac user. In that case, you can still face the same problems as Macs tend to be difficult operating systems to bend.
But, you can try a few methods to find a solution, and we've picked three of the best solutions for you. Which are as follows:
The best way to solve this problem without losing data or formatting is by changing/tweaking the permissions. There's an easy way of doing it, and all you need to do is head to the Finder again and follow these steps:
Step 1: Right-click the external drive and pick Get Info.
Step 2: Click on Sharing & Permissions once again.
Step 3: Click on the Lock icon.
![]()
Step 4: Authenticate and check Ignore ownership on this volume.
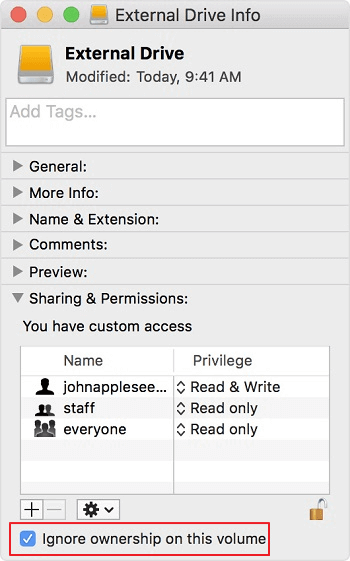
This will bypass any permission and most likely fix the Read-Only error.
There are times when an external drive formatted on a Windows computer will be read-only on a Mac. Because it'll be in NTFS format. So, how do you work your way around that? Here's how you can reformat the external drive:
Step 1: Launch Disk Utility on your Mac by tapping Command+Space and then typing Disk Utility.
Step 2: Find the available drives in the left sidebar and pick the external volume.
Step 3: Find and click Erase in the top bar.
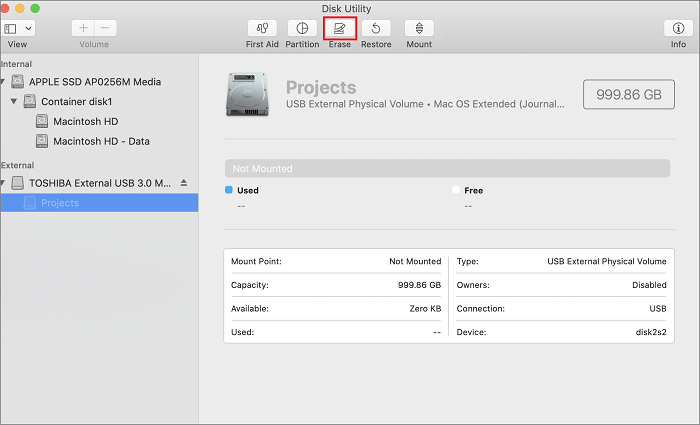
Step 4: Pick either APFS or one of the various Mac OS Extended if you intend to use it on Mac only.
Step 5: Or pick ExFAT or MS-DOS (FAT) if you plan on using it on other devices.
Step 6: Click Erase.
This will change the read-only setting, and you can confirm it by going to the Get-Info panel once more. However, if you wish to continue using this device on both Mac and Windows PC, then you must avoid this method and head to the third one instead.
A third-party tool can make your life easier, and you have no better option than using EaseUS NTFS for Mac. While this 7-days free trial may not sound much, it's enough to help you get your external drive in use again.
Step 1. Launch and activate EaseUS NTFS for Mac. Click "I already have a license" to unlock this software.
Step 2. Connect an NTFS drive to Mac, EaseUS NTFS for Mac will automatically detect the device. Select your drive and you'll see it's now marked as 'Read-only". Click "Enable Writable" to add read and write rights to the drive.
Step 3. When the state of NTFS drives turns into "Writable".
Step 4. EaseUS NTFS for Mac will pops up a window to help Mac get access to the NTFS drive:
Step 5. When EaseUS NTFS for Mac restarts, you can then open to check, read, write, and even modify saved data on the NTFS device.
It's a remarkable tool that features many key features for Mac users, besides just helping them get their drive back. This includes:
Therefore, make your life easier by using this tool to employ your external hard drive on both Mac and Windows computers.
These are some of the methods you can employ to use an external drive on a Mac. While you surely need to back up your data before reformatting an NTFS file, we recommend using EaseUS NTFS for Mac to ensure a smooth transition between Mac and Windows for a single external device.
Related Articles - ALSO ON EaseUS SOFTWARE
How to Read NTFS on Mac for Free? 3 Best Solutions Available
![]() Tracy King/2023-12-19
Tracy King/2023-12-19
How to Format SSD to exFAT on Mac? Full Guide Here
![]() Tracy King/2023-12-05
Tracy King/2023-12-05
How to Delete Files From NTFS on Mac
![]() Daisy/2024-01-16
Daisy/2024-01-16
How to Enable Full Disk Access on Mac | Full Guide
![]() Cici/2023-12-20
Cici/2023-12-20
Copyright © 2004 - 2023 EaseUS. All rights reserved.


