- Store
-
Support CenterGuides, License, ContactDownloadDownload installerChat SupportChat with a TechnicianPre-Sales InquiryChat with a Sales Rep
Do you want to know about reading/writing NTFS drive on macOS big sur? Don't worry as we have all the answers to your questions in this article.
Table of Contents
The macOS 11.0 Big Sur software update is a news release from macOS. It aims to improve the performance and functionality of compatible machines while also providing a more appealing interface for people to engage with.
Big Sur brings the most substantial update to Safari, layout enhancements in the Messages app, and many other more minor tweaks. Unfortunately, the macOS Big Sur software upgrade is in beta, so the engineers are testing it to discover where it excels and falls short.
| Workable Solutions | Step-by-step Troubleshooting |
|---|---|
| Method 1: Third-party Software | Step 1. Launch and activate EaseUS NTFS for Mac on Mac...Full steps |
| Method 2: Using Terminal | Step 1: Make sure your USB or HDD has all of your data, rename your USB...Full steps |
| Method 3: Format to read and write NTFS drives | Right-click the USB flash device in Windows and select fromat...Full steps |
So, you're undoubtedly asking if this software update will allow you to read and write NTFS files on your Mac, as well as how to write NTFS volumes in macOS Big Sur.
The problem is that the macOS 11.0 Big Sur software upgrade is incompatible with NTFS discs. Because of its heritage, NTFS discs are notoriously tricky to work with Mac software. Since the early 1990s, NTFS has been utilized as a proprietary filing system in Windows machines. Windows computers and software updates still use it today.
However, Mac does not supply the essential specifications for the open-source use of NTFS discs. This means that they'd have to pay a significant licensing fee to a key competitor, Windows, to allow all of their systems and macOS software, past, present, and future, to fully utilize the open-source NTFS storage.
This is why Mac computers and applications cannot write to or read from NTFS discs, whether they are internal or external. They'd rather have their consumers put in a little more effort than pay for software that not every Mac user requires or wants.
However, you do! So, let's have a look at how to write to NTFS drives in macOS Big Sur!
The first and the most easiest way to read-write NTFS files to MacOS Big Sur is to go for the third-party apps.
EaseUS NTFS for Mac allows Mac users running OS Catalina or other versions of OS X to read and write NTFS discs with ease.
EaseUS NTFS for Mac is designed for Mac users, allowing to mount and unmount Windows NTFS devices in Finder and Disk Utility, among other programmes. EaseUS can help you to examine and copy data from an NTFS-formatted external disc.
EaseUS allows you to mount and unmount Windows NTFS volumes from the Mac's status bar, and it's compatible with M1-based Macs. In MacOS, it can also provide you complete read-write access to NTFS volumes.
Step 1. Launch and activate EaseUS NTFS for Mac. Click "I already have a license" to unlock this software.
Step 2. Connect an NTFS drive to Mac, EaseUS NTFS for Mac will automatically detect the device. Select your drive and you'll see it's now marked as 'Read-only". Click "Enable Writable" to add read and write rights to the drive.
Step 3. When the state of NTFS drives turns into "Writable".
Step 4. EaseUS NTFS for Mac will pops up a window to help Mac get access to the NTFS drive:
Step 5. When EaseUS NTFS for Mac restarts, you can then open to check, read, write, and even modify saved data on the NTFS device.
You won't have to deal with terminal commands to manually mount partitions if you use EaseUS. Because EaseUS is so handy, it lives in the Mac status bar, allowing you to quickly and simply mount and unmount NTFS devices from the Mac status bar.
EaseUS NTFS for Mac is a sophisticated yet user-friendly application. It aids in the resolution of the Mac's inability to write to NTFS storage. On Microsoft NTFS drives, you can write, edit, copy, move, and delete files. On your Mac, you can do anything with Windows discs!
EaseUS NTFS for Mac is an NTFS driver that supports reading and writing external hard discs previously formatted for Windows from other well-known hard drive manufacturers.
Some of the other amazing features of EaseUS include:
1. Amazingly Quick Speed
EaseUS Microsoft NTFS for Mac is lightning quick. It means you'll spend less time waiting for files to save or copy between your Mac and your external disc.
2. Effectiveness
Features that are extremely effective
3. Consistency
Data security and a consistent user experience
4. Fully Compliant
It's entirely compatible with Macs that use the M1 processor.
It also works with Mac OS X Big Sur and prior Mac OS X versions.
5. Trial version
A 7-day trial edition of EaseUS NTFS for macOS is available.
Since the beginning of Mac OS X, Microsoft's file systems NTFS and Fat32 have never been particularly popular. Aside from that, the relationship between a company's reputation and its core is a bit of a different story. Follow the procedures below to read and write NTFS discs on macOS Big Sur and earlier versions.
Step 1: Make sure your USB or HDD has all of your data. Rename your USB or HDD by labeling it. In my case, I'll use the moniker "Data." When you've finished identifying it, eject it from Windows and connect it to your Mac.
Step 2: Open Terminal (You can use the LaunchPad's spotlight to open it if you choose.)
Step 3: Once the terminal is open, type the command below.
sudo nano /etc/fstab
Step 4: In the Terminal, type the following command, replacing "Name" with the label of the USB or HDD.
LABEL=NAME none ntfs rw,auto,nobrowse
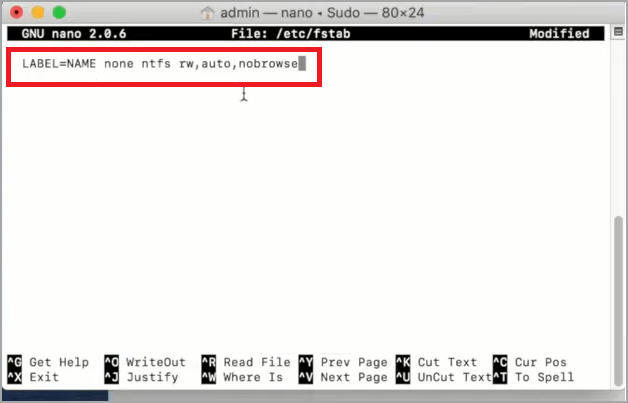
Step 5: After you've applied the second command, you'll need to save the modifications to the file. To do so, use control + O on a Mac or ctrl + o on a PC. The x button can be used to close the terminal, or the command + x can close the GNU.
Step 6. Reconnect the USB flash drive to the Mac, then go to the Go menu and select Find. They hit the return key after typing Volume.

Without any third-party software, you may now read and write your ntfs files on macOS Big Sur.
Since the 1990s, Microsoft Windows has used the New Technology file system (NTFS). Unfortunately, when you want to read or write to this file system, it is not supported by macOS. Many companies offer various types of software for mac (obviously people buy these products) to read and write the ntfs file system for this purpose.
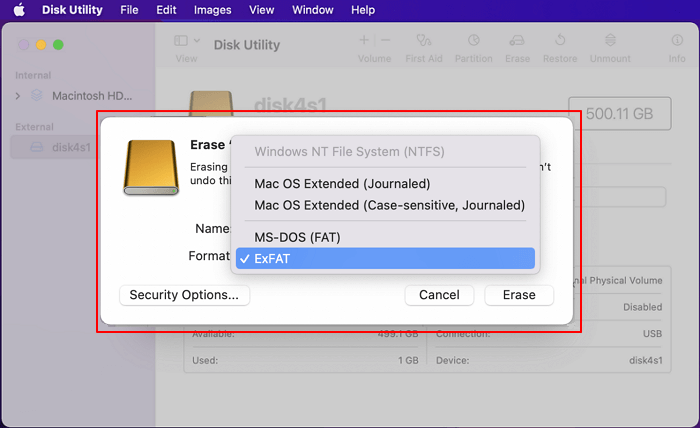
The exfat file format is the only one that can read and write between both operating systems. Exfat is a file system that is used in the Linux operating system and subsystems. If you want your USB or HDD to be read and written on a Mac, you should format them using exfat.

This method is OK if your USB has no data or only a little amount of data, but if you have a 2 TB HDD, it will be a hassle. Because you can't format the disc, you can read and write NTFS on macOS using the terminal rather than third-party applications or apps.
If you can't transfer data from an NTFS drive to a Mac running macOS Big Sur, it's significant pain in the neck. It's also aggravating that you can't write to your recently purchased drives since you didn't realize they were NTFS.
This article will help you resolve your confusion regarding how to write to an NTFS drive on a Mac, whether you use third-party software or not. Most crucially, even in macOS Big Sur, users can anticipate Mac to write to NTFS drives with the help of EaseUS NTFS for Mac. In addition, EaseUS Data Recovery will assist you if you accidentally deleted vital data from your NTFS drive.
Related Articles - ALSO ON EaseUS SOFTWARE
How to Fix LaCie Hard Drive Not Showing Up on Mac (5 Practical Methods)
![]() Banu/2025-06-26
Banu/2025-06-26
How to Use NTFS Drive on macOS Sonoma [Picture Guide]
![]() Sherly/2025-06-26
Sherly/2025-06-26
Don't Have Permission to Write to External Hard Drive on Mac? Get Your Complete Guide
![]() Banu/2025-06-26
Banu/2025-06-26
How to Delete Files from External Hard Drive Mac
![]() Banu/2025-06-26
Banu/2025-06-26
Copyright © 2004 - 2023 EaseUS. All rights reserved.


